Easter Chocolate Lasagna- Decadent Dessert Recipe
Easter Chocolate Lasagna is the decadent dessert dreams are made of, and this year, I’m so excited to share my ultimate recipe with you! Forget everything you thought you knew about traditional lasagna; this version is a sweet, glorious symphony of chocolate, creamy layers, and a hint of Easter magic. It’s no wonder this Easter Chocolate Lasagna has become such a beloved treat. People adore its unexpected yet utterly delightful combination of familiar comfort food structure with a shockingly rich chocolate flavor profile. What truly sets this Easter Chocolate Lasagna apart is the perfect balance of textures: a no-bake, cookie crum extractb base, velvety smooth chocolate pudding, a cloud-like whipped topping, and of course, those irresistible chocolate shavings that make every bite an indulgence. It’s a showstopper that’s surprisingly easy to assemble, making it the perfect centerpiece for your Easter feast.
Easter Chocolate Lasagna
This Easter Chocolate Lasagna is a showstopper dessert that’s surprisingly easy to make and utterly delicious. It’s a no-bake marvel, layered with creamy, chocolaty goodness that will have everyone beggin extractg for the recipe. The fun, festive decorations make it the perfect centerpiece for your Easter celebration. Imagin extracte a symphony of chocolate flavors and textures coming together in one glorious dish – that’s exactly what this lasagna delivers! It’s rich, decadent, and perfectly balanced, ensuring that every bite is a delight.
Ingredients:
Cooking Instructions:
Let’s get started on this delightful dessert! We’ll break it down into easy-to-follow steps.
Step 1: Crafting the Oreo Crust
Begin extract by preparing the foundation of our Easter Chocolate Lasagna: the irresistible Oreo crust. Take all 36 Oreo cookies and place them into a food processor. Pulse them until they are finely crushed into crum extractbs. If you don’t have a food processor, you can place the Oreos in a sturdy zip-top bag and crush them with a rolling pin. Make sure to get them nice and fine for an even layer. In a medium bowl, combine the finely crushed Oreo crum extractbs with the ½ cup of melted unsalted butter. Stir until all the crum extractbs are moistened. This mixture will resemble wet sand. Press this crum extractb mixture evenly into the bottom of a 9×13 inch baking dish. Use the back of a spoon or the bottom of a glass to create a firm, even layer. This will be our sturdy base for all the delicious layers to come. For an extra firm crust, you can bake it at 350°F (175°C) for about 8-10 minutes, then let it cool completely before proceeding. However, since this is a no-bake lasagna, we’ll skip the baking and head straight to the next creamy layer once the crust is set in the fridge. Pop this crust into the refrigerator while you prepare the next layer to allow it to set.
Step 2: Whipping up the Cream Cheese Layer
Next, we’re going to create the luscious cream cheese layer that adds a tangy, creamy contrast to the chocolate. In a large mixing bowl, beat the ½ cup of softened unsalted butter and the 8 oz of softened cream cheese together until they are light and fluffy. You want to ensure there are no lumps of cream cheese remaining. A hand mixer or a stand mixer will make this process much easier. Once smooth, gradually beat in the 1 cup of powdered sugar until well combined and creamy. Then, stir in the 1 teaspoon of vanilla extract for that classic sweet aroma and flavor. Finally, gently fold in 1 cup of Cool Whip. Be careful not to overmix at this stage; you want to maintain the airy texture of the Cool Whip. This layer will be wonderfully smooth and airy, providing a delightful textural contrast to the cookie crust.
Step 3: Assembling the First Creamy Layer
Now it’s time to assemble the first of our luscious, creamy layers. Carefully spread the cream cheese mixture evenly over the chilled Oreo crust in your 9×13 inch baking dish. Make sure to reach all the corners for an even distribution of this delightful layer. Once this layer is smoothed out, place the dish back into the refrigerator for at least 15-20 minutes. This chilling time is crucial to allow the cream cheese layer to firm up slightly, making it easier to add the subsequent pudding layer without them mixing too much. Patience here will pay off in distinct, beautiful layers.
Step 4: Preparing the Chocolate Pudding Layer
This layer is where the rich chocolate flavor truly shines. In a separate large bowl, whisk together the 2 (3.9 oz.) packages of chocolate instant pudding mix with the 2 and 3/4 cups of cold milk. Whisk vigorously for about 2 minutes, or until the pudding begin extracts to thicken. It’s important to use cold milk for the pudding to set properly and achieve the correct consistency. Let the pudding stand for about 5 minutes to allow it to set up. While the pudding is setting, you can briefly return to the cream cheese layer in the fridge if it hasn’t firmed up enough. Once the pudding has thickened, it’s ready to be layered.
Step 5: Layering and Finishing the Lasagna
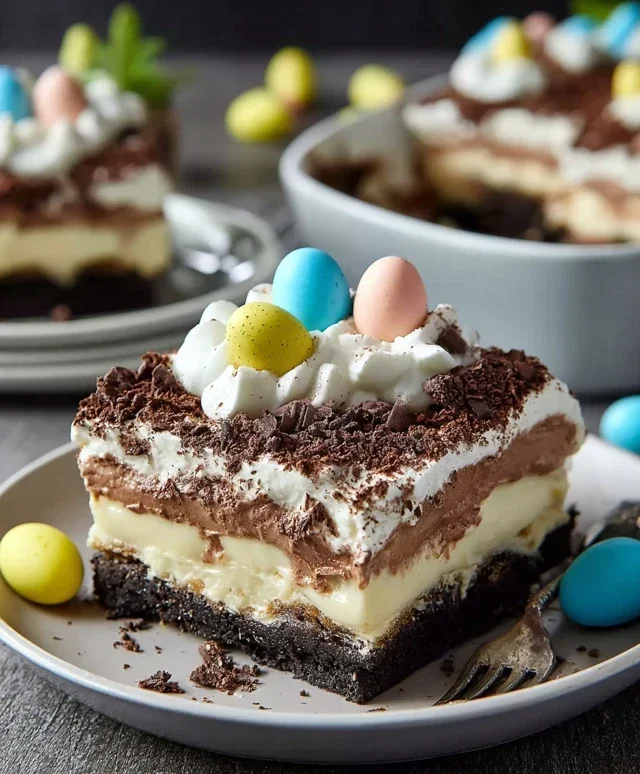
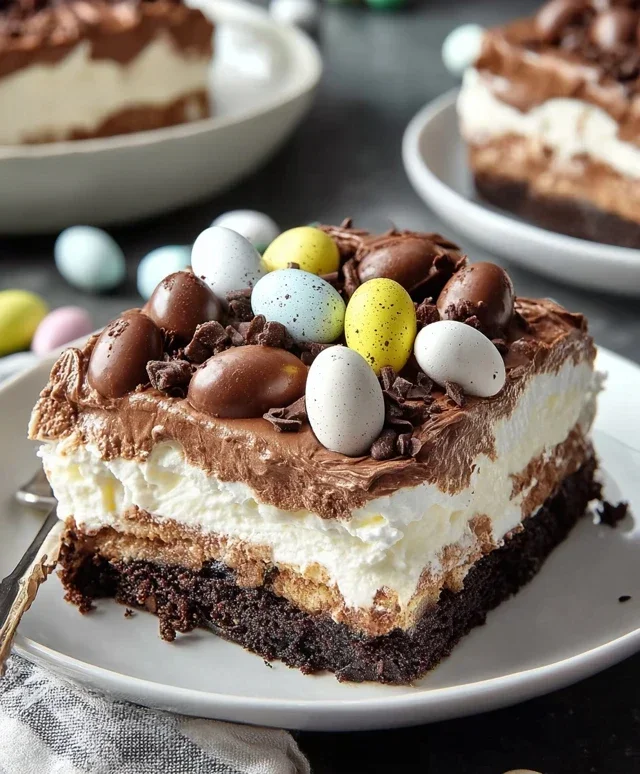
Once the cream cheese layer has had adequate chilling time, gently spoon the thickened chocolate pudding over the cream cheese layer. Spread the pudding evenly to cover the cream cheese entirely. Now, carefully spread the remaining 2 cups of Cool Whip over the chocolate pudding layer, creating a fluffy, white topping. This is the final creamy layer before we get to the fun part – decorating! To achieve a beautiful finish, you can use an offset spatula or the back of a spoon to create swirls in the Cool Whip. Finally, it’s time to unleash your inner artist! Sprinkle the 1 ½ cups of crushed Oreo cookies over the top of the Cool Whip. Then, adorn your Easter Chocolate Lasagna with Peeps bunnies and colorful Easter egg candies. Arrange them artfully to create a festive and whimsical Easter display. This is where the magic happens and your dessert truly transforms into a holiday masterpiece! Chill the lasagna in the refrigerator for at least 4 hours, or preferably overnight, before serving. This allows all the layers to meld together beautifully and ensures the lasagna is firm enough to slice easily. When it’s time to serve, cut into generous squares and watch your guests marvel at this delightful Easter creation! Enjoy every decadent bite.
Conclusion:
And there you have it – your guide to creating a show-stopping Easter Chocolate Lasagna! This dessert truly shines because it takes all the beloved elements of a rich, decadent chocolate dessert and layers them into a visually stunning and incredibly satisfying treat. The combination of creamy chocolate pudding, crushed cookies, and a smooth whipped topping creates a symphony of textures and flavors that’s perfect for any Easter gathering or simply as an indulgent indulgence. I’m confident that once you try this Easter Chocolate Lasagna, it will become a cherished recipe in your holiday repertoire.
For serving, I love to garnish each portion with a few extra chocolate shavings and perhaps a fresh raspberry for a pop of color. It’s also wonderful served chilled, allowing all those delicious layers to meld together beautifully. Don’t be afraid to get creative with variations! Consider adding a layer of caramel sauce between the cookie and pudding layers, or swapping out the chocolate pudding for a white chocolate or even a mint chocolate version. You could also experiment with different cookie crum extractbs, like Oreos for an extra chocolatey kick, or even shortbread for a lighter contrast. I encourage you all to give this Easter Chocolate Lasagna a try; you won’t regret the smiles it brings!
Frequently Asked Questions:
Can I make this dessert ahead of time?
Absolutely! This Easter Chocolate Lasagna is actually best when made a few hours ahead, or even the day before. This allows the flavors to meld together and the cookie layers to soften slightly, creating a more cohesive dessert. Just be sure to cover it tightly with plastic wrap before refrigerating.
What kind of chocolate should I use for the pudding?
For the richest flavor, I recommend using a good quality instant chocolate pudding mix. If you’re feeling adventurous and want to make your own pudding from scratch, ensure it’s a thick, rich chocolate pudding that will hold its shape well between the layers. Using milk chocolate or semi-sweet chocolate pudding will yield slightly different, but equally delicious, results.
Can I use a different type of cookie besides grabeef ham crackers?
Certainly! While grabeef ham crackers provide a classic base, feel free to get creative. Chocolate wafer cookies or even crum extractbled Oreos (with the filling included for extra richness!) would make fantastic alternatives. Shortbread cookies would offer a delightful buttery contrast to the chocolate layers.
Easter Chocolate Lasagna
A decadent, no-bake dessert featuring layers of chocolate, cream cheese, and pudding, perfect for Easter celebrations.
Ingredients
-
36 Oreo cookies, crushed
-
½ cup unsalted butter, melted
-
½ cup unsalted butter, softened
-
1 cup powdered sugar
-
8 oz cream cheese, softened
-
1 teaspoon vanilla extract
-
1 cup Cool Whip
-
2 (3.9 oz.) packages chocolate instant pudding
-
2 and 3/4 cups cold milk
-
2 cups Cool Whip
-
1 ½ cups crushed Oreo cookies
-
Peeps bunnies, for decoration
-
Easter egg candies, for decoration
Instructions
-
Step 1
Combine 36 crushed Oreo cookies and ½ cup melted butter. Press evenly into the bottom of a 9×13 inch baking dish. -
Step 2
In a bowl, beat ½ cup softened butter with 1 cup powdered sugar until smooth. Add 8 oz softened cream cheese and 1 teaspoon vanilla extract, beating until well combined. Fold in 1 cup Cool Whip. -
Step 3
Spread the cream cheese mixture evenly over the Oreo crust. -
Step 4
Whisk together 2 packages chocolate instant pudding and 2 and ¾ cups cold milk until thickened, about 2 minutes. Let stand for 5 minutes. -
Step 5
Spoon the pudding mixture evenly over the cream cheese layer. -
Step 6
Top the pudding layer with 2 cups Cool Whip, spreading evenly. -
Step 7
Sprinkle 1 ½ cups crushed Oreo cookies over the Cool Whip. Decorate with Peeps bunnies and Easter egg candies. -
Step 8
Refrigerate for at least 4 hours before serving.
Important Information
Nutrition Facts (Per Serving)
It is important to consider this information as approximate and not to use it as definitive health advice.
Allergy Information
Please check ingredients for potential allergens and consult a health professional if in doubt.