Easy Baked Chicken Legs and Rice Recipe
Baked chicken legs and rice are an absolute go-to in my kitchen, and for good reason! This dish is the epitome of comfort food, delivering that satisfying, home-cooked goodness that brings a smile to everyone’s face. We all love a meal that’s both incredibly delicious and delightfully uncomplicated, right? That’s precisely where baked chicken legs and rice shines. It’s the kind of meal that requires minimal fuss but yields maximum flavor, making it perfect for busy weeknights or casual weekend gatherings. What truly makes it special is the magical way the tender, juicy chicken legs infuse their savory essence into the fluffy rice, creating a symphony of taste and texture that’s simply irresistible. Forget bland dinners; this recipe is about to become your new favorite!

Ingredients:
Baked Chicken Legs and Rice: A One-Pan Wonder
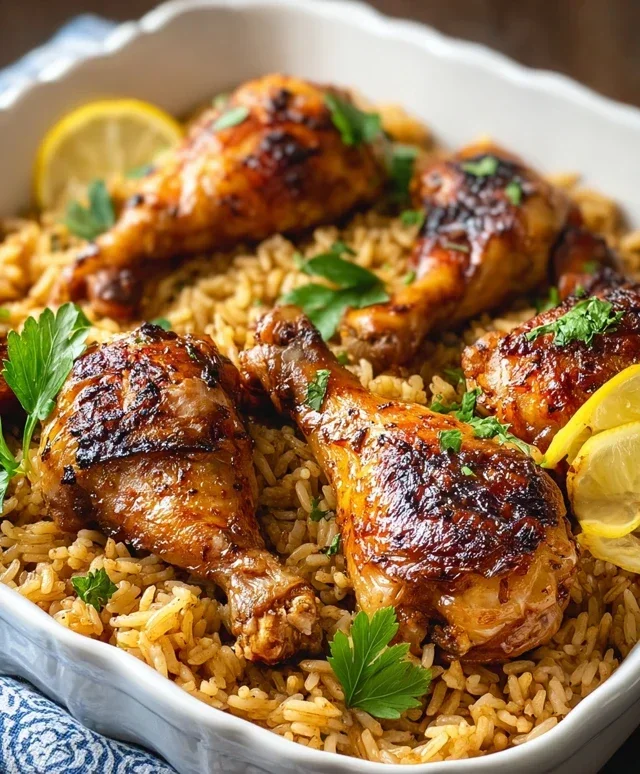
There’s something incredibly comforting about a home-cooked meal that’s both delicious and simple to prepare. This baked chicken legs and rice recipe is a true weeknight warrior, transforming humble ingredients into a flavorful and satisfying dish that the whole family will love. The beauty of this recipe lies in its simplicity and the fact that it all cooks together in one pan, minimizing cleanup and maximizing flavor. We’re going to create a beautiful, slightly caramelized crust on the chicken while simultaneously cooking fluffy, savory rice infused with the chicken’s juices. It’s a symphony of textures and tastes that comes together effortlessly.
The secret to this dish’s success is a well-seasoned chicken and a perfectly cooked rice base. We’ll start by creating a spice rub that will give our chicken legs a wonderful depth of flavor. The combination of smoked paprika, brown sugar, thyme, oregano, garlic powder, salt, and black pepper creates a sweet, smoky, and herbaceous coating that bakes up to a beautiful golden-brown. The brown sugar not only adds a touch of sweetness but also helps with caramelization, giving the chicken those irresistible crispy bits.
Meanwhile, the rice will absorb all the delicious flavors released from the chicken as it bakes, becoming tender and infused with savory goodness. The butter and aromatics – onion and garlic – add another layer of complexity to the rice, making it far more interesting than plain steamed rice. This is truly a dish where all the components work in harmony.
Preparing the Chicken
Before we get to the oven, let’s focus on getting our chicken ready to shine. Patting the chicken drum extractsticks dry with paper towels is a crucial first step. This helps to ensure that the spice rub adheres well and that the skin gets nice and crispy during baking. Moisture on the surface can steam the chicken, preventing that coveted crispiness.
In a medium bowl, we’ll combine our flavor powerhouses for the chicken. Pour in the olive oil, then sprinkle in the brown sugar, smoked paprika, dried thyme, dried oregano, garlic powder, 1 teaspoon of kosher salt, and a generous amount of freshly ground black pepper. Give this mixture a good stir to ensure everything is well combined and the sugar is starting to dissolve into the oil.
Now, it’s time to get your hands in there! Add the patted-dry chicken drum extractsticks to the bowl with the spice mixture. Toss them around, making sure each piece is thoroughly coated. You want every nook and cranny to be covered in that delicious rub. This thorough coating is what guarantees an explosion of flavor in every bite. You can even use a brush to ensure an even layer if you prefer, but good old-fashioned tossing usually does the trick.
Building the Rice Base
With the chicken prepped, we’ll move on to creating the flavorful bed of rice. In a large, oven-safe skillet or a 9×13 inch baking dish, melt the butter over medium heat. Once the butter is melted and shimmering, add the chopped yellow onion. Sauté the onion for about 3-4 minutes, stirring occasionally, until it begin extracts to soften and turn translucent. This step is important for building the aromatic foundation of our rice.
Next, add the minced garlic to the skillet. Cook for another minute until fragrant, being careful not to burn the garlic, as burnt garlic can turn bitter. The aroma of sautéing onion and garlic is one of the best in the kitchen, isn’t it?
Now, add the uncooked white rice to the skillet. Stir the rice with the onion and garlic for about 1-2 minutes, toasting it slightly. This toasting process helps to prevent the rice from becoming mushy and also enhances its nutty flavor.
Pour in the chicken broth and water. Add the remaining 1/2 teaspoon of kosher salt and give everything a good stir to combine. Make sure to scrape up any browned bits from the bottom of the skillet, as these bits are packed with flavor.
Assembling and Baking
This is where the magic truly happens. Arrange the seasoned chicken drum extractsticks evenly on top of the rice mixture in the skillet or baking dish. Try to nestle them in a bit so that they are partially submerged in the liquid and rice, which will help them cook evenly and keep them moist. Ensure there’s some space between the drum extractsticks for proper air circulation and browning.
Preheat your oven to 400 degrees Fahrenheit (200 degrees Celsius). Once the oven is preheated, carefully place the skillet or baking dish into the oven. Bake for 35-45 minutes, or until the chicken is cooked through and has a beautiful golden-brown, slightly caramelized exterior, and the rice is tender and has absorbed most of the liquid. The exact baking time will depend on the size of your chicken drum extractsticks and your oven’s calibration, so keep an eye on it. You can check for doneness by inserting a meat thermometer into the thickest part of a drum extractstick; it should register 165 degrees Fahrenheit (74 degrees Celsius). If the rice seems a little dry towards the end of cooking, you can always add a splash more chicken broth or water. If the chicken skin is browning too quickly, you can loosely tent the pan with foil.
Once baked to perfection, remove the dish from the oven and let it rest for about 5-10 minutes before serving. This resting period allows the juices to redistribute throughout the chicken, making it more tender and flavorful. It also allows the rice to finish absorbing any remaining liquid and become perfectly fluffy. Serve hot and enjoy the delicious aromas that have filled your kitchen!
Conclusion:
There you have it! A straightforward and incredibly delicious recipe for baked chicken legs and rice that’s sure to become a weeknight staple. This dish is a winner because it’s so forgiving, incredibly satisfying, and requires minimal effort for maximum flavor. The tender, juicy chicken legs paired with perfectly cooked, seasoned rice create a harmonious meal that appeals to everyone. It’s a complete meal in one pan, making cleanup a breeze, which is always a win in my book!
I love serving this baked chicken legs and rice with a fresh side salad or some steamed green beans for a touch of brightness. For variations, don’t be afraid to get creative with your seasonings! Try adding smoked paprika for a smoky kick, a pinch of cayenne for a little heat, or even some dried herbs like rosemary and thyme. You can also experiment with different types of rice, like brown rice or basmati, for a slightly different texture and flavor profile. I truly encourage you to give this recipe a try; I think you’ll be delighted with how easy and flavorful it is!
Frequently Asked Questions:
Can I make this recipe ahead of time?
Yes, you absolutely can! You can prepare the chicken and rice mixture up to a day in advance and store it in the refrigerator. When you’re ready to bake, simply transfer it to your baking dish and adjust the baking time as needed, as it might take a few extra minutes to heat through.
What are some good side dishes to complement the baked chicken legs and rice?
Beyond a simple salad or steamed vegetables, consider roasted broccoli, a dollop of your favorite sauce like BBQ or a creamy herb sauce, or even some baked apples for a touch of sweetness. Corn on the cob is also a fantastic seasonal choice!
Is it possible to use chicken thighs instead of legs?
Absolutely! Chicken thighs are an excellent substitute and often result in even more moist and flavorful meat due to their higher fat content. You might need to adjust the baking time slightly depending on the size of the thighs, so keep an eye on them.
Baked Chicken Legs and Rice
A flavorful and simple baked chicken leg and rice dish seasoned with smoked paprika, thyme, and oregano.
Ingredients
-
3 tablespoons olive oil
-
2 tablespoons brown sugar
-
1 tablespoon smoked paprika
-
2 teaspoons dried thyme
-
1 teaspoon dried oregano
-
1 teaspoon garlic powder
-
1 teaspoon kosher salt
-
15-20 cranks fresh-ground black pepper
-
2 tablespoons butter
-
1/2 medium yellow onion, chopped
-
3-4 cloves garlic, minced
-
1 cup uncooked white rice
-
1/2 teaspoon kosher salt
-
1 and 1/3 cups chicken broth, low-sodium preferred
-
2/3 cup water
Instructions
-
Step 1
Preheat oven to 400°F (200°C). In a small bowl, combine olive oil, brown sugar, smoked paprika, thyme, oregano, garlic powder, salt, and pepper. Toss chicken legs with this mixture until evenly coated. -
Step 2
In an oven-safe skillet or baking dish, melt butter over medium heat. Add chopped onion and cook until softened, about 5 minutes. Add minced garlic and cook for 1 minute more until fragrant. -
Step 3
Stir in uncooked white rice and 1/2 teaspoon kosher salt into the skillet. Pour in chicken broth and water. Bring to a simmer. -
Step 4
Arrange the seasoned chicken legs on top of the rice mixture. -
Step 5
Cover the skillet or baking dish tightly with foil and bake for 30 minutes. -
Step 6
Remove foil and continue baking for another 15-20 minutes, or until chicken is cooked through and rice is tender and liquid is absorbed. Let stand for 5 minutes before serving.
Important Information
Nutrition Facts (Per Serving)
It is important to consider this information as approximate and not to use it as definitive health advice.
Allergy Information
Please check ingredients for potential allergens and consult a health professional if in doubt.