Strawberry Swirl Cheesecake Cookie Cups-Easy Dessert
Strawberry Swirl Cheesecake Cookie Cups are an absolute dream come true for any dessert lover. Imagin extracte the classic, creamy indulgence of cheesecake perfectly married with the buttery goodness of a chocolate chip cookie, all nestled within a delightful, bite-sized cup. It’s the best of both worlds, and let me tell you, these Strawberry Swirl Cheesecake Cookie Cups deliver on every single promise. People adore this treat because it captures the soul-satisfying comfort of familiar favorites while presenting them in an irresistible, portable package. What truly makes these Strawberry Swirl Cheesecake Cookie Cups stand out is the vibrant, slightly tart ribbon of strawberry swirling through the rich cheesecake filling, offering a beautiful contrast and a burst of fruity freshness that cuts through the sweetness. They’re perfect for parties, a delightful afternoon pick-me-up, or simply when you’re craving something truly special and incredibly delicious.
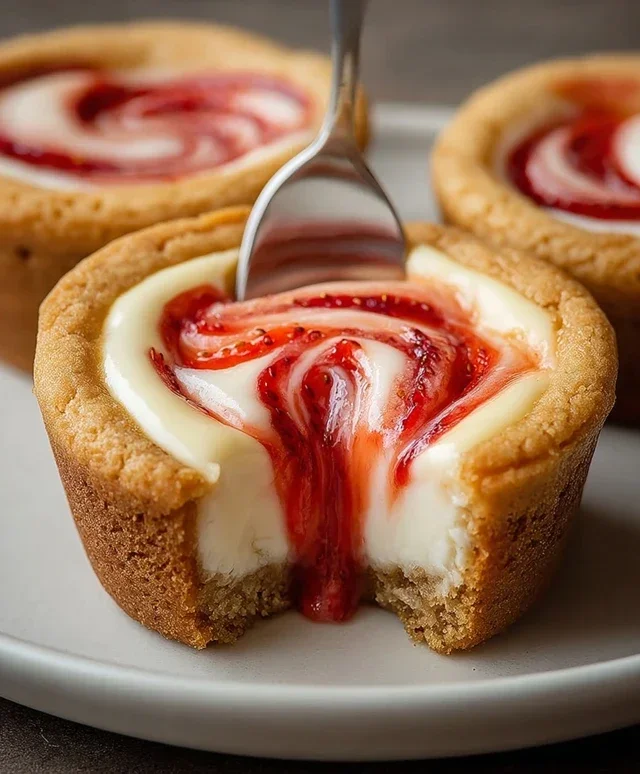
Strawberry Swirl Cheesecake Cookie Cups
Get ready to impress your taste buds and your guests with these absolutely delightful Strawberry Swirl Cheesecake Cookie Cups! Imagin extracte the classic indulgence of creamy cheesecake married with the comforting chegrape juicess of a sugar cookie, all swirled with vibrant, fruity strawberry jam. These little treats are surprisingly easy to make and deliver a big punch of flavor. They’re perfect for dessert, a special occasion, or even just a delightful afternoon pick-me-up. The cookie base provides a sturdy, slightly crisp foundation, while the smooth, rich cream cheese filling offers a luxurious contrast. And that strawberry swirl? It’s the perfect sweet and tart accent that ties everything together beautifully. Let’s dive into creating these little masterpieces!
Ingredients:
Prepping Your Cookie Cups
The first step to creating these fantastic cookie cups is to prepare your cookie base. You’ll need a standard muffin tin for this. The beauty of using refrigerated sugar cookie dough is its convenience; it’s pre-portioned and ready to go. If you’re using homemade dough, make sure it’s chilled sufficiently so it’s easy to handle and doesn’t spread too much in the oven.
We want to create little cups that will hold our delicious cheesecake filling. To do this, we’ll need to shape the cookie dough to fit into the muffin tin. You can either break off small portions of the dough and press them into the bottom and up the sides of each muffin cup, or if your dough is in a log, you can slice it into rounds and then press those rounds into place. The goal is to form a cup shape with a slight indentation in the center. Don’t worry if they aren’t perfectly uniform; a little rustic charm adds to their homemade appeal! Make sure the dough is pressed firmly against the bottom and sides to prevent leaks. Pricking the bottom of the cookie cups a few times with a fork can help prevent them from puffing up too much before you add the filling.
Whipping Up the Cream Cheese Filling
While your cookie dough is getting ready to be baked, it’s time to focus on that irresistible cream cheese filling. This part is wonderfully simple and requires just a few key ingredients. Make sure your cream cheese is truly softened; this is crucial for achieving a smooth, lump-free filling. Leaving it on the counter for about an hour should do the trick, or you can gently soften it in the microwave for short intervals.
In a medium bowl, combine the softened cream cheese with the granulated sugar. Using an electric mixer (handheld or stand mixer) on medium speed is the easiest way to get a creamy, well-incorporated mixture. Beat them together until the sugar is fully dissolved and the cream cheese is light and fluffy. This process also helps to aerate the filling, making it even more decadent. Next, add the vanilla extract. Vanilla is essential for its warm, aromatic flavor that complements both the sweetness of the cookie and the tang of the cream cheese. Beat again until everything is thoroughly combined and smooth. Taste a tiny bit of the filling – it should be sweet, creamy, and perfectly balanced.
Assembling and Swirling the Magic
Now comes the fun part: assembling the cookie cups and creating that beautiful strawberry swirl! Once your cookie cups have been formed in the muffin tin, it’s time to add the cheesecake filling. Spoon a generous amount of the cream cheese mixture into each cookie cup, filling them about two-thirds of the way full. Remember, they will puff up slightly during baking.
The strawberry jam needs to be warmed slightly. This makes it easier to swirl and create those lovely patterns. You can do this by placing the jam in a small microwave-safe bowl and heating it in 15-second increments until it’s a pourable consistency. Don’t overheat it; you just want it warm enough to drizzle. Then, carefully spoon dollops of the warmed strawberry jam over the cream cheese filling in each cookie cup. Now, take a toothpick or the tip of a knife and gently swirl the jam into the cream cheese. You can make simple circular motions or more intricate patterns. The goal is to create a marbled effect, ensuring some of the red jam peeks through. Be careful not to over-swirl, or you’ll end up with a pink, uniform mixture rather than distinct swirls.
Baking and Cooling for Perfection
With your cookie cups filled and swirled, they’re ready for their transformation in the oven. Preheat your oven according to the sugar cookie dough package directions, typically around 350 degrees Fahrenheit (175 degrees Celsius).
Bake the cookie cups for the time specified on the dough package, or until the edges of the cookie base are golden brown and the cream cheese filling is set. This usually takes around 18-22 minutes, but keep a close eye on them. You want the cookies to be cooked through, but not overdone, and the cheesecake filling should look slightly puffed and set, not jiggly. Once they’re out of the oven, resist the urge to remove them immediately! Let the cookie cups cool in the muffin tin for at least 10-15 minutes. This allows them to firm up and makes them easier to remove without breaking. After this initial cooling period, carefully use a small offset spatula or a butter knife to loosen the edges and gently lift each cookie cup out of the muffin tin. Place them on a wire rack to cool completely. Allowing them to cool fully ensures the cheesecake filling is perfectly set and the cookie base has a delightful texture.
Garnishing and Enjoying
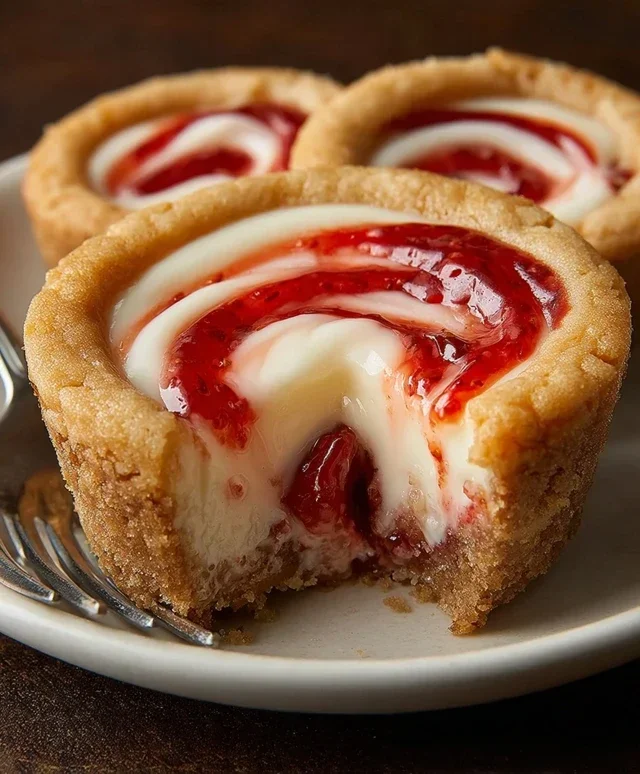
Once your Strawberry Swirl Cheesecake Cookie Cups have cooled completely, it’s time for the final flourish! If you’re feeling fancy, you can add a few optional garnishes to make them even more appealing. A small dollop of whipped cream on top of each cookie cup is always a delicious addition. You can also place a fresh strawberry half or slice on top for a beautiful pop of color and extra fruity flavor. For a touch of elegance, a sprinkle of chocolate shavings can add a lovely contrast to the sweetness of the cookie and jam.
These cookie cups are best enjoyed at room temperature or slightly chilled. They store well in an airtight container in the refrigerator for up to 3 days. The combination of the chewy cookie, the tangy cream cheese, and the sweet strawberry swirl is truly a winning one. They’re incredibly satisfying and incredibly adorable. Enjoy every single bite of these delightful homemade treats!
Conclusion:
And there you have it – the ultimate guide to creating these delightful Strawberry Swirl Cheesecake Cookie Cups! I truly believe this recipe is fantastic because it perfectly blends the comforting chegrape juicess of a classic cookie with the rich, creamy indulgence of cheesecake, all swirled together with vibrant strawberry flavor. They’re surprisingly simple to make, yet deliver an impressive, restaurant-worthy treat that’s sure to wow your friends and family. Whether you’re looking for a crowd-pleasing dessert for a party, a special occasion, or simply a weekend baking project, these cookie cups are a guaranteed hit.
Serving these Strawberry Swirl Cheesecake Cookie Cups is an absolute joy. They are divine served slightly warm, allowing the cheesecake filling to be extra gooey, or chilled for a firmer, more refreshing bite. They make a beautiful addition to any dessert spread, standing tall in their muffin liners, or can be presented individually for a more elegant touch. For variations, consider adding a sprinkle of lemon zest to the cookie dough for an extra zing, or topping them with fresh strawberry slices and a dollop of whipped cream for an even more decadent finish. Don’t be afraid to experiment! I highly encourage you to give this recipe a try; you won’t regret the delicious outcome!
Frequently Asked Questions:
Can I make the strawberry swirl ahead of time?
Absolutely! You can prepare the strawberry swirl component a day or two in advance and store it in an airtight container in the refrigerator. This can help streamline your baking process on the day you plan to assemble and bake the cookie cups.
How long do these cookie cups last?
These Strawberry Swirl Cheesecake Cookie Cups are best enjoyed within 2-3 days of baking. Store any leftovers in an airtight container in the refrigerator to maintain their freshness and texture. The cheesecake filling can become a bit softer at room temperature, so refrigeration is recommended.
What if I don’t have a muffin tin?
If you don’t have a muffin tin, you can adapt this recipe by baking the cookie dough portions on a baking sheet lined with parchment paper. You’ll want to create a slight indentation in the center of each cookie before baking to mimic the cup shape. The cheesecake and strawberry swirl can then be carefully added to the warm, slightly indented cookies after they come out of the oven, allowing them to melt slightly into the center.
Strawberry Swirl Cheesecake Cookie Cups
Decadent cookie cups with a creamy cheesecake filling and a sweet strawberry swirl.
Ingredients
-
1 roll (16.5 oz) refrigerated sugar cookie dough
-
8 oz cream cheese, softened
-
1/4 cup granulated sugar
-
1 tsp vanilla extract
-
1/3 cup strawberry jam, warmed slightly
-
Fresh strawberries
-
Chocolate shavings
Instructions
-
Step 1
Preheat oven to 350°F (175°C). Grease a 12-cup muffin tin. -
Step 2
Press 2 tablespoons of sugar cookie dough into the bottom and up the sides of each muffin cup, forming a shell. -
Step 3
In a medium bowl, beat together the softened cream cheese and granulated sugar until smooth. -
Step 4
Stir in the vanilla extract. -
Step 5
Spoon about 1 tablespoon of the cream cheese mixture into each cookie shell. -
Step 6
Dollop about 1 teaspoon of warmed strawberry jam onto the cream cheese filling. -
Step 7
Using a toothpick or skewer, gently swirl the jam into the cream cheese for a marbled effect. -
Step 8
Bake for 10-12 minutes, or until the cookie edges are golden brown and the cream cheese is set. -
Step 9
Let cool in the muffin tin for 10 minutes before carefully removing to a wire rack to cool completely. -
Step 10
Top with fresh strawberries or chocolate shavings, if desired, before serving.
Important Information
Nutrition Facts (Per Serving)
It is important to consider this information as approximate and not to use it as definitive health advice.
Allergy Information
Please check ingredients for potential allergens and consult a health professional if in doubt.