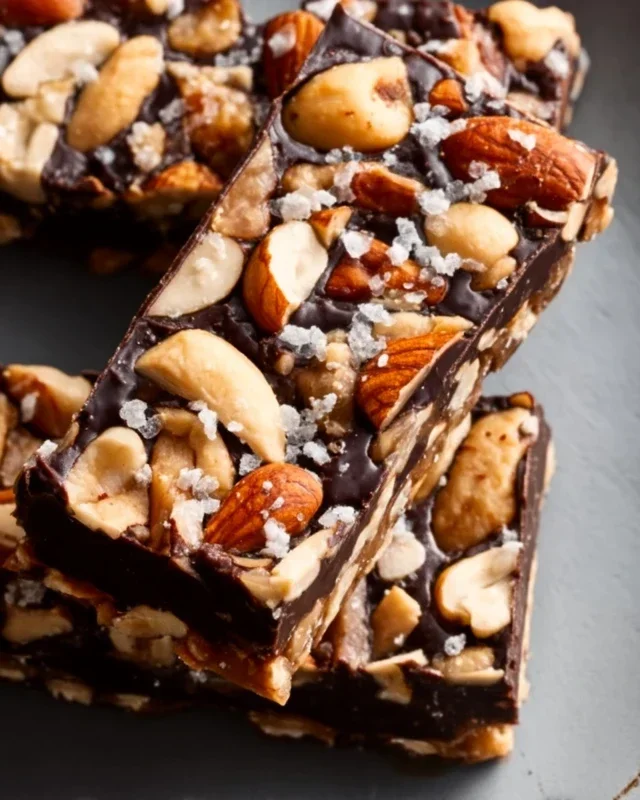
Dark Chocolate Sea Salt Nut Bars-Easy No-Bake Treat
Dark Chocolate and Sea Salt Nut Bars are more than just a treat; they’re a symphony of textures and flavors that I simply can’t get enough of. Imagin extracte the satisfying crunch of roasted nuts, harmoniously balanced with the intense, slightly bitter depth of premium dark chocolate. Then, a whisper of flaky sea salt cuts through the richness, awakening your palate with every bite. It’s this perfect interplay that makes these bars so incredibly addictive, turning them into a go-to for satisfying a craving or impressing guests. People adore them because they offer a sophisticated yet wonderfully approachable indulgence. They’re incredibly versatile – perfect for an afternoon pick-me-up, a post-workout refuel, or even a decadent dessert. What truly makes these Dark Chocolate and Sea Salt Nut Bars special is their simplicity, allowing the quality of the ingredients to shine, proving that sometimes, the most extraordinary flavors come from the most straightforward combinations.
Get ready to elevate your snack game.
These bars are a game-changer.
Dark Chocolate and Sea Salt Nut Bars
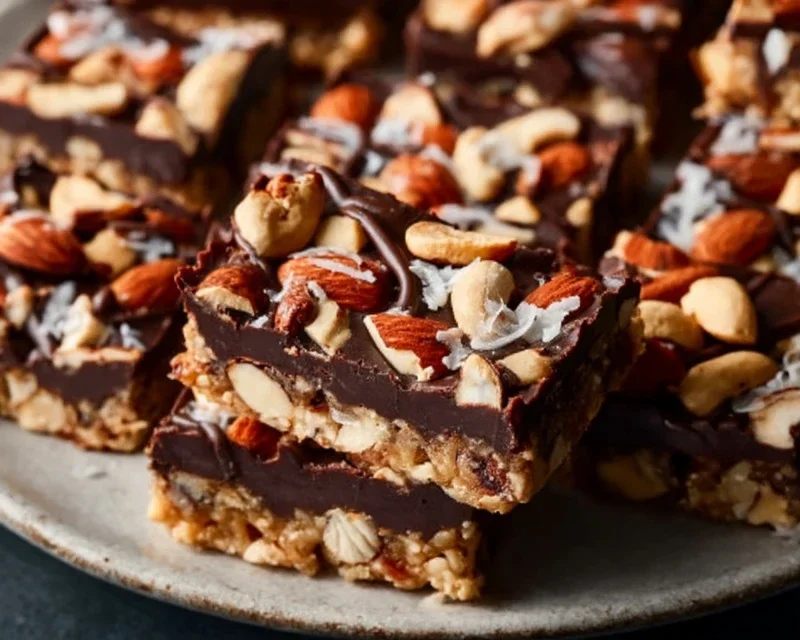
These Dark Chocolate and Sea Salt Nut Bars are my go-to for a satisfying, slightly sweet, and delightfully salty treat. They’re incredibly easy to make, requiring no baking, and are perfect for a quick energy boost, a desk snack, or even a thoughtful homemade gift. The combination of crunchy nuts, chewy puffed rice, rich dark chocolate, and that signature hint of sea salt is simply irresistible. I love how adaptable they are too – you can play around with your favourite nut combinations!
Ingredients:
Instructions:
Step 1: Preparing the Nut and Rice Base
The first step is to get our dry ingredients ready. In a medium-sized bowl, combine your chosen nuts and the puffed rice. I’ve found that using a mix of nuts provides a wonderful texture and flavour profile. Cashews offer a creamy richness, peanuts add a familiar, hearty crunch, and almonds contribute a subtle sweetness and firmness. If you prefer a specific nut, feel free to use all of one kind! Give the nuts and puffed rice a good stir to ensure they are well distributed. This mixture will form the sturdy, crunchy foundation of our bars.
Step 2: Creating the Binding Syrup
Next, we need to create the sticky binder that will hold everything together. In a small saucepan, gently heat the brown rice syrup over low heat. You don’t want it to boil vigorously, just to warm up enough to become more pourable. Once it’s warm and slightly more fluid, stir in the vanilla extract and the 1/2 teaspoon of sea salt. The vanilla adds a lovely warmth and depth of flavour, while the sea salt is crucial for balancing the sweetness and enhancing the chocolate. Whisk these ingredients together until they are fully incorporated into the syrup.
Step 3: Combining the Base and Binder
Now comes the exciting part where we bring our ingredients together! Pour the warm syrup mixture over the bowl of nuts and puffed rice. Using a sturdy spatula or wooden spoon, begin extract to mix thoroughly. It might seem a bit dry at first, but keep stirring and folding until every single nut and piece of puffed rice is coated in the sticky syrup. This might take a minute or two, and patience is key here to ensure even distribution. You want a cohesive mixture that starts to clump together nicely. Pressing down lightly with the back of your spoon can help the syrup adhere better.
Step 4: Pressing the Bars into the Pan
Prepare an 8×8 inch baking pan by lining it with parchment paper. Make sure the parchment paper extends up the sides of the pan, creating a sort of sling. This will make it incredibly easy to lift the bars out once they’ve set. Transfer the nut and syrup mixture into the prepared pan. Now, using your hands or another piece of parchment paper placed on top of the mixture, press down firmly and evenly. You want to compact the mixture as much as possible to create dense, well-formed bars. The firmer you press, the less crum extractbly your bars will be. Ensure the surface is as smooth and flat as you can get it.
Step 5: Melting and Drizzling the Chocolate
While the base is pressing, let’s get our chocolate ready. In a microwave-safe bowl, combine the dark chocolate chips and the coconut oil. Microwave in 30-second intervals, stirring well after each interval, until the chocolate is smooth and completely melted. The coconut oil helps the chocolate melt smoothly and creates a lovely sheen. Be careful not to overheat the chocolate, as it can scorch. Once melted, you can either spread a thin layer of the melted chocolate over the entire surface of the pressed nut mixture, or you can drizzle it in a decorative pattern. For an extra pop of flavour and visual appeal, sprinkle a little flaky sea salt over the melted chocolate immediately after drizzling.
Step 6: Chilling and Cutting the Bars
Once everything is assembled, place the pan in the refrigerator for at least 1-2 hours, or until the chocolate is completely set and the bars are firm. The chilling process is essential for the bars to hold their shape when cut. When they are firm, use the parchment paper sling to lift the entire slab out of the pan onto a cutting board. Using a sharp knife, cut the slab into your desired bar shapes. I usually cut mine into about 12-16 bars. For cleaner cuts, you can dip your knife in hot water and wipe it dry between cuts. Store the finished bars in an airtight container in the refrigerator for best results. They’ll keep for about a week, though I doubt they’ll last that long! Enjoy these delightful homemade treats!
Conclusion:
These Dark Chocolate and Sea Salt Nut Bars are an absolute triumph of flavor and texture! The rich, slightly bitter dark chocolate beautifully balances the salty crunch of the nuts and the subtle sweetness. They are incredibly satisfying, making them perfect for a quick energy boost, a decadent dessert, or even a thoughtful homemade gift. I find them to be a wonderfully versatile treat that’s surprisingly easy to make. The combination of wholesome ingredients and indulgent chocolate is truly irresistible.
I love serving these bars as a sophisticated afternoon snack alongside a hot cup of coffee or tea. They also make a fantastic addition to a dessert platter, offering a delightful contrast to fruit-based sweets. For a touch of elegance, try breaking them into smaller pieces and serving them with a scoop of vanilla bean ice cream. Don’t be afraid to experiment with variations! You can swap out different nuts like pecans or macadamia nuts, or even add a sprinkle of chili flakes for a bit of heat. If you’re a fan of chocolate and a hint of salt, I wholeheartedly encourage you to give this recipe a try. You won’t be disappointed!
Frequently Asked Questions:
Can I make these Dark Chocolate and Sea Salt Nut Bars vegan?
Absolutely! To make these bars vegan, simply ensure you use vegan dark chocolate chips. Most dark chocolate is naturally vegan, but it’s always good to check the ingredients list for any dairy derivatives. Also, if you’re using honey as a binder, you can substitute it with maple syrup or agave nectar for a fully plant-based treat.
How long do these nut bars last?
Stored in an airtight container at room temperature, these bars should stay fresh for about 5-7 days. For longer storage, you can keep them in the refrigerator, where they will last for up to two weeks. They also freeze beautifully for up to three months; just let them thaw at room temperature before enjoying.
Dark Chocolate and Sea Salt Nut Bars
Easy no-bake bars featuring a crunchy nut and puffed rice base, a hint of sea salt and vanilla, all topped with rich dark chocolate and flaky sea salt.
Ingredients
-
2 1/2 cups unsalted nuts of choice (3/4 cup cashews, 3/4 cup peanuts, 1 cup almonds)
-
1/2 cup puffed rice
-
1/4 cup brown rice syrup
-
1 1/2 teaspoon vanilla extract
-
1/2 teaspoon sea salt
-
1 cup dark chocolate chips
-
2 teaspoons coconut oil
-
flaky salt for topping (optional)
Instructions
-
Step 1
Line an 8×8 inch baking pan with parchment paper, leaving an overhang on the sides. -
Step 2
In a large bowl, combine the nuts, puffed rice, and 1/2 teaspoon sea salt. -
Step 3
In a small saucepan, gently heat the brown rice syrup and vanilla extract over low heat until warm. Do not boil. -
Step 4
Pour the warm syrup mixture over the dry ingredients and stir until everything is evenly coated. -
Step 5
Press the mixture firmly into the prepared baking pan. -
Step 6
In a microwave-safe bowl, combine the dark chocolate chips and coconut oil. Microwave in 30-second intervals, stirring between each, until smooth and melted. -
Step 7
Spread the melted chocolate evenly over the nut mixture. Sprinkle with flaky salt, if using. -
Step 8
Refrigerate for at least 1 hour, or until the chocolate is firm. -
Step 9
Lift the bars out of the pan using the parchment paper overhang. Cut into desired bar shapes.
Important Information
Nutrition Facts (Per Serving)
It is important to consider this information as approximate and not to use it as definitive health advice.
Allergy Information
Please check ingredients for potential allergens and consult a health professional if in doubt.