Crispy Baked Zucchini Chips Recipe-Easy Healthy Snack
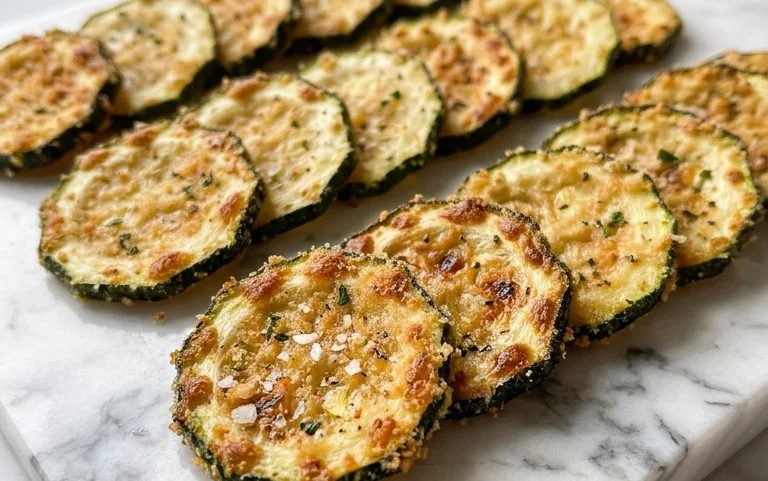
Crispy Baked Zucchini Chips are about to become your new favorite snack obsession! Let’s be honest, who doesn’t love a satisfying crunch, especially when it’s guilt-free and bursting with fresh flavor? Forget those greasy, store-bought chips; these homemade wonders offer a delightful alternative that I can’t get enough of. What makes these Crispy Baked Zucchini Chips so special? It’s the magic of transforming humble zucchini into an impossibly light and airy treat. Thinly sliced, seasoned to perfection, and baked until golden and shatteringly crisp, they’re perfect for dipping, sharing, or simply devouring straight from the oven. They’re a fantastic way to enjoy seasonal produce and impress yourself (and anyone lucky enough to get a bite!). Get ready for a healthier, tastier crunch!
Ingredients:
When it comes to finding a healthy and delicious snack that’s satisfyingly crunchy, it’s hard to beat homemade zucchini chips. Forget those greasy, store-bought versions; these baked beauties are incredibly simple to make and taste so much better. They’re a fantastic way to use up those garden zucchini (or the ones you picked up at the grocery store), and they’re surprisingly addictive. The subtle sweetness of the zucchini combined with the savory spices creates a flavor profile that’s incredibly appealing. Plus, baking them makes them much lighter than frying, so you can enjoy a generous portion guilt-free. I love making these for movie nights, as a quick afternoon pick-me-up, or even as a fun, healthy addition to a lunchbox. The process is straightforward, and the results are consistently delightful. Let’s get started on creating these crispy wonders!
Preparing the Zucchini
The first, and arguably most important, step in achieving perfectly crispy zucchini chips is proper preparation. You’ll start with your 1 medium zucchini. Ensure it’s thoroughly washed and completely dried. I like to use a clean kitchen towel or paper towels to gently pat it dry, removing as much surface moisture as possible. This is crucial because excess water will steam the zucchini instead of allowing it to crisp up in the oven. Once dry, you’ll need to slice the zucchini thinly and uniformly. The best tool for this job is a mandoline slicer. If you don’t have one, a very sharp knife and a steady hand will also work, but a mandoline ensures consistent thickness, which is key for even cooking. Aim for slices that are about 1/8 inch thick. If they’re too thick, they won’t get crispy; if they’re too thin, they might burn too quickly. You want those perfect little chip-like rounds.
Seasoning for Flavor
Now comes the fun part: seasoning! This is where we infuse our zucchini with all sorts of deliciousness. In a medium bowl, combine your sliced zucchini with the olive oil. You want to ensure each slice is lightly coated. You can use your hands to gently toss them, making sure every piece gets a little slick of oil. This oil helps the spices adhere and promotes browning and crisping in the oven. Next, sprinkle in the kosher salt, black pepper, onion powder, and paprika. The kosher salt adds a nice burst of flavor and also helps draw out a bit of moisture, contributing to crispiness. The black pepper provides a gentle warmth, while the onion powder offers a savory depth without overpowering the zucchini’s natural flavor. The paprika is not only for color, adding a lovely reddish hue, but also contributes a mild, sweet smokiness. Again, gently toss the zucchini slices to distribute the seasonings evenly. Be mindful not to over-season, as the flavors will concentrate as they bake.
Arrangin extractg for Optimal Crispness
Once your zucchini slices are perfectly seasoned, it’s time to arrange them on your baking sheet. This step is critical for achieving that coveted crispiness. You’ll need a large baking sheet, and I highly recommend lining it with parchment paper. This prevents sticking and makes cleanup a breeze. The absolute key here is to arrange the zucchini slices in a single layer, without any overlapping. Overlapping will cause the slices to steam each other, resulting in a soggy texture rather than a crispy one. Take your time and lay out each slice individually. If your baking sheet is too small to fit all the slices in a single layer, use two baking sheets. It’s far better to use an extra sheet than to cram them together and sacrifice crispiness. Ensure there’s a little bit of space between each chip.
Baking to Perfection
Now that everything is prepped, it’s time to bake! Preheat your oven to 400°F (200°C). This moderately high temperature is perfect for achieving a good crisp. Carefully place your prepared baking sheet(s) into the preheated oven. The baking time can vary depending on your oven and the thickness of your zucchini slices, but generally, you’ll be looking at about 15 to 20 minutes. You’ll want to keep a close eye on them, especially during the last few minutes. Around the halfway mark, usually after about 8-10 minutes, I like to gently flip each zucchini chip. This ensures even browning and crisping on both sides. Look for the edges to start turning golden brown and the centers to appear slightly shriveled and firm. They should feel dry to the touch. Be careful not to overbake, as they can go from perfectly crispy to burnt very quickly.
Cooling and Enjoying
Once your zucchini chips are golden brown and have reached your desired level of crispness, carefully remove the baking sheet from the oven. It’s important to let the chips cool completely on the baking sheet. As they cool, they will continue to crisp up even further. Resist the temptation to taste them hot off the oven – they will be softer then! Once they are completely cooled, you can gently transfer them to a serving platter. These crispy baked zucchini chips are best enjoyed fresh, but if you have any leftovers, you can store them in an airtight container at room temperature for a day or two. They might lose a tiny bit of their crispness over time, but they’ll still be a delicious and healthy snack. I often find myself reaching for these throughout the day, and they’re a hit with everyone who tries them! Enjoy your homemade crunchy goodness!

Conclusion:
So there you have it – the secret to achieving perfectly Crispy Baked Zucchini Chips right in your own oven! This recipe is a winner because it’s incredibly simple to make, requires just a handful of common ingredients, and delivers a satisfying crunch without the grease of traditional fried snacks. It’s a fantastic way to enjoy a healthy, homemade treat that’s guilt-free and surprisingly addictive. I encourage you all to give these a try, especially if you’re looking for a delicious way to use up extra zucchini or a crowd-pleasing appetizer. They’re perfect for movie nights, parties, or even as a light lunch accompaniment.
You can serve these delightful zucchini chips as a stand-alone snack, or get creative! They pair wonderfully with a variety of dips like ranch, sriracha mayo, garlic aioli, or even a simple marinara sauce. For variations, feel free to experiment with your favorite seasonings. Smoked paprika adds a lovely depth, a pinch of chili powder brings a gentle kick, and a sprinkle of nutritional yeast can give them a cheesy flavor without any dairy. Don’t be afraid to make them your own!
Frequently Asked Questions:
Can I use other vegetables besides zucchini?
Absolutely! While zucchini is fantastic, you can also try this method with thinly sliced yellow squash, eggplant, or even sweet potatoes. Just be mindful of the moisture content and adjust baking time as needed.
Why are my zucchini chips not crispy?
The most common culprits are not slicing the zucchini thinly enough or not removing enough moisture. Ensure your slices are very thin, and don’t skip the step of patting them dry with paper towels. Overcrowding the baking sheet can also lead to steaming instead of crisping, so bake them in a single layer.
How should I store leftover zucchini chips?
For the best texture, it’s ideal to eat them fresh. If you do have leftovers, store them in an airtight container at room temperature for a day or two. However, they will lose some of their crispness over time.
Crispy Baked Zucchini Chips
Enjoy a healthy and delicious snack with these crispy baked zucchini chips, seasoned to perfection.
Ingredients
-
1 medium zucchini (washed and dried)
-
1 tablespoon olive oil
-
½ teaspoon kosher salt
-
½ teaspoon black pepper
-
¼ teaspoon onion powder
-
½ teaspoon paprika
Instructions
-
Step 1
Preheat your oven to 400°F (200°C) and line a baking sheet with parchment paper. -
Step 2
Slice the zucchini thinly, about 1/8 inch thick. You can use a mandoline for consistent slices. -
Step 3
In a bowl, toss the zucchini slices with olive oil, kosher salt, black pepper, onion powder, and paprika until evenly coated. -
Step 4
Arrange the seasoned zucchini slices in a single layer on the prepared baking sheet, ensuring they don’t overlap. -
Step 5
Bake for 15-20 minutes, flipping halfway through, until the edges are golden brown and crispy. -
Step 6
Remove from the oven and let cool slightly before serving.
Important Information
Nutrition Facts (Per Serving)
It is important to consider this information as approximate and not to use it as definitive health advice.
Allergy Information
Please check ingredients for potential allergens and consult a health professional if in doubt.