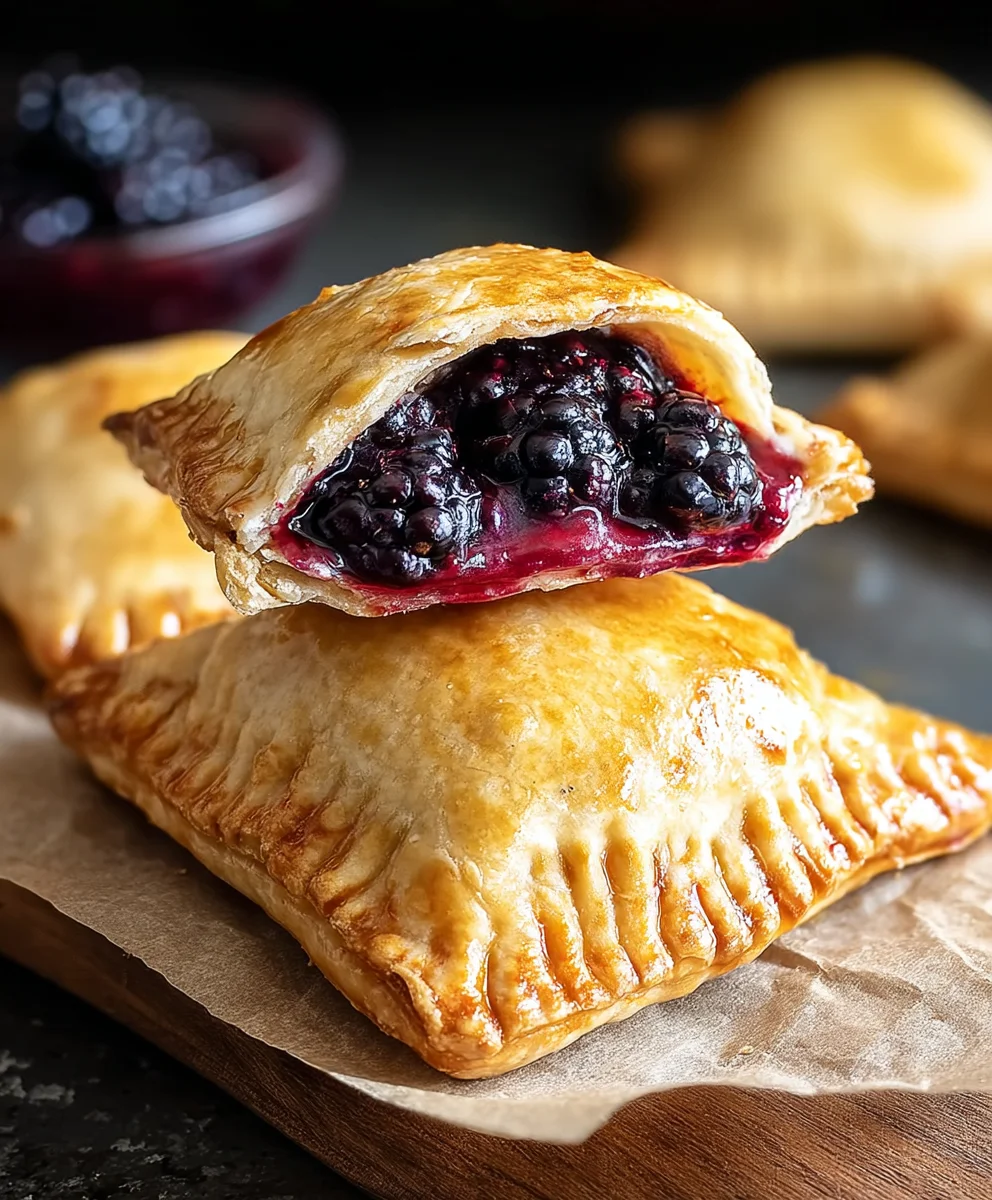
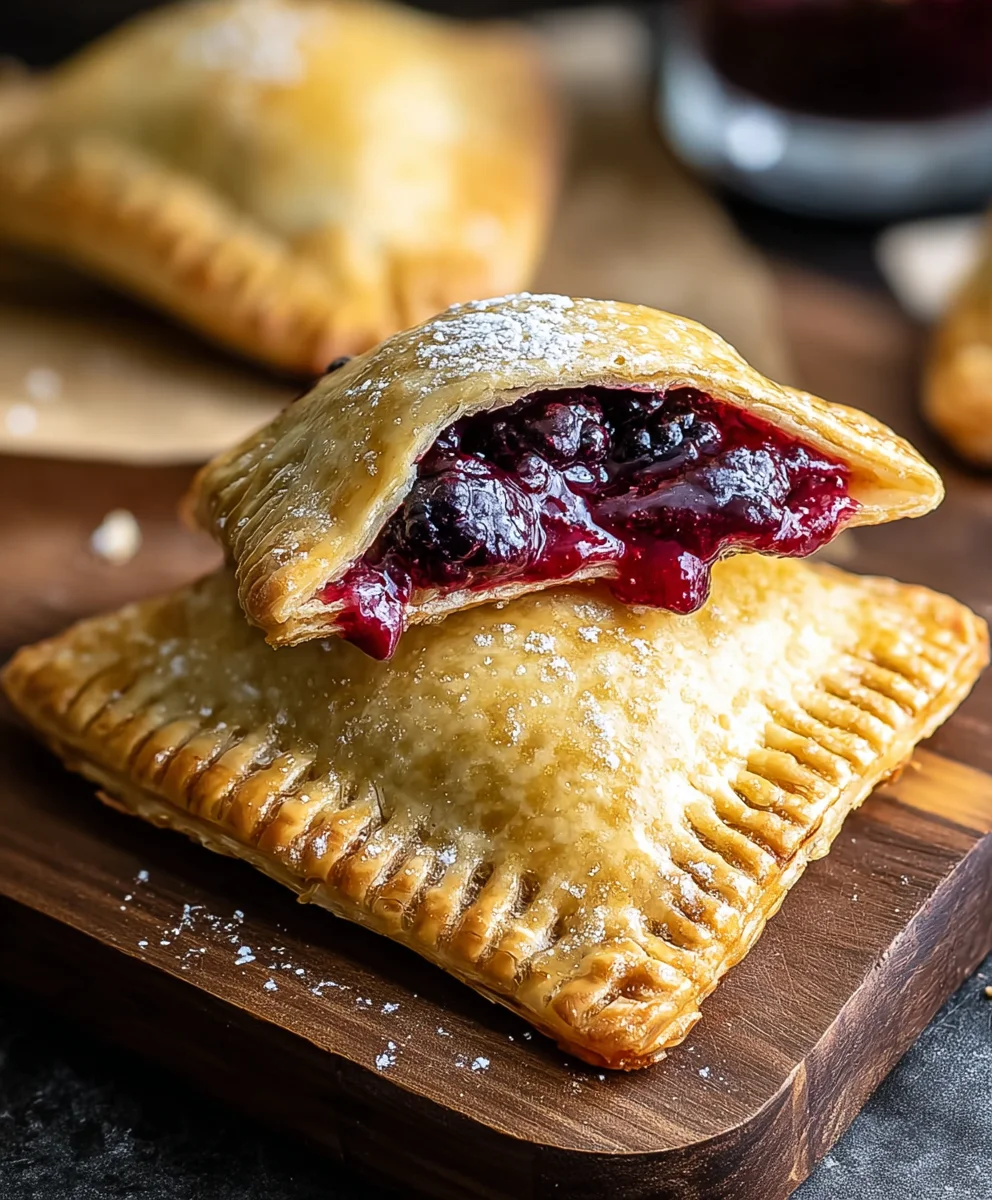
Blackberry Hand Pies-Sweet & Easy Dessert Recipe
Blackberry Hand Pies are more than just a delightful dessert; they’re a portable piece of sunshine, a sweet escape that fits perfectly in the palm of your hand. Imagin extracte biting into a flaky, buttery crust, giving way to a warm, jammy filling bursting with the sweet-tart flavor of ripe blackberries. It’s no wonder these charming little pastries are a perennial favorite! Whether you’re packing them for a picnic, enjoying them at a garden party, or simply craving a comforting treat after a long day, Blackberry Hand Pies offer a unique blend of convenience and pure indulgence. What truly sets these apart is the delicate balance of the slightly caramelized fruit against the tender pastry, creating a symphony of textures and tastes that’s utterly irresistible. Get ready to fall in love with this classic for a reason!
Ingredients:
- 1 (21 ounce) can blackberry pie filling
- 2 (14.1 ounce) packages refrigerated pie crust (you’ll likely only need one package for this recipe, but having a spare is always a good idea)
- 1/2 cup powdered sugar
- 1 teaspoon corn syrup
- 1 tablespoon water
- Vegetable oil for frying (enough to fill your pan about 1-2 inches deep)
Preparing the Dough
To begin extract our delicious Blackberry Hand Pies, the first step involves getting our pie crust ready. Since we’re using a convenient refrigerated pie crust, the prep work is minimal. Open one package of the refrigerated pie crust. Gently unroll the dough onto a lightly floured surface. If the dough feels a bit stiff and difficult to unroll, let it sit at room temperature for about 5-10 minutes to soften slightly. This will prevent it from cracking.
Using a round cookie cutter or a small bowl with about a 4-5 inch diameter, cut out as many circles as you can from the pie crust. Aim for about 6-8 circles per crust. Re-roll the scraps gently, being careful not to overwork the dough, and cut out additional circles until you’ve used up most of the dough. You want to have an even number of circles, as each hand pie will be made from two circles – one for the bottom and one for the top.
Assembling the Hand Pies
Now comes the fun part: filling and assembling our Blackberry Hand Pies. Take one of the pie crust circles and place it on your lightly floured surface. Spoon about 2-3 tablespoons of the canned blackberry pie filling onto one half of the circle, leaving about a 1/2 inch border all around. It’s important not to overfill the pies, as this can cause the filling to leak out during cooking. If the pie filling seems very thick, you can give it a gentle stir to loosen it up.
Once filled, take a second pie crust circle and place it over the filling. Carefully press the edges of the two circles together to seal them. You can use your fingers to crimp the edges, or for a more decorative finish, you can use the tines of a fork to press down around the entire border. This not only makes them look pretty but also ensures a good seal, preventing any precious blackberry goodness from escaping. Make sure there are no gaps or holes where the filling could ooze out.
Creating Steam Vents and Frying Prep
Before we send these little pockets of joy to the fryer, we need to make sure they can breathe! Using a sharp knife or a toothpick, carefully cut a small slit or two in the top crust of each hand pie. This is crucial for allowing steam to escape during frying. Without these vents, the steam could build up inside, potentially causing the hand pies to burst or puff up unevenly.
Once all your hand pies are assembled and vented, it’s time to prepare for frying. In a large, heavy-bottomed skillet or a Dutch oven, pour enough vegetable oil to reach a depth of about 1-2 inches. Heat the oil over medium heat. You want the oil to be at the right temperature for frying – not too hot, or the crust will burn before the filling is heated through, and not too cool, or they’ll be greasy. A good way to test the temperature is to drop a tiny scrap of pie dough into the oil; it should sizzle gently and float to the surface. Alternatively, a kitchen thermometer should read between 350-360°F (175-180°C).
Frying the Blackberry Hand Pies
With the oil at the perfect temperature, we can now fry our Blackberry Hand Pies to golden perfection. Carefully, using a spatula or a slotted spoon, gently place 2-3 hand pies into the hot oil at a time. Be careful not to overcrowd the pan, as this will lower the oil temperature and result in soggy hand pies. Allow the hand pies to fry for about 2-3 minutes per side, or until they are a beautiful golden brown and puffed up. Keep a close eye on them, as they can go from perfectly golden to burnt very quickly.
Using your slotted spoon or spatula, carefully remove the fried hand pies from the oil and place them on a wire rack set over a baking sheet or a plate lined with paper towels. This allows any excess oil to drain away, ensuring a crispier crust. Repeat the frying process with the remaining hand pies, making sure to let the oil return to the correct temperature between batches.
Making the Glaze and Finishing Touches
While our delicious Blackberry Hand Pies are still warm from the fryer, it’s time to add the final touch: a sweet and simple glaze. In a small bowl, whisk together the powdered sugar, corn syrup, and 1 tablespoon of water. The corn syrup will add a lovely sheen and help the glaze set slightly. Whisk until the mixture is smooth and lump-free. If the glaze seems too thick, add a tiny bit more water, a few drops at a time, until it reaches a drizzly consistency. If it’s too thin, add a little more powdered sugar.
Using a spoon or a small whisk, generously drizzle the glaze over the warm Blackberry Hand Pies. The warmth of the pies will help the glaze spread and set beautifully. Allow the glaze to harden for a few minutes before serving. These Blackberry Hand Pies are absolutely divine served warm, allowing the gooey blackberry filling to shine. Enjoy every delicious bite!
Conclusion:
We hope you’ve enjoyed learning how to make these delightful Blackberry Hand Pies! These portable pastries are a perfect balance of sweet, tart blackberries encased in a flaky, buttery crust. They’re not just a treat for special occasions, but an excellent option for a simple yet satisfying dessert or even a special breakfast treat. The aroma that fills your kitchen as they bake is simply irresistible!
For serving, consider pairing your Blackberry Hand Pies with a dollop of fresh whipped cream, a scoop of vanilla bean ice cream, or even a drizzle of crème anglaise. They are wonderful served warm but are also delicious at room temperature. Don’t be afraid to experiment with variations! You could add a pinch of cinnamon or nutmeg to the filling for extra warmth, or incorporate a bit of lemon zest to brighten the blackberry flavor even further. Perhaps even try a different berry, like raspberries or blueberries, for a delightful twist.
We encourage you to give this recipe a try and make it your own. Baking is an adventure, and these Blackberry Hand Pies are a fantastic starting point for creating delicious memories in your own kitchen. Enjoy every bite!
Frequently Asked Questions:
Can I make the dough ahead of time?
Absolutely! The pie dough for your Blackberry Hand Pies can be made up to two days in advance and stored, tightly wrapped, in the refrigerator. You can also freeze the dough for up to a month; just be sure to thaw it in the refrigerator overnight before you’re ready to use it.
How should I store leftover Blackberry Hand Pies?
Store any leftover Blackberry Hand Pies in an airtight container at room temperature for up to two days, or in the refrigerator for up to four days. Reheat them gently in a warm oven for a few minutes to restore their crispness.
Can I use frozen blackberries?
Yes, you can definitely use frozen blackberries for your Blackberry Hand Pies. If using frozen berries, there’s no need to thaw them completely; simply toss them with the sugar, cornstarch, and lemon juice as directed. You might need to add a few extra minutes to the baking time to ensure the filling cooks through.
Blackberry Hand Pies
Sweet and easy blackberry hand pies made with simple ingredients and fried to golden perfection.
Ingredients
-
1 (21 ounce) can blackberry pie filling
-
2 packages refrigerated pie crust
-
1/2 cup powdered sugar
-
1 teaspoon corn syrup
-
1 tablespoon water
-
Vegetable oil for frying
Instructions
-
Step 1
Prepare the pie crusts by unrolling them onto a lightly floured surface. Cut out 4-5 inch circles using a cookie cutter or bowl. Aim for an even number of circles. -
Step 2
Spoon 2-3 tablespoons of blackberry pie filling onto one half of a pie crust circle, leaving a 1/2 inch border. Do not overfill. -
Step 3
Place a second pie crust circle over the filling and press the edges to seal. Crimp with a fork for a decorative finish. -
Step 4
Cut small slits in the top crust of each hand pie to allow steam to escape during frying. Heat 1-2 inches of vegetable oil in a skillet over medium heat to 350-360°F (175-180°C). -
Step 5
Carefully fry 2-3 hand pies at a time for 2-3 minutes per side, until golden brown. Drain on a wire rack. -
Step 6
Whisk together powdered sugar, corn syrup, and water to create a glaze. Drizzle over warm hand pies and let set before serving.
Important Information
Nutrition Facts (Per Serving)
It is important to consider this information as approximate and not to use it as definitive health advice.
Allergy Information
Please check ingredients for potential allergens and consult a health professional if in doubt.