No Bake Patriotic Cheesecake Easy & Delicious Recipe
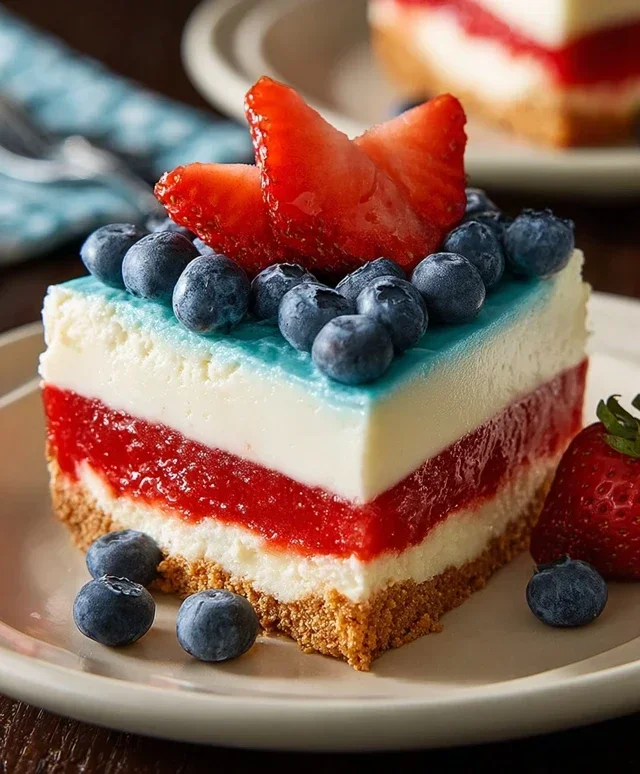
No Bake Patriotic Cheesecake is an absolute showstopper for any summer celebration, and trust me, it’s going to be the star of your next gathering! Imagin extracte creamy, dreamy cheesecake filling layered with vibrant, fresh berries, all nestled in a buttery grabeef ham cracker crust. What’s not to love? This incredible dessert offers all the rich, decadent flavor of traditional cheesecake without any of the fuss of baking. It’s the ultimate stress-free indulgence, perfect for those sweltering summer days when you’d rather be relaxing than tending to a hot oven. The stunning visual appeal, mimicking the iconic colors of the American flag, makes this No Bake Patriotic Cheesecake a guaranteed crowd-pleaser, bringin extractg smiles and gasps of delight with every slice.
Why You’ll Adore This Recipe
Effortless Elegance
This No Bake Patriotic Cheesecake is a testament to how simple ingredients can create something truly spectacular. It’s the perfect dessert for begin extractners and seasoned bakers alike, proving that you don’t need a degree in pastry to impress. The ease of preparation means you can whip this up quickly, leaving you more time to enjoy the festivities and less time in the kitchen. It’s the kind of dessert that looks like you spent hours on it, but in reality, it comes together with minimal effort and maximum impact.
No Bake Patriotic Cheesecake
Get ready to wow your guests with this absolutely stunning and incredibly easy No Bake Patriotic Cheesecake! Perfect for Fourth of July celebrations, Memorial Day picnics, or any occasion where you want to add a festive pop of red, white, and blue, this cheesecake is a guaranteed crowd-pleaser. The best part? No oven required! We’ll be layering a creamy, dreamy cheesecake base with a vibrant blue raspberry Jell-O topping, all nestled in a sweet golden Oreo crust. It’s so simple, even novice bakers can achieve impressive results. Let’s dive into creating this edible masterpiece!
Ingredients:
Creating the Golden Oreo Crust
Step 1: Prepare the Crust Mixture
First things first, we need to create our delightful crust. In a medium bowl, combine the 2 cups of golden Oreo crum extractbs with the melted butter and the 1/4 teaspoon of salt. The salt is a little secret that helps balance the sweetness and really makes the Oreo flavor sing. Mix everything together thoroughly until the crum extractbs are evenly moistened. It should resemble wet sand. Press this mixture firmly into the bottom of a 9-inch springform pan. Use the bottom of a glass or a flat measuring cup to get a nice, even, and compact layer. This ensures your crust won’t crum extractble when you slice into the cheesecake. For an extra sturdy crust, you can chill it in the refrigerator for about 15-20 minutes while you prepare the filling.
Crafting the Creamy Cheesecake Filling
Step 2: Beat the Cream Cheese and Sugar
Now for the star of the show – the creamy cheesecake filling! In a large mixing bowl, beat the two softened 8-ounce packages of cream cheese until it’s completely smooth and free of lumps. Make sure your cream cheese is truly softened; this is crucial for a silky texture. If it’s still a bit firm, microwave it for very short intervals (10-15 seconds at a time) until it’s pliable but not melted. Gradually add the 2 cups of powdered sugar and beat until well combined and fluffy. Scrape down the sides of the bowl as needed to ensure everything is incorporated. Then, mix in the 2 teaspoons of vanilla extract for that classic cheesecake flavor.
Step 3: Whip the Heavy Cream
In a separate, clean bowl (it’s important that this bowl and your beaters are grease-free for the best results), whip the 2 cups of heavy whipping cream on medium-high speed until stiff peaks form. This means when you lift the beater, the cream will hold its shape and stand straight up. Be careful not to over-whip, or you’ll end up with butter! Gently fold the whipped cream into the cream cheese mixture. Folding is a gentle technique where you use a spatula to cut down through the center of the mixture, then bring it up around the sides, turning the bowl as you go. This helps maintain the airiness of the whipped cream, giving you a lighter, fluffier cheesecake.
Layering the Patriotic Colors
Step 4: Divide and Color the Filling
This is where the magic happens and our cheesecake gets its patriotic flair! We’re going to divide the creamy cheesecake filling into three portions. Take about one-third of the mixture and set it aside in a separate bowl. To this portion, add the 1 teaspoon of red gel food color and mix until you achieve a vibrant red hue. Gel food coloring is recommended because it’s highly concentrated and won’t thin out your filling. Now, take another third of the cheesecake filling and set it aside in a third bowl. This portion will be our white layer. The remaining third will also remain white, but it will form the base of our blue Jell-O layer.
Assembling the No-Bake Wonder
Step 5: Assemble the Cheesecake Layers
Now it’s time to assemble our beautiful cheesecake! Spread the plain white cheesecake filling evenly over the prepared golden Oreo crust. This will be your base white layer. Carefully spoon the red cheesecake filling over the white layer. Don’t worry about making it perfectly smooth at this stage; a slightly swirled effect can be quite attractive. Finally, prepare the blue Jell-O according to package directions, but use only 1 cup of boiling water for a firmer set. Allow it to cool slightly, then pour it over the red layer. You can also gently add fresh blueberries on top of the red layer before pouring the blue Jell-O, if you like. For the white layer on top of the red, we will spread the remaining portion of the cheesecake mixture. Chill the cheesecake in the refrigerator for at least 4-6 hours, or preferably overnight, until firm.
The Frosting and Final Touches
Step 6: Prepare the Cream Cheese Frosting
While the cheesecake is chilling, let’s whip up a simple but delicious cream cheese frosting to add another layer of richness and a bright white contrast. In a medium bowl, beat the 6 oz of softened cream cheese with the 6 tablespoons of softened butter until smooth and creamy. Gradually beat in the 3 cups of powdered sugar until fully incorporated and the frosting is light and fluffy. Stir in the 1 teaspoon of vanilla extract.
Step 7: Decorate and Serve
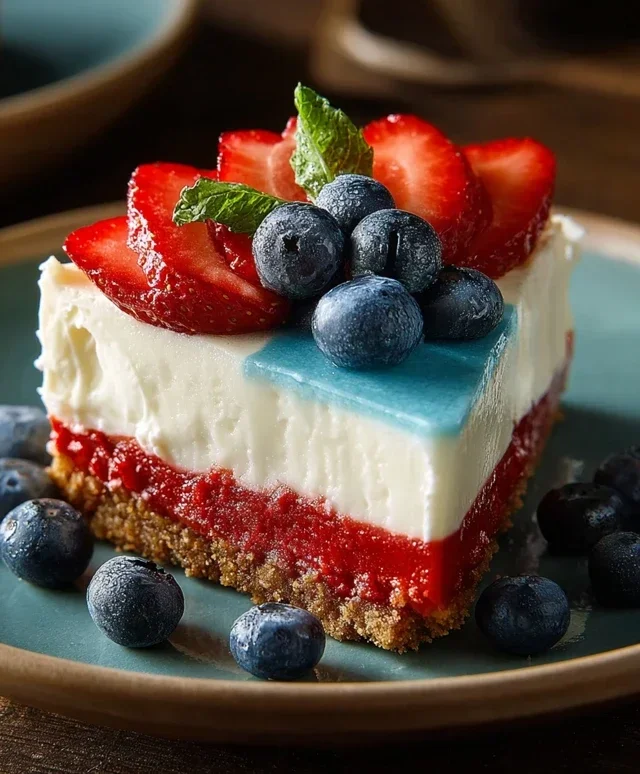
Once the cheesecake is completely set, carefully remove the sides of the springform pan. Spread the cream cheese frosting over the top of the Jell-O layer, or pipe it decoratively for an extra touch of elegance. Finally, artfully arrange fresh blueberries on top of the frosting to complete the red, white, and blue theme. Slice and serve this stunning No Bake Patriotic Cheesecake chilled. Enjoy the cheers and compliments that are sure to follow!
Conclusion:
And there you have it! My delicious and incredibly easy No Bake Patriotic Cheesecake is ready to impress. This recipe is a true winner because it requires absolutely no oven time, making it perfect for those hot summer days or when you’re short on kitchen space. The creamy, rich filling combined with the vibrant patriotic berry topping is a stunning visual and a delightful taste sensation. It’s the ideal dessert for any holiday gathering, from Fourth of July barbecues to Memorial Day picnics, or even just a fun treat to brighten up an ordinary day. I truly hope you give this fantastic no bake recipe a try – I know you’ll love it as much as I do!
Serving Suggestions:
Serve this beautiful No Bake Patriotic Cheesecake chilled. It’s wonderful on its own, but you can also add a dollop of whipped cream or a sprig of fresh mint for an extra touch of elegance. It pairs beautifully with fresh fruits or even a light drizzle of raspberry or blueberry sauce.
Variations:
Feel free to get creative! For a different flavor profile, you could add a hint of lemon zest to the cream cheese mixture. If you’re not a fan of berries, you could use thinly sliced peaches and a sprinkle of blueberries for a different patriotic look. For an extra decadent treat, consider adding a layer of crushed grabeef ham crackers mixed with melted butter to the bottom of your springform pan before pouring in the filling.
Frequently Asked Questions:
Can I make this cheesecake ahead of time?
Absolutely! In fact, I highly recommend making this No Bake Patriotic Cheesecake at least 4-6 hours, or even a day, in advance. This allows the cheesecake to set up properly, ensuring a firm and sliceable texture. It’s a fantastic make-ahead dessert!
How long will the cheesecake last in the refrigerator?
Stored in an airtight container or well-wrapped in plastic wrap, your No Bake Patriotic Cheesecake should stay fresh in the refrigerator for up to 3-4 days. The flavors often meld and deepen beautifully over time.
What kind of crust works best for this recipe?
A classic grabeef ham cracker crust is a perfect complement to the creamy filling. However, you could also experiment with a shortbread cookie crust or even a crushed vanilla wafer crust for a slightly different texture and flavor. Just ensure it’s pressed firmly into your pan!
No Bake Patriotic Cheesecake
A festive and easy no-bake cheesecake perfect for any patriotic celebration, featuring layers of red, white, and blue.
Ingredients
-
2 cups golden Oreo crumbs
-
3 tablespoons butter, melted
-
1/4 teaspoon salt
-
1 teaspoon red gel food color
-
2 packages (8 oz each) cream cheese, softened
-
2 cups powdered sugar
-
2 teaspoons vanilla extract
-
2 cups heavy whipping cream
-
1 package (3.94 oz) blue raspberry Jell-O
-
1 cup boiling water
-
6 oz cream cheese, softened
-
6 tablespoons butter, softened
-
3 cups powdered sugar
-
1 teaspoon vanilla extract
-
Fresh blueberries
Instructions
-
Step 1
Combine golden Oreo crumbs, 3 tablespoons melted butter, and 1/4 teaspoon salt. Press into the bottom of a 9-inch springform pan. -
Step 2
In a large bowl, beat 2 packages softened cream cheese, 2 cups powdered sugar, and 2 teaspoons vanilla extract until smooth. -
Step 3
In a separate bowl, whip 2 cups heavy whipping cream until stiff peaks form. Gently fold into the cream cheese mixture. -
Step 4
Divide the cream cheese mixture into two bowls. Add red gel food color to one bowl and mix well. Leave the other bowl plain (white layer). -
Step 5
Pour the plain cream cheese mixture over the crust. Carefully layer the red cream cheese mixture on top. Chill for at least 1 hour. -
Step 6
Dissolve blue raspberry Jell-O in 1 cup boiling water. Stir in 1 cup cold water. Let cool to room temperature. -
Step 7
In another bowl, beat 6 oz softened cream cheese and 6 tablespoons softened butter until creamy. Gradually beat in 3 cups powdered sugar and 1 teaspoon vanilla extract until smooth. This is your blue layer base. -
Step 8
Gently pour the cooled blue Jell-O mixture over the chilled cheesecake layers. Chill for at least 4 hours, or until firm. -
Step 9
Once firm, frost the top with the blue cream cheese mixture. Decorate with fresh blueberries.
Important Information
Nutrition Facts (Per Serving)
It is important to consider this information as approximate and not to use it as definitive health advice.
Allergy Information
Please check ingredients for potential allergens and consult a health professional if in doubt.