Easy Biscoff Truffles – Irresistible Sweet Treats
Biscoff Truffles are pure magic in every bite, and I’m so excited to share this recipe with you! If you’re anything like me, the moment you catch the warm, spiced aroma of Biscoff cookies, your taste buds start doing a happy dance. These aren’t just any truffles; they’re miniature explosions of caramelized speculoos goodness, transforming that beloved cookie into an impossibly decadent treat. What makes these Biscoff Truffles so utterly irresistible? It’s the perfect harmony of creamy, rich chocolate and the distinct, gin extractgerbread-like warmth of Biscoff. They’re surprisingly simple to whip up, making them the ideal indulgence for a cozy evening or an impressive addition to any gathering. Prepare yourself for a symphony of textures and flavors that will have everyone beggin extractg for the recipe!
Why You’ll Love These Biscoff Truffles:
Effortless Elegance
Unforgettable Flavor
Biscoff Truffles: Your New Favorite Indulgence
Get ready to experience pure bliss with these incredible Biscoff Truffles! If you’re a fan of the unique, caramelized, and slightly spiced flavor of Biscoff cookies, then you’re going to fall head over heels for this recipe. These truffles are deceptively simple to make, requiring no fancy equipment, and the result is a decadent, melt-in-your-mouth treat that’s perfect for gifting, parties, or simply treating yourself. The creamy Biscoff filling is perfectly complemented by a smooth, sweet coating, creating a harmonious flavor explosion in every bite. Trust me, once you try these, you’ll be hooked!
Ingredients:
Preparing the Biscoff Filling
The heart of these truffles lies in their unbelievably delicious and smooth filling. We’ll be creating a creamy, intensely Biscoff-flavored base that’s just beggin extractg to be rolled into perfect little spheres.
1. Creaming the Foundation: In a medium-sized mixing bowl, combine the 1 cup of Biscoff cookie butter and the 1/3 cup of softened cream cheese. It’s crucial that your cream cheese is properly softened. This means taking it out of the refrigerator about 30-60 minutes before you plan to start mixing, depending on your kitchen’s temperature. Softened cream cheese will be pliable and easy to mix without lumps, ensuring a silky smooth filling. You can use a hand mixer on low speed or a sturdy spatula to vigorously beat these two ingredients together until they are completely smooth and well incorporated. There should be no visible streaks of cream cheese. This creaming process is key to achieving that luscious texture.
2. Incorporating the Cookie Crum extractbs: Once the Biscoff butter and cream cheese are beautifully blended, it’s time to add the star texture – the Biscoff cookie crum extractbs. Gently fold in the 1 cup of Biscoff cookie crum extractbs. You can easily make these crum extractbs by placing Biscoff cookies in a food processor and pulsing them until you have fine crum extractbs, or by placing them in a sturdy zip-top bag and crushing them with a rolling pin. The crum extractbs will add a delightful texture and an extra punch of Biscoff flavor to the filling. Mix until the crum extractbs are evenly distributed throughout the creamy mixture. Be careful not to overmix at this stage, as we want to maintain some of that lovely crum extractb texture.
3. Chilling for Structure: Now, this mixture needs a little time to firm up. Cover the bowl tightly with plastic wrap or a lid and refrigerate for at least 30 minutes, or until the mixture is firm enough to handle. This chilling step is absolutely essential. If the mixture is too soft, it will be very difficult to roll into neat balls. The refrigerator allows the fats in the cookie butter and cream cheese to solidify, making it much easier to scoop and shape. You can even leave it in the fridge for a bit longer, up to an hour, if your kitchen is particularly warm.
Rolling and Coating the Truffles
Once our Biscoff filling has chilled and firmed up, it’s time to transform it into beautiful, bite-sized truffles. This is where the magic really happens!
4. Forming the Truffles: Once the Biscoff mixture is firm enough, scoop out portions using a small cookie scoop or a tablespoon. Roll each portion into a smooth, round ball, about 1 inch in diameter. The size is up to you, but this is a good starting point for a classic truffle. If the mixture starts to get too soft as you work, don’t hesitate to pop it back into the refrigerator for a few minutes to firm up again. You might find it helpful to lightly grease your hands with a little neutral oil or butter if the mixture is a bit sticky, but often just working quickly is enough. Place the rolled truffle balls on a parchment-lined baking sheet as you work. You should aim for a consistent size so they all cook evenly in the coating.
5. Melting the Coating: While your truffles are chilling or as you’re rolling them, prepare your coating. Carefully melt the 12 ounces of almond bark or white chocolate candy melts. The easiest and safest way to do this is in a microwave-safe bowl in 30-second intervals, stirring well after each interval, until completely smooth. Be patient; it’s better to melt it slowly and avoid scorching the chocolate. Alternatively, you can use a double boiler method over simmering water. Ensure the bowl doesn’t touch the water. Once melted and smooth, let it cool slightly for a few minutes before dipping. This helps the coating adhere better to the truffle.
6. Dipping and Setting: Now for the satisfying part! Using a fork or a dipping tool, carefully dip each Biscoff truffle ball into the melted almond bark or white chocolate, ensuring it’s fully coated. Let any excess coating drip back into the bowl. Place the coated truffles back onto the parchment-lined baking sheet. For the best finish, you can gently tap the baking sheet on the counter a few times to help smooth out the coating and remove any air bubbles.
Finishing Touches and Serving
These truffles are already delicious as they are, but a few extra touches can elevate them to a whole new level of deliciousness and presentation.
7. Optional Drizzle and Setting: If you’d like to add a decorative flair and an extra burst of Biscoff flavor, gently melt the additional 1/4 cup of Biscoff cookie butter. Once melted and smooth, drizzle it over the tops of the set truffles using a spoon or a piping bag with a small tip. This adds a beautiful swirl and an extra layer of that beloved Biscoff taste. Allow the truffles to set completely at room temperature, or speed up the process by placing them in the refrigerator for about 15-20 minutes until the coating is firm. Once set, they are ready to be devoured! These Biscoff Truffles are best stored in an airtight container in the refrigerator for up to a week, though they rarely last that long! Enjoy every irresistible bite.

Conclusion:
And there you have it – a simple yet utterly delicious recipe for Biscoff Truffles! I’m so excited for you to try these, as they truly are a showstopper with minimal effort. The magic of these truffles lies in the irresistible combination of crushed Biscoff cookies, creamy filling, and that decadent chocolate coating. They are perfect for impressing guests at parties, as a sweet treat to enjoy with your afternoon coffee, or even as a thoughtful homemade gift. I love that they’re so versatile; you can easily customize them to suit your preferences. Why not dip them in white chocolate for a different look, or sprinkle them with chopped nuts or extra cookie crum extractbs for added texture? I truly encourage you to give these Biscoff Truffles a go – I’m confident you’ll fall in love with them just as much as I have!
Frequently Asked Questions:
Q: How should I store my Biscoff Truffles?
A: Store your Biscoff Truffles in an airtight container in the refrigerator. They will keep well for up to a week. For best results, let them sit at room temperature for about 10-15 minutes before serving to allow the chocolate coating to soften slightly.
Q: Can I make Biscoff Truffles ahead of time?
A: Absolutely! These truffles are perfect for making ahead. Once you’ve formed and coated them, refrigerate them until you’re ready to serve or gift them. They are a fantastic make-ahead dessert for any occasion.
Q: What if I don’t have a food processor?
A: No problem at all! If you don’t have a food processor, you can place your Biscoff cookies in a sturdy zip-top bag, seal it, and then crush them using a rolling pin or the bottom of a heavy pan. It might take a little more effort, but the result will be just as delicious!
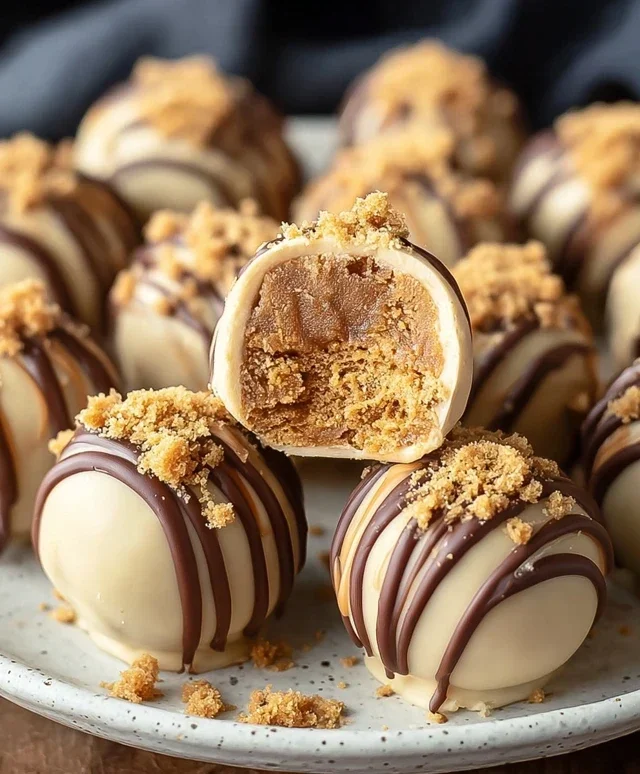
Biscoff Truffles
Decadent no-bake truffles made with Biscoff cookie butter and crushed Biscoff cookies, coated in creamy white chocolate.
Ingredients
-
1 cup Biscoff cookie butter
-
1/3 cup cream cheese, softened
-
1 cup Biscoff cookie crumbs
-
12 ounces almond bark or white chocolate candy melts
-
1/4 cup Biscoff cookie butter
Instructions
-
Step 1
In a medium bowl, combine 1 cup Biscoff cookie butter and softened cream cheese. Beat until smooth. -
Step 2
Stir in 1 cup Biscoff cookie crumbs until well combined. The mixture will be thick. -
Step 3
Roll the mixture into small balls, about 1-inch in diameter. Place them on a parchment-lined baking sheet. -
Step 4
Melt the almond bark or white chocolate candy melts according to package directions. You can use a microwave or a double boiler. -
Step 5
Dip each truffle into the melted chocolate, ensuring it is fully coated. Let excess chocolate drip off. -
Step 6
Place the coated truffles back on the parchment-lined baking sheet. If desired, drizzle with additional melted Biscoff cookie butter while the chocolate is still wet. -
Step 7
Refrigerate the truffles for at least 30 minutes, or until the chocolate coating is firm.
Important Information
Nutrition Facts (Per Serving)
It is important to consider this information as approximate and not to use it as definitive health advice.
Allergy Information
Please check ingredients for potential allergens and consult a health professional if in doubt.