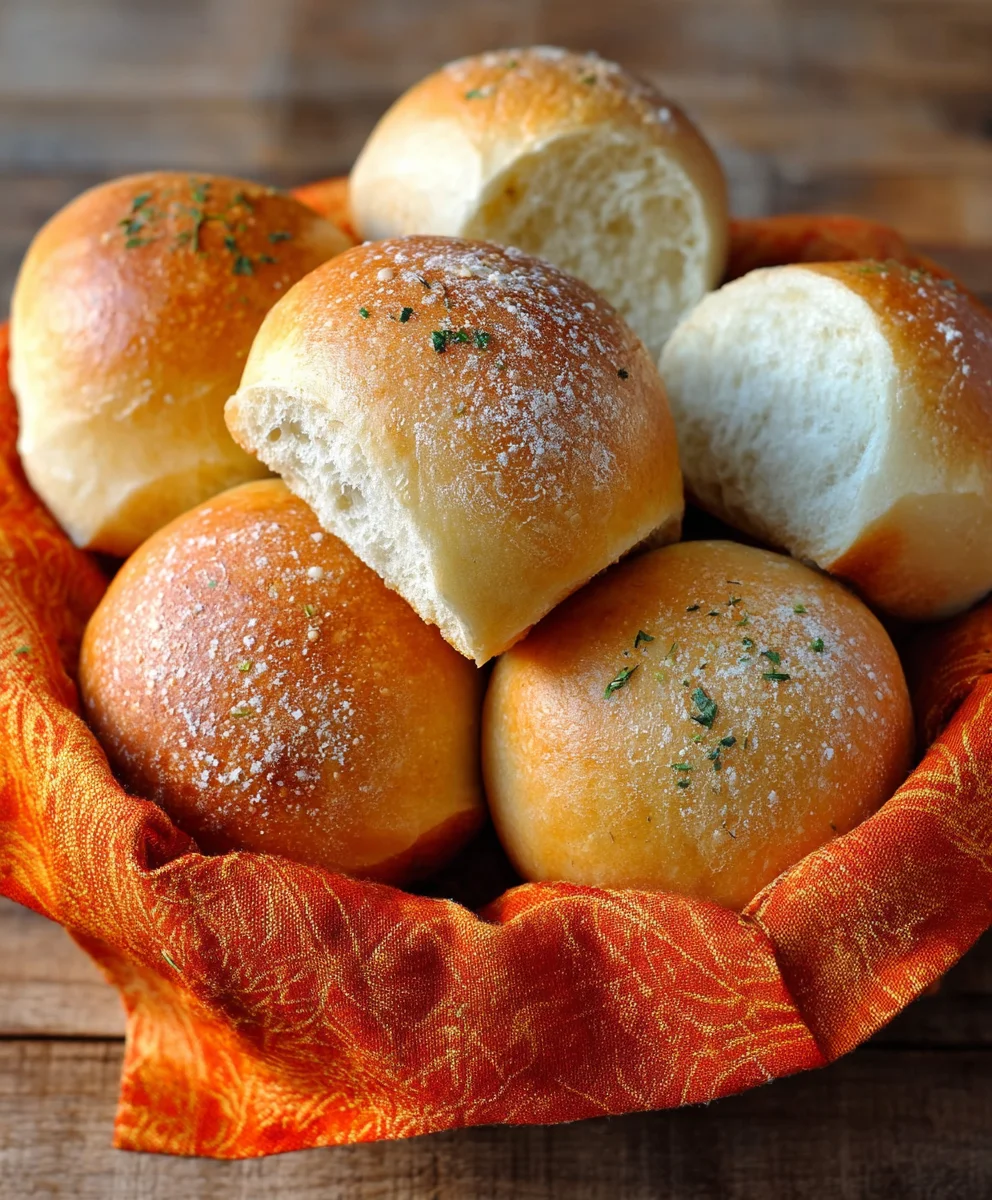
Easy French Bread Dinner Rolls Recipe-Soft & Delicious
French Bread Dinner Rolls are more than just a side dish; they’re an experience. Imagin extracte the aroma filling your kitchen, a warm, yeasty embrace that promises pure comfort. This is what we’re creating today – a recipe for fluffy, golden-brown French bread dinner rolls that are destined to become the star of your table. There’s a reason why these classic rolls are loved by so many; their delicate crum extractb, slightly crisp crust, and irresistible chegrape juicess make them the perfect accompaniment to any meal, from hearty stews to a simple Sunday roast. They’re incredibly versatile, fantastic for soaking up sauces, or simply enjoyed slathered with butter. What truly sets these French Bread Dinner Rolls apart is their remarkable lightness and tender interior, achieved through a careful balance of ingredients and a touch of patient rising. Get ready to impress yourself and your loved ones with these homemade delights!
Ingredients:
- 1 cup Warm Water (ensure it’s under 110 degrees Fahrenheit, around 105-110 is ideal for yeast activation)
- 1 teaspoon Active Dry Yeast
- 1/2 teaspoon Honey
- 2 1/4 cups All-Purpose Flour (plus more for dusting your work surface)
- 1 teaspoon Salt
Making the Dough
Activating the Yeast
To begin extract, we need to wake up our yeast. In a medium-sized mixing bowl, combine the warm water, active dry yeast, and honey. Give it a gentle stir to help dissolve the honey and distribute the yeast. You want the water to be warm, not hot, as excessive heat can kill the yeast. Think of it like a comfortably warm bath for the yeast. Let this mixture sit undisturbed for about 5 to 10 minutes. During this time, you should see the yeast start to get foamy and bubbly, forming a creamy layer on top. This indicates that the yeast is alive and ready to work its magic in creating airy French bread dinner rolls. If you don’t see any activity, your yeast might be old or the water too hot/cold, and you’ll need to start with fresh yeast.
Combining the Dry Ingredients and Forming the Dough
Once your yeast mixture is active, it’s time to add the dry ingredients. In a separate, larger mixing bowl, whisk together the all-purpose flour and salt. This ensures the salt is evenly distributed throughout the flour, which is important for flavor and controlling yeast activity. Now, pour the foamy yeast mixture into the bowl with the dry ingredients. Using a sturdy spoon or a dough whisk, start to mix everything together until a shaggy gin extractgh begins to form. It will look quite rough and unappealing at this stage, but don’t worry, that’s perfectly normal.
Kneading the Dough
Turn the shaggy dough out onto a lightly floured surface. Now comes the fun part: kneading! This process develops the gluten in the flour, which is essential for the structure and chewy texture of our French bread dinner rolls. Start by pushing the dough away from you with the heels of your hands, then fold it back towards you. Rotate the dough a quarter turn and repeat. It will be sticky at first, so resist the urge to add too much extra flour. Just a light dusting on your hands and the work surface is usually enough to prevent excessive sticking. Continue kneading for about 8 to 10 minutes. You’ll know the dough is ready when it becomes smooth, elastic, and springs back slowly when gently poked. It should feel soft and pliable.
First Rise
Proofing the Dough
Lightly grease a clean bowl with a little bit of oil or cooking spray. Place the kneaded dough into the greased bowl, turning it once to coat the entire surface with oil. This prevents a dry skin from forming. Cover the bowl tightly with plastic wrap or a clean kitchen towel. Find a warm, draft-free spot in your kitchen for the dough to rise. This could be in a slightly warm oven (turned off, of course!) or simply on your countertop if your kitchen is naturally warm. Let the dough rise for about 1 to 1.5 hours, or until it has doubled in size. The exact time will depend on the temperature of your proofing environment. Gently poke the dough with your finger; if an indentation remains, it’s ready.
Shaping and Second Rise
Shaping the Rolls
Once the dough has doubled, gently punch it down to release the air. Turn the dough out onto a lightly floured surface again. For classic French bread dinner rolls, you can divide the dough into 8 to 12 equal portions. To do this, you can either use a bench scraper or a knife. Once you have your portions, shape each piece into a round or oval roll. To get a smooth surface on your rolls, take one piece of dough, flatten it slightly, then fold the edges into the center and pinch them together. Turn the seam-side down and gently cup your hands around the dough, rolling it in a circular motion on the counter to create tension and a smooth surface. Repeat with the remaining dough portions.
Second Proof
Arrange the shaped rolls on a baking sheet lined with parchment paper, leaving about 2 inches of space between each roll to allow for expansion. Cover the baking sheet loosely with plastic wrap or a clean kitchen towel. Let the rolls rise for another 30 to 45 minutes, or until they look puffy and have increased in size again, though not necessarily doubled this time. They should look light and airy, ready for baking.
Baking the French Bread Dinner Rolls
Preheating and Baking
While the rolls are on their second rise, preheat your oven to 400 degrees Fahrenheit (200 degrees Celsius). For an extra crispy crust, you can create steam in your oven. To do this, place an oven-safe skillet or baking pan on the bottom rack of your oven while it preheats. Just before you place the rolls in, carefully pour about 1 cup of hot water into the preheated skillet. This will create a burst of steam. Carefully place the baking sheet with the rolls into the preheated oven. Bake for 15 to 20 minutes, or until the rolls are golden brown and sound hollow when tapped on the bottom. The steam will help create that beautiful, crackly crust characteristic of French bread.
Cooling
Once baked to perfection, remove the French bread dinner rolls from the oven and transfer them immediately to a wire cooling rack. This prevents the bottoms from becoming soggy. Allow them to cool for at least 5 to 10 minutes before serving. They are absolutely divine served warm, with a pat of butter melting into their soft, airy interior. Enjoy your homemade French bread dinner rolls!

Conclusion:
And there you have it – your very own batch of delicious and incredibly versatile French Bread Dinner Rolls! I hope you’ve enjoyed following along with this recipe and are excited to impress your family and friends with these golden, fluffy beauties. These rolls are the perfect accompaniment to any meal, from a hearty stew to a light summer salad. Their subtle, classic flavor makes them a wonderful canvas for whatever you’re serving.
For serving suggestions, I love to serve these warm, brushed with a little melted butter, perhaps infused with some garlic or herbs. They are also fantastic alongside soups and stews, perfect for soaking up every last delicious drop. Don’t be afraid to get creative with variations! You can add a sprinkle of sesame seeds or poppy seeds before baking for a delightful crunch and visual appeal. A touch of rosemary or thyme kneaded into the dough can also add a wonderful aromatic dimension.
Baking your own French Bread Dinner Rolls is a rewarding experience, and the aroma filling your kitchen is simply divine. Give them a try, and I’m confident they’ll become a staple in your baking repertoire. Happy baking!
Frequently Asked Questions:
Can I make these French Bread Dinner Rolls ahead of time?
Yes, absolutely! You can bake the rolls and then store them in an airtight container at room temperature for up to two days. For longer storage, you can freeze them once completely cooled. Reheat them gently in a warm oven or toaster oven before serving.
What if my dough isn’t rising well?
There could be a few reasons for this. Ensure your yeast is fresh and active by proofing it in warm liquid (around 105-115°F or 40-46°C) with a pinch of sugar. Also, check that your kitchen is warm enough; cold drafts can hinder rising. Sometimes, a bit more kneading can help develop the gluten structure needed for a good rise.
Can I use different types of flour?
While this recipe is designed for all-purpose flour for that classic French bread texture, you can experiment with a small substitution of whole wheat flour, up to about 20%, for a slightly heartier roll. Be aware that this might slightly alter the texture and require a touch more liquid.
Easy French Bread Dinner Rolls Recipe-Soft & Delicious
Soft and delicious French bread dinner rolls made with simple ingredients and an easy-to-follow process.
Ingredients
-
1 cup Warm Water (under 110 degrees Fahrenheit)
-
1 teaspoon Active Dry Yeast
-
1/2 teaspoon Honey
-
2 1/4 cups All-Purpose Flour
-
1 teaspoon Salt
Instructions
-
Step 1
Activate the yeast by combining warm water, active dry yeast, and honey in a bowl. Let sit for 5-10 minutes until foamy. -
Step 2
Combine all-purpose flour and salt in a larger bowl. Pour the activated yeast mixture over the dry ingredients and mix until a shaggy dough forms. -
Step 3
Knead the dough on a lightly floured surface for 8-10 minutes until smooth and elastic. -
Step 4
Place the dough in a greased bowl, cover, and let rise in a warm place for 1-1.5 hours, or until doubled in size. -
Step 5
Punch down the dough, divide into 8-12 portions, and shape into rounds or ovals. Place on a baking sheet and let rise for another 30-45 minutes. -
Step 6
Preheat oven to 400°F (200°C). Bake for 15-20 minutes until golden brown and hollow-sounding when tapped. Cool on a wire rack before serving.
Important Information
Nutrition Facts (Per Serving)
It is important to consider this information as approximate and not to use it as definitive health advice.
Allergy Information
Please check ingredients for potential allergens and consult a health professional if in doubt.