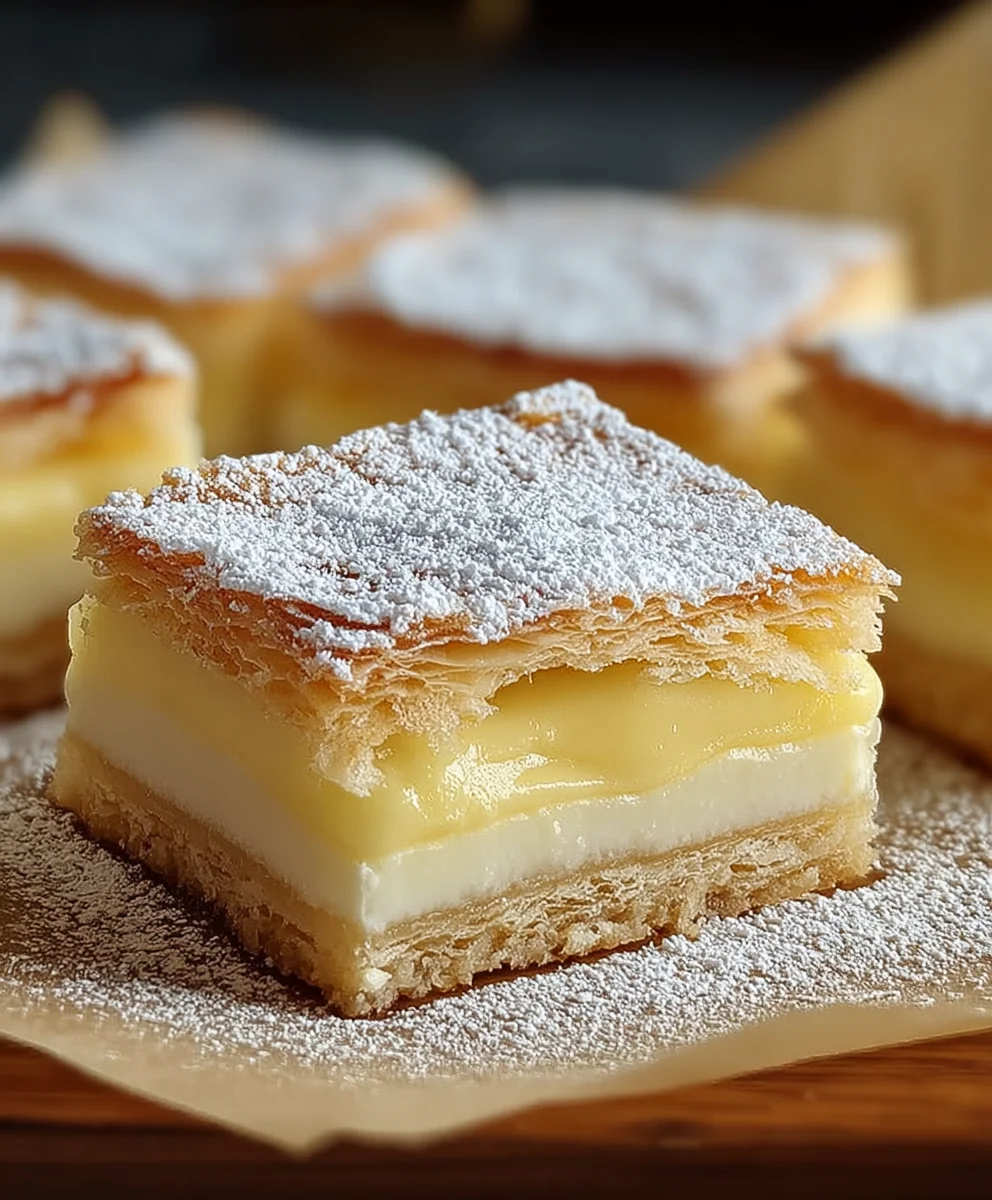
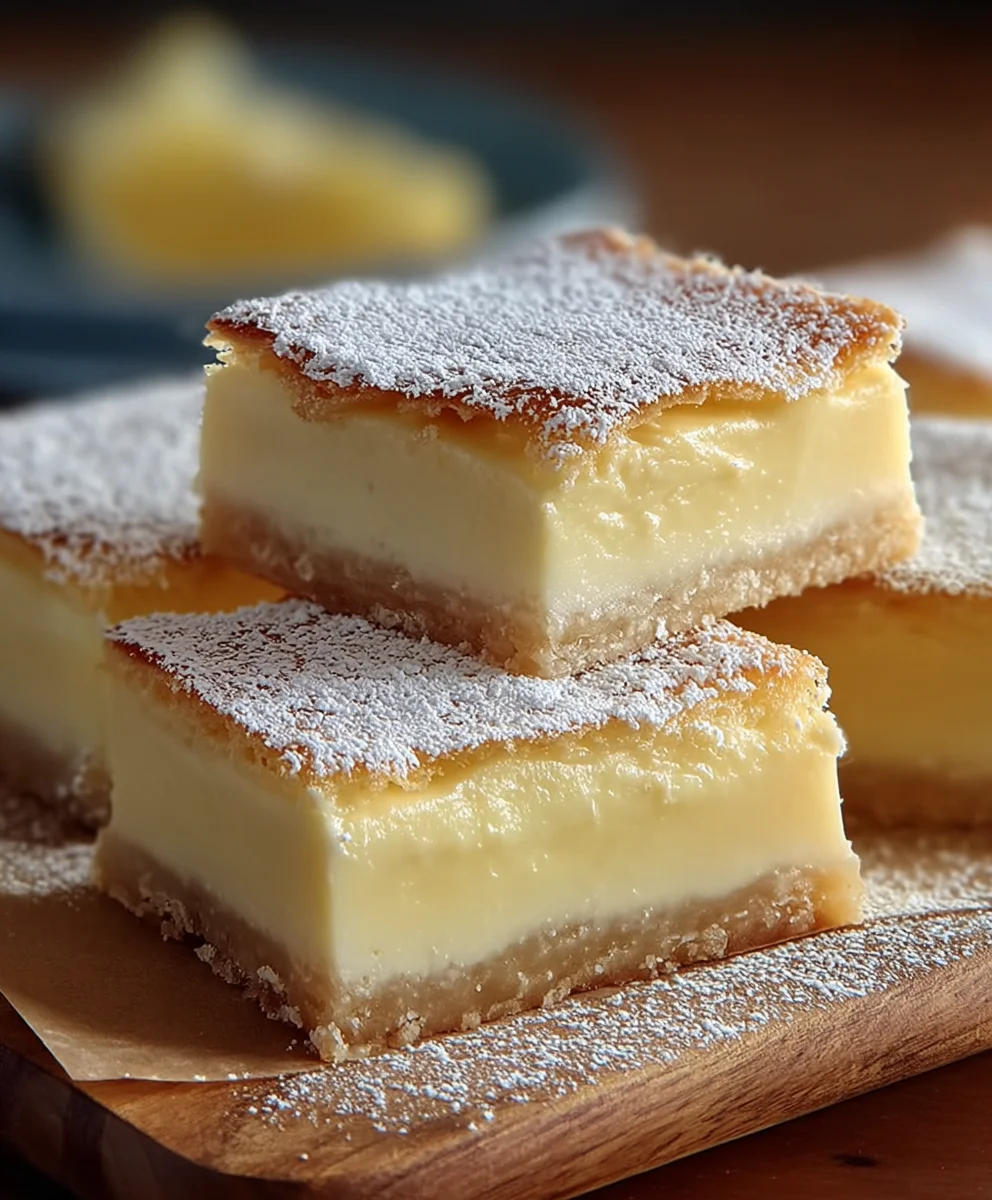
Easy Vanilla Custard Cream Squares Recipe
Vanilla Custard Cream Squares are more than just a dessert; they’re a nostalgic journey back to simple pleasures and comforting aromas. Who doesn’t adore the delicate dance between a tender, buttery pastry and a luxuriously smooth, sweet vanilla custard? These delightful squares have a way of making any occasion feel a little more special, whether it’s a celebratory gathering or a quiet afternoon tea. What truly sets these Vanilla Custard Cream Squares apart is the perfect harmony of textures and flavors: the slight crispness of the baked dough giving way to that impossibly creamy, melt-in-your-mouth custard infused with the warm, inviting essence of pure vanilla. They’re deceptively easy to make, yet undeniably elegant, promising a truly satisfying culinary experience that will have everyone asking for seconds.
Ingredients:
- 2 sheets puff pastry, thawed but kept cold
- 4 cups whole milk, divided
- 1 1/2 cups granulated sugar
- 1 1/4 cups all-purpose flour
- 8 large eggs, carefully separated
- 3 teaspoons pure vanilla extract
- 2 tablespoons premium rum extract extract (optional)
- 1/4 teaspoon salt
- 2 cups heavy whipping cream, thoroughly chilled
- 2 tablespoons powdered sugar, plus extra for dusting
Preparing the Puff Pastry Base
Baking the Puff Pastry
The foundation of our Vanilla Custard Cream Squares relies on perfectly baked puff pastry. Begin extract by preheating your oven to 400 degrees Fahrenheit (200 degrees Celsius). While the oven heats, gently unfold your two thawed sheets of puff pastry onto a lightly floured surface. It’s crucial to work with the pastry while it’s still cold, as this helps it puff up beautifully. You want to avoid any warming that would make it greasy.
Once unfolded, carefully place each sheet onto a separate baking sheet lined with parchment paper. You want to ensure there’s enough space between the pastry sheets on the baking trays to allow for even air circulation. For a perfectly flat and even base, gently prick the entire surface of each pastry sheet all over with a fork. This step is essential to prevent the pastry from puffing up too much in the center, which can lead to an uneven custard layer. You’re aiming for a crisp, flat canvas.
Now, place a piece of parchment paper on top of each pastry sheet, and then weigh it down with another baking sheet. This “sandwich” method ensures the pastry bakes flat without excessive bubbling. Bake for about 15-20 minutes. You’re looking for the pastry to be a pnon-alcoholic ale golden color. Once it reaches this stage, remove the top baking sheet and the parchment paper. Continue to bake for another 5-7 minutes, or until the pastry is a beautiful, deep golden brown and is firm to the touch. This second bake ensures it’s fully cooked through and has a lovely crispness. Let the baked puff pastry sheets cool completely on wire racks. Once cool, carefully trim the edges to create neat rectangles; you can save the trimmings for snacking or other culinary adventures. Then, cut each rectangle in half horizontally, yielding four equal layers of crisp pastry.
Crafting the Rich Vanilla Custard
Making the Custard Base
This is where the magic happens! We’ll start by combining 3 cups of the whole milk with 1 cup of the granulated sugar in a large, heavy-bottomed saucepan. Place this mixture over medium heat and stir occasionally until the sugar has completely dissolved and the milk is warm but not boiling. You’ll see steam rising and small bubbles forming around the edges – that’s your cue to turn off the heat and set it aside.
In a separate large bowl, whisk together the all-purpose flour, the remaining 1/2 cup of granulated sugar, and the 1/4 teaspoon of salt. This dry mixture will form the thickening base for our custard. Now, in another medium bowl, whisk the 8 egg yolks (remember, we’re separating the eggs, so the whites will be used later for the cream!) with the remaining 1 cup of whole milk until thoroughly combined. It’s important to have this milk mixture ready to temper the hot milk.
Slowly and gradually, ladle about half of the warm milk mixture into the egg yolk mixture, whisking constantly. This tempering process gently raises the temperature of the egg yolks without cooking them into scrambled eggs. Once tempered, pour this entire egg yolk and milk mixture back into the saucepan with the remaining warm milk. Place the saucepan back over medium-low heat and continue to cook, stirring constantly with a wooden spoon or whisk, until the custard thickens considerably and coats the back of your spoon. This usually takes about 8-10 minutes. Be patient; low and slow is key to a silky smooth custard. Resist the urge to rush this step, as overcooking can curdle the custard.
Once thickened, remove the custard from the heat and stir in the 3 teaspoons of pure vanilla extract and the optional 2 tablespoons of rum extractmium rum extract. This is where that wonderful aroma will fill your kitchen! To ensure an ultra-smooth texture, strain the custard through a fine-mesh sieve into a clean bowl. Press any solids through gently to extract all the creamy goodness. Cover the surface of the custard directly with plastic wrap, pressing it down to prevent a skin from forming. Let it cool to room temperature, then refrigerate until thoroughly chilled.
Whipping the Cream and Assembling the Squares
Preparing the Chantilly Cream
While the custard is chilling, we’ll prepare the light and airy Chantilly cream that crowns our dessert. In a very clean, chilled bowl, combine the 2 cups of thoroughly chilled heavy whipping cream and the 2 tablespoons of powdered sugar. Using an electric mixer (or a whisk and a lot of arm power!), whip the cream on medium-high speed until stiff peaks form. This means when you lift the beaters out, the cream will hold its shape and the peaks will stand straight up. Be careful not to over-whip, as this can turn the cream into butter. The powdered sugar adds a touch of sweetness and helps the cream maintain its structure.
Assembling the Vanilla Custard Cream Squares
Now for the satisfying part – assembly! Take your chilled custard out of the refrigerator. It should be thick and luscious. Gently fold about half of the whipped Chantilly cream into the chilled custard. You’re not aiming to fully incorporate it; instead, you want to lighten the custard slightly. This makes it easier to spread and gives a lovely layered texture.
Place one layer of the baked and trimmed puff pastry onto your serving platter or cake board. Spread a generous layer of the lightened custard mixture evenly over this pastry base, ensuring it goes all the way to the edges. Then, carefully place a second puff pastry layer on top of the custard. Repeat this process: spread another layer of lightened custard, then top with the third puff pastry layer, followed by the final layer of pastry.
Now, take the remaining whipped Chantilly cream and spread it evenly over the top pastry layer, creating a beautiful, smooth finish. You can also pipe decorative swirls if you prefer. For a professional touch, lightly dust the top of the dessert with extra powdered sugar using a fine-mesh sieve. It’s best to chill the assembled Vanilla Custard Cream Squares for at least 30 minutes before slicing and serving. This allows the layers to meld and makes for cleaner cuts. Use a sharp knife to cut into squares, serving each delightful piece with a smile.
Conclusion:
There you have it – a delightful journey into creating perfect Vanilla Custard Cream Squares! We’ve walked through each step, from crafting the velvety custard to achieving that ideal crisp pastry. These squares are a testament to simple ingredients transforming into something truly special. They’re elegant enough for a special occasion but comforting enough for an everyday treat. Don’t be intimidated; the process is forgiving and the rewards are immense. I encourage you to give this recipe a try and experience the pure joy of homemade Vanilla Custard Cream Squares. They are wonderful on their own, but also shine when paired with fresh berries or a dusting of powdered sugar. For an extra touch, consider a light drizzle of caramel or a dollop of whipped cream. Enjoy every delicious bite!
Frequently Asked Questions:
How can I ensure my custard is smooth and lump-free?
The key to a smooth custard is continuous whisking and tempering the eggs properly. Make sure to whisk the egg yolks and sugar until pnon-alcoholic ale, then gradually add the warm milk while whisking constantly. Cook over low to medium heat, stirring almost constantly, until it thickens. If you do get a few small lumps, you can strain the custard through a fine-mesh sieve before chilling.
Can I make Vanilla Custard Cream Squares ahead of time?
Yes, absolutely! The custard can be made a day or two in advance and stored in the refrigerator. The pastry can also be blind-baked and stored in an airtight container at room temperature once cooled. Assemble the Vanilla Custard Cream Squares a few hours before serving for the best texture, allowing the pastry to soften slightly but remain crisp.
Are there any fruit variations that work well with Vanilla Custard Cream Squares?
Certainly! Fresh raspberries, sliced strawberries, or even a layer of lightly stewed apples would be delicious additions. You could also incorporate a touch of citrus zest, like lemon or orange, into the custard for a brighter flavor profile that complements fruity toppings beautifully.
Easy Vanilla Custard Cream Squares
A delightful and easy-to-make dessert featuring layers of crisp puff pastry and creamy vanilla custard, topped with whipped cream.
Ingredients
-
2 sheets puff pastry, thawed but kept cold
-
4 cups whole milk, divided
-
1 1/2 cups granulated sugar
-
1 1/4 cups all-purpose flour
-
8 large eggs, carefully separated
-
3 teaspoons pure vanilla extract
-
2 tablespoons non-alcoholic rum extract (optional)
-
1/4 teaspoon salt
-
2 cups heavy whipping cream, thoroughly chilled
-
2 tablespoons powdered sugar, plus extra for dusting
Instructions
-
Step 1
Preheat oven to 400°F (200°C). Unfold puff pastry sheets onto a lightly floured surface. Place each sheet on a separate parchment-lined baking sheet. Prick the entire surface of each pastry sheet with a fork to prevent excessive puffing. Cover each pastry with parchment paper and a second baking sheet. Bake for 15-20 minutes until golden. Remove top baking sheet and parchment, then bake for another 5-7 minutes until deep golden brown and firm. Cool completely, trim edges, and cut each rectangle in half horizontally. -
Step 2
In a saucepan, combine 3 cups of milk and 1 cup of sugar. Heat over medium heat until sugar dissolves and milk is warm. In a bowl, whisk flour, remaining 1/2 cup sugar, and salt. In another bowl, whisk egg yolks with 1 cup milk. Gradually ladle half the warm milk into the egg yolk mixture, whisking constantly to temper. Pour tempered mixture back into the saucepan with remaining milk. -
Step 3
Cook the custard over medium-low heat, stirring constantly, until thickened and coats the back of a spoon (about 8-10 minutes). Remove from heat, stir in vanilla extract and optional non-alcoholic rum extract. Strain custard through a fine-mesh sieve into a clean bowl. Cover surface directly with plastic wrap to prevent skin formation. Cool to room temperature, then refrigerate until chilled. -
Step 4
In a chilled bowl, whip heavy cream and powdered sugar on medium-high speed until stiff peaks form. Be careful not to over-whip. -
Step 5
Gently fold about half of the whipped cream into the chilled custard to lighten it. Place one puff pastry layer on a serving platter. Spread a generous layer of lightened custard over the pastry. Top with another pastry layer, then repeat with custard and pastry, ending with the final pastry layer. -
Step 6
Spread the remaining whipped cream evenly over the top pastry layer. Dust with extra powdered sugar. Chill for at least 30 minutes before slicing into squares and serving.
Important Information
Nutrition Facts (Per Serving)
It is important to consider this information as approximate and not to use it as definitive health advice.
Allergy Information
Please check ingredients for potential allergens and consult a health professional if in doubt.