Soft Chewy Lemon Cookies- Easy & Delicious Recipe
Soft & Chewy Lemon Cookies are the sunshine you can bake into your day. There’s something undeniably joyous about biting into a cookie that offers that perfect textural balance: a delicate crisp edge giving way to a wonderfully soft and chewy center. And when that center bursts with the vibrant, zesty essence of fresh lemon? Pure bliss. These aren’t just any cookies; they’re little pockets of happiness, designed to brighten even the cloudiest afternoon. People adore them because they deliver an immediate mood lift, a burst of citrusy flavor that’s both refreshing and comforting. What truly makes these Soft & Chewy Lemon Cookies special is their ability to be both sophisticated and wonderfully approachable. They’re elegant enough for a tea party, yet simple and satisfying enough for a casual craving. Get ready to experience pure citrus perfection!
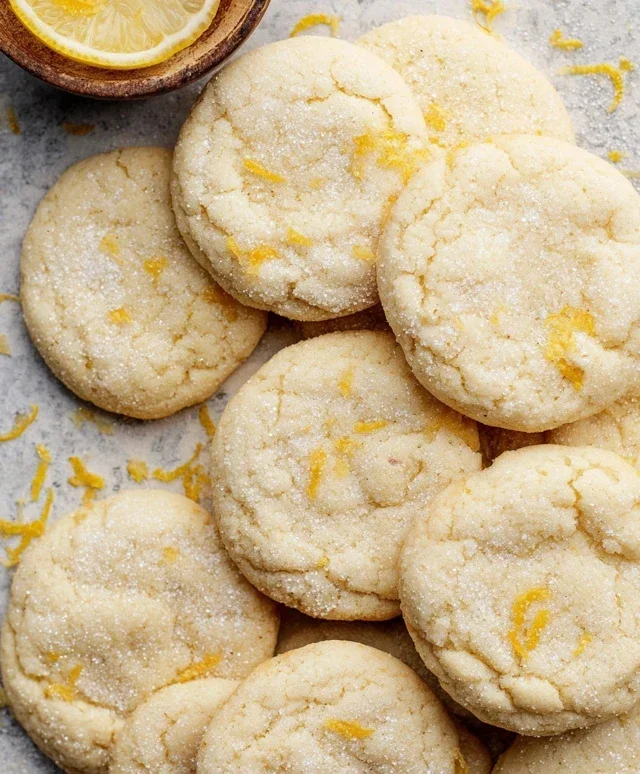
Soft & Chewy Lemon Cookies
There’s something incredibly uplifting about the bright, zesty flavor of lemon, isn’t there? It’s like sunshine in edible form. And when you combine that delightful tang with a cookie that’s perfectly soft, delightfully chewy, and just a little bit sweet, you’ve got a winner. These Soft & Chewy Lemon Cookies are exactly that. They’re wonderfully simple to make, yet the results are sophisticated enough for any occasion. Whether you’re looking for a cheerful afternoon treat, a sweet addition to a brunch spread, or a way to brighten someone’s day, these cookies deliver. The secret to their irresistible texture lies in a few key ingredients and techniques, which we’ll explore in detail.
Ingredients:
Instructions:
Creaming the Butter and Sugar for a Tender Base
Begin extract by preheating your oven to 350°F (175°C). Line baking sheets with parchment paper, which is crucial for preventing sticking and ensuring even baking. In a large mixing bowl, combine the softened unsalted butter and 1 ½ cups of granulated sugar. Using an electric mixer (a stand mixer with a paddle attachment is ideal, but a hand mixer works perfectly too), cream these two ingredients together until they are light and fluffy. This step is called creaming, and it’s where we incorporate air into the mixture. This air will expand during baking, contributing to the cookies’ tender texture and lift. Don’t rush this process; aim for at least 2-3 minutes of vigorous mixing. You want to see a noticeable change in color and consistency – it should become pnon-alcoholic aler and much airier. Once creaming is complete, add the lemon zest. The zest is where the intense, bright lemon flavor resides. Gently rub the zest between your fingertips as you add it to the bowl to help release its essential oils and maximize its aromatic punch. Mix for another 30 seconds to distribute the zest evenly.
Adding Wet Ingredients for Richness and Flavor
Next, it’s time to incorporate the eggs and lemon extract. Add the room temperature large egg and the large egg yolk to the creamed butter and sugar mixture. Using room temperature eggs is important because they emulsify better with the fat, leading to a smoother, more consistent dough. If your eggs are cold, you can quickly warm them by placing them in a bowl of warm water for about 5-10 minutes. Beat on medium speed until the eggs are fully incorporated, scraping down the sides of the bowl as needed. Now, add the lemon extract. If you prefer a more nuanced flavor profile, you can use 1 teaspoon of lemon extract and 1 teaspoon of vanilla extract to complement the lemon without overpowering it. Beat again until everything is well combined and the mixture is smooth and glossy. This stage is all about building a rich, flavorful foundation for our cookies.
Whisking Dry Ingredients for Perfect Structure
In a separate medium-sized bowl, whisk together the all-purpose flour, baking soda, cornstarch, and salt. Spoon your flour into the measuring cup and level it off with a straight edge rather than scooping directly from the bag, as this ensures you have the correct amount. Baking soda is essential for leavening, helping the cookies to spread and become chewy. Cornstarch might seem like an unusual addition, but it plays a vital role in creating that desired soft and tender crum extractb by inhibiting gluten development. The salt balances the sweetness and enhances all the other flavors. Whisking these dry ingredients together thoroughly ensures that the leavening agents and salt are evenly distributed throughout the flour, which prevents pockets of uneven texture or flavor in your finished cookies.
Combining Wet and Dry for the Dough and the Magic of Lemon Juice
Gradually add the dry ingredients to the wet ingredients in the large mixing bowl, mixing on low speed until just combined. It’s crucial not to overmix at this stage. Overmixing can develop the gluten in the flour too much, resulting in tougher cookies. You want to mix until there are just a few streaks of flour remaining, then switch to a spatula or wooden spoon to finish incorporating the last bits of flour. Now for another touch of lemon magic: stir in the 2 tablespoons of fresh lemon juice. This might seem like a small amount, but it provides an extra burst of fresh, bright lemon flavor and helps to tenderize the dough. The dough will be soft and slightly sticky at this point, which is exactly what we want for chewy cookies.
Shaping, Rolling, and Baking for Golden Perfection
Take the ¼ cup of granulated sugar you set aside for rolling and place it in a shallow bowl. Scoop the cookie dough using a cookie scoop or two spoons into roughly 1 ½-inch balls. Roll each ball of dough gently between your palms to form a smooth sphere. Then, roll each dough ball in the reserved granulated sugar. This coating of sugar not only adds a delightful crunch and sparkle to the finished cookie but also helps them achieve that classic golden-brown hue. Place the sugared dough balls about 2 inches apart on your prepared baking sheets. If you like, you can press down slightly on the top of each ball with the palm of your hand or the bottom of a glass to help them flatten a bit before baking, encouragin extractg more even spreading. Bake for 9-12 minutes, or until the edges are lightly golden and the centers appear set but still slightly soft. They will continue to set up as they cool on the baking sheet. Allow the cookies to cool on the baking sheets for 5-10 minutes before transferring them to a wire rack to cool completely. This resting period on the hot baking sheet is important for the cookies to firm up properly. Enjoy these little rays of sunshine!

Conclusion:
I hope you’ve been inspired to try this wonderfully easy recipe for Soft & Chewy Lemon Cookies! These delightful treats are a perfect balance of tart and sweet, with a melt-in-your-mouth texture that’s simply irresistible. The bright, zesty flavor of lemon makes them a refreshing change from your everyday cookie, perfect for any occasion, from a simple afternoon pick-me-up to a festive gathering. They’re so straightforward to make, even begin extractner bakers can achieve fantastic results, and the aroma that fills your kitchen while they bake is pure bliss. I encourage you to gather your ingredients and give these a whirl – I promise you won’t be disappointed!
These cookies are wonderfully versatile. Enjoy them on their own with a cup of tea or coffee, or serve them as a light dessert alongside fresh berries and a dollop of whipped cream. They also make a beautiful addition to a cookie platter or as a thoughtful homemade gift.
Frequently Asked Questions:
Why are my lemon cookies not chewy?
For maximum chegrape juicess, ensure you’re not overbaking them. Pull them out of the oven when the edges are set but the centers still look slightly soft. They will continue to firm up as they cool on the baking sheet. Also, using a higher ratio of brown sugar to granulated sugar contributes to a chewier texture.
Can I add other flavors to these Soft & Chewy Lemon Cookies?
Absolutely! You can add a teaspoon of poppy seeds for a delightful crunch and visual appeal, or incorporate a touch of lavender for a sophisticated floral note. A drizzle of white chocolate or a simple lemon glaze can also elevate these cookies even further.
How should I store these lemon cookies?
Store your cooled lemon cookies in an airtight container at room temperature for up to 3-4 days. For longer storage, you can freeze baked cookies for up to 3 months. Simply place them in a single layer on a baking sheet to freeze, then transfer them to a freezer-safe bag or container.
Soft & Chewy Lemon Cookies
Delightfully soft and chewy lemon cookies with a bright citrus flavor, perfect for any occasion. These cookies feature a tender crumb and a zesty lemon kick.
Ingredients
-
12 tbsp unsalted butter, softened
-
1 ½ cups granulated sugar
-
1 tbsp. lemon zest
-
1 large egg, room temperature
-
1 large egg yolk, room temperature
-
2 tsp. lemon extract
-
3 cups all-purpose flour, spooned and leveled
-
1 tsp. baking soda
-
1 tsp. cornstarch
-
3/4 tsp. salt
-
2 tbsp. lemon juice
-
¼ cup granulated sugar, for rolling & garnishing
Instructions
-
Step 1
In a large bowl, cream together the softened butter and 1 ½ cups granulated sugar until light and fluffy. -
Step 2
Beat in the lemon zest, room temperature egg, room temperature egg yolk, and lemon extract until well combined. -
Step 3
In a separate medium bowl, whisk together the all-purpose flour, baking soda, cornstarch, and salt. -
Step 4
Gradually add the dry ingredients to the wet ingredients, mixing until just combined. Stir in the lemon juice. -
Step 5
Roll tablespoons of dough into balls and then roll each ball in the ¼ cup granulated sugar set aside for rolling. -
Step 6
Place the dough balls onto baking sheets lined with parchment paper, leaving about 2 inches between each cookie. -
Step 7
Bake in a preheated oven at 375°F (190°C) for 10-12 minutes, or until the edges are lightly golden and the centers are still soft. -
Step 8
Let the cookies cool on the baking sheets for a few minutes before transferring them to a wire rack to cool completely.
Important Information
Nutrition Facts (Per Serving)
It is important to consider this information as approximate and not to use it as definitive health advice.
Allergy Information
Please check ingredients for potential allergens and consult a health professional if in doubt.