Sticky Coconut Cake- Deliciously Moist & Easy Recipe
Sticky Coconut Cake is one of those desserts that instantly transports me to a tropical paradise. There’s something incredibly comforting and undeniably decadent about sinking your fork into a slice of this delightful confection. People adore Sticky Coconut Cake for its perfect balance of sweet, moist crum extractb and that irresistible, slightly chewy caramelized topping. It’s a dish that evokes warmth, sunshine, and pure indulgence, making it a perennial favorite for celebrations, cozy evenings, or just when a craving strikes for something truly special. What truly sets this Sticky Coconut Cake apart is the way the rich, nutty flavor of toasted coconut melds with the tender cake, creating layers of texture and taste that dance on your palate. Get ready to fall in love!
Sticky Coconut Cake
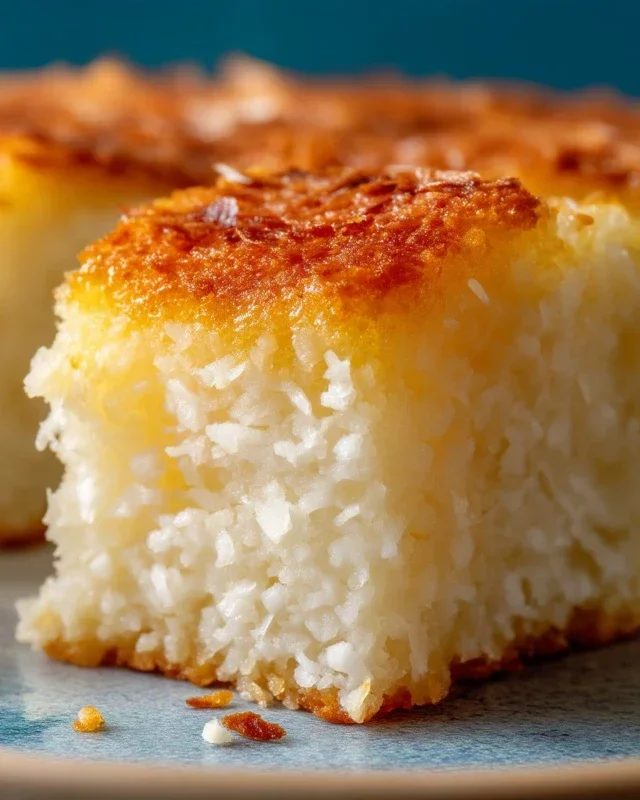
There’s something incredibly comforting and utterly delicious about a sticky coconut cake. The combination of creamy coconut milk, sweet shredded coconut, and the unique chegrape juicess of glutinous rice flour creates a dessert that’s both decadent and surprisingly simple to make. This cake isn’t your typical fluffy sponge; it has a delightful density and a satisfyingly chewy texture that pairs wonderfully with the rich coconut flavor. It’s perfect for any occasion, from a casual afternoon treat to a special dessert to impress your guests. The natural sweetness of the ingredients means it doesn’t need a heavy frosting, allowing the pure coconut goodness to shine through. Get ready to fill your kitchen with the irresistible aroma of coconut as we create this delightful Sticky Coconut Cake.
Ingredients:
Preparing the Batter
The foundation of our Sticky Coconut Cake lies in a well-balanced batter that combines all the key flavors and textures. We begin extract by creaming together the egg yolks and sugar. This step is crucial for creating a smooth and cohesive base. In a large bowl, whisk together the 2 egg yolks and the 1¼ cup of granulated sugar until the mixture becomes pnon-alcoholic ale yellow and forms ribbons when you lift the whisk. This process incorporates air and helps to dissolve the sugar, preventing a gritty texture in the finished cake. Next, we’ll introduce the liquid elements. Gradually pour in the 2¼ cup of full fat canned coconut milk while continuously whisking. Ensure that the coconut milk is fully incorporated into the egg and sugar mixture, creating a smooth, creamy liquid. At this stage, stir in the 1 teaspoon of vanilla extract. The vanilla adds a subtle depth of flavor that complements the coconut beautifully without overpowering it.
Incorporating the Dry Ingredients and Coconut
Now it’s time to add the ingredients that will give our cake its signature texture and flavor. We’ll start by gently folding in the shredded coconut. Add the 3 cups of shredded sweetened coconut to the wet ingredients and mix until it’s evenly distributed throughout the batter. Don’t overmix at this stage; we just want everything to come together. The shredded coconut will absorb some of the liquid as it bakes, contributing to the cake’s moistness and delightful chew.
The key to the unique texture of this cake is the glutinous rice flour. In a separate bowl, measure out 1½ cup of glutinous rice flour. It’s important to use glutinous rice flour (sometimes labeled as sweet rice flour) as it has a higher starch content that results in the characteristic chegrape juicess. Regular rice flour will not yield the same result. Gradually add the glutinous rice flour to the wet ingredients, mixing gently until just combined. It’s important to avoid overmixing once the flour is added, as this can lead to a tough cake. You should have a thick, somewhat sticky batter at this point.
Whipping the Egg Whites
This step is essential for giving our cake a little lift and a lighter, though still dense, interior. Take the 2 egg whites that you separated earlier and place them in a clean, dry bowl. Using an electric mixer or a whisk, beat the egg whites until they form stiff peaks. This means that when you lift the whisk, the peaks of the egg whites stand up straight and don’t curl over. Be patient with this process; it can take a few minutes. It’s crucial that the bowl and whisk are completely free of any grease or fat, otherwise, the egg whites will not whip properly.
Once your egg whites are at stiff peak stage, gently fold them into the main batter. Do this in two additions. Take about a third of the whipped egg whites and gently fold them into the batter using a spatula. This lightens the batter slightly. Then, add the remaining egg whites and continue to fold them in gently until no streaks of white remain. The goal is to incorporate the air from the egg whites without deflating them, which will help the cake to bake up with a slightly more tender crum extractb.
Baking the Sticky Coconut Cake
Preheat your oven to 350°F (175°C). Prepare your baking pan by greasing and flouring it, or by lining it with parchment paper. A 9×13 inch baking pan is a good size for this recipe. Pour the batter evenly into the prepared pan. Gently spread the batter to the edges to ensure even baking.
Now, place the pan in your preheated oven. The baking time can vary depending on your oven, but generally, it will take between 45 to 60 minutes. To check for doneness, insert a toothpick into the center of the cake. If it comes out clean or with just a few moist crum extractbs attached, the cake is ready. If it comes out with wet batter, continue baking for additional 5-10 minute intervals, checking frequently. The top of the cake should be golden brown and the edges should start to pull away slightly from the sides of the pan.
Cooling and Serving
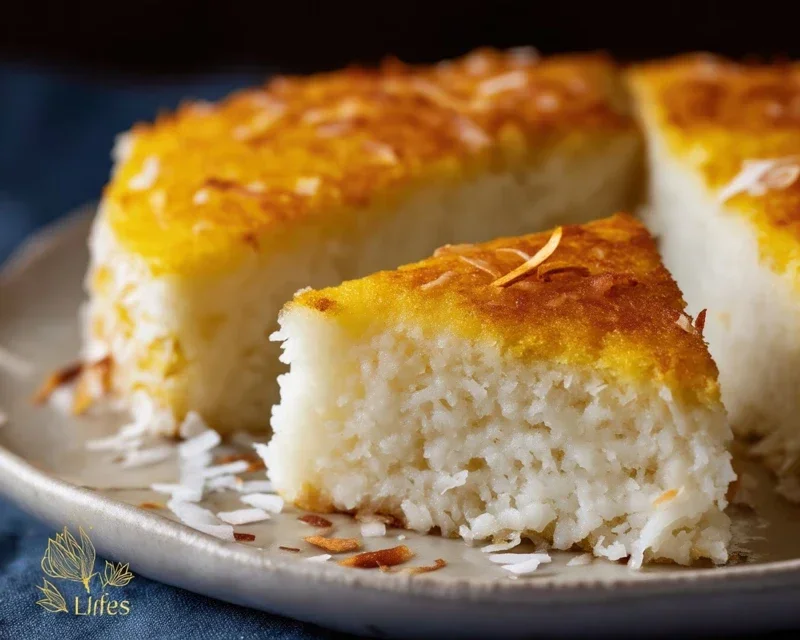
Once baked, carefully remove the Sticky Coconut Cake from the oven. Let it cool in the pan on a wire rack for about 15-20 minutes. This allows the cake to set further and makes it easier to handle. After this initial cooling period, you can invert the cake onto the wire rack to cool completely. Alternatively, you can serve it directly from the pan after it has cooled slightly. This cake is absolutely delicious served warm or at room temperature. You can enjoy it as is, or with a dusting of powdered sugar, or even a dollop of whipped cream or a scoop of vanilla ice cream. The dense, chewy texture and rich coconut flavor make it a truly satisfying dessert experience.
Conclusion:
I hope you’re as excited to bake this Sticky Coconut Cake as I am to eat it! This recipe is truly a winner because it delivers on both incredible flavour and a delightful texture. The combination of rich coconut, the irresistible sticky glaze, and the moist crum extractb creates a dessert that’s both comforting and sophisticated. It’s perfect for any occasion, from a casual afternoon tea to a celebratory gathering. Don’t hesitate to give this Sticky Coconut Cake a try; I promise it will become a new favourite.
For serving, I love it warm with a dollop of fresh whipped cream or a scoop of vanilla bean ice cream. A sprinkle of toasted coconut flakes adds an extra layer of texture and visual appeal. If you’re feeling adventurous, consider adding a swirl of lime zest to the batter for a subtle tropical twist, or even a tablespoon of rum extract to the glaze for an adult-friendly kick. I encourage you to get in the kitchen and experience the joy of creating this beautiful cake.
Frequently Asked Questions:
Can I make this cake ahead of time?
Yes, absolutely! This Sticky Coconut Cake actually improves in flavour and texture after a day. Store it at room temperature, covered tightly, and the glaze will continue to meld beautifully with the cake. It’s perfect for making the day before a party.
What kind of coconut should I use?
For the best flavour and texture in this Sticky Coconut Cake, I recommend using unsweetened shredded coconut for the cake batter. For the glaze, desiccated coconut works wonderfully to create that characteristic sticky coating. Make sure to toast some extra if you’d like to use it as a garnish!
Is it possible to make this cake dairy-free?
While the origin extractal recipe uses butter and milk, you can often adapt it. Substitute the butter with a good quality vegan butter alternative and use a plant-based milk, like coconut milk or almond milk. The texture might vary slightly, but it should still be delicious!
Sticky Coconut Cake
A moist and flavorful cake made with coconut milk and shredded coconut, featuring a delightful sticky texture.
Ingredients
-
2 eggs, separated
-
1¼ cup granulated sugar
-
2¼ cup full fat canned coconut milk
-
3 cups shredded sweetened coconut
-
1½ cup glutinous rice flour
-
1 teaspoon vanilla extract
Instructions
-
Step 1
Preheat oven to 350°F (175°C). Grease and flour a 9×13 inch baking pan. -
Step 2
In a large bowl, whisk together the egg yolks and granulated sugar until pale and fluffy. -
Step 3
Gradually whisk in the coconut milk and vanilla extract until well combined. -
Step 4
In a separate bowl, combine the shredded sweetened coconut and glutinous rice flour. Add this dry mixture to the wet ingredients and stir until just combined. Do not overmix. -
Step 5
In another clean bowl, beat the egg whites until stiff peaks form. Gently fold the beaten egg whites into the batter. -
Step 6
Pour the batter into the prepared baking pan and spread evenly. Bake for 30-40 minutes, or until a toothpick inserted into the center comes out clean. -
Step 7
Let the cake cool in the pan for at least 15 minutes before inverting onto a wire rack to cool completely.
Important Information
Nutrition Facts (Per Serving)
It is important to consider this information as approximate and not to use it as definitive health advice.
Allergy Information
Please check ingredients for potential allergens and consult a health professional if in doubt.