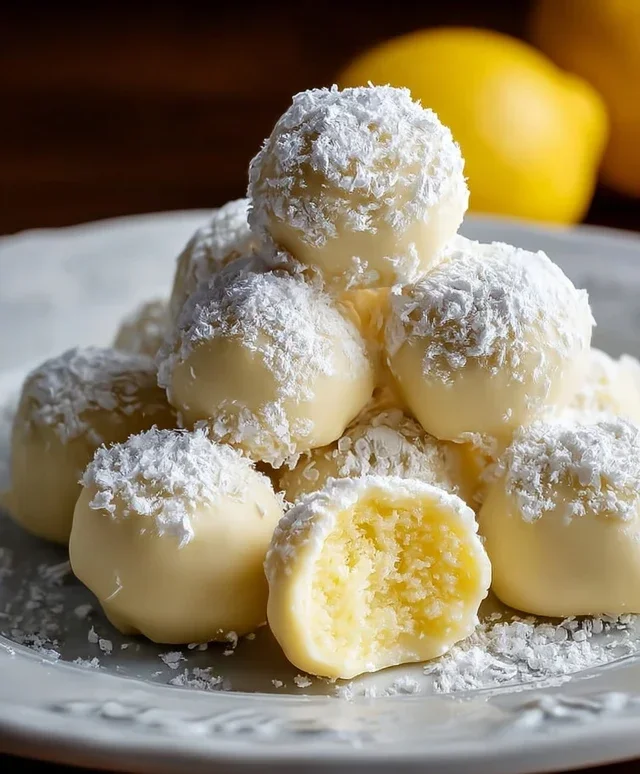
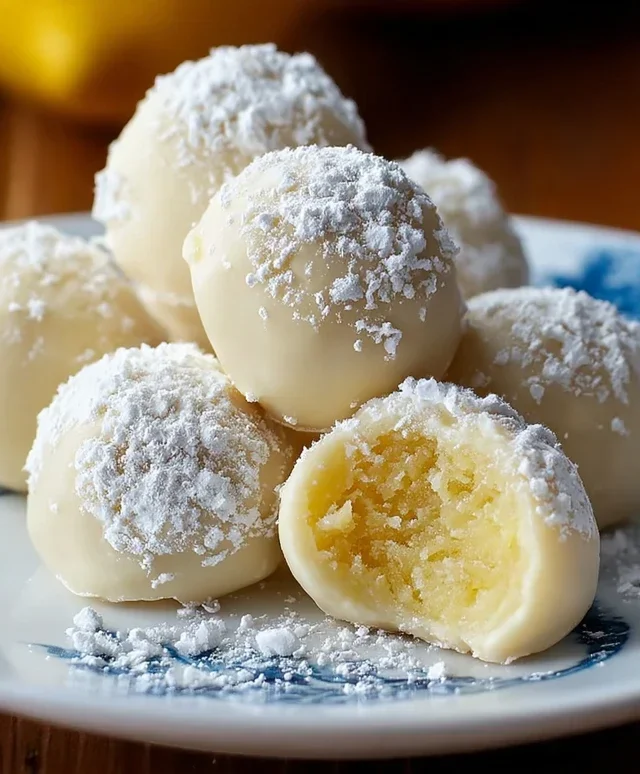
Zesty Lemon Truffles- Easy & Irresistible Dessert
Lemon truffles are a delightful burst of sunshine in every bite. Imagin extracte tiny spheres of creamy, decadent chocolate, infused with the zesty, bright aroma of fresh lemons. That’s the magic we’re capturing today! These aren’t your average, run-of-the-mill chocolates; these lemon truffles offer an exhilarating contrast – the rich sweetness of white chocolate perfectly balanced by that invigorating citrus zing. They’re incredibly addictive, making them the perfect treat for a special occasion, a thoughtful handmade gift, or simply when you need a little pick-me-up. What truly sets these apart is their elegant simplicity. You don’t need to be a pastry chef to create something truly spectacular. With just a few key ingredients and a little bit of love, you can bring these little gems to life, impressing everyone who has the pleasure of tasting them.
Lemon Truffles
Welcome to a little slice of sunshine! These Lemon Truffles are incredibly easy to make and deliver a bright, zesty punch that’s perfect for any occasion. Whether you’re looking for a delightful homemade gift, a sweet treat to impress guests, or just a moment of pure indulgence for yourself, these little beauties are sure to hit the spot. They’re wonderfully creamy, bursting with fresh lemon flavor, and have a delightful melt-in-your-mouth texture. Plus, you can customize them to be dairy-free or use a sugar substitute, making them accessible to more people. Let’s get started!
Ingredients:
Preparing Your Lemon Truffles
This recipe is all about simplicity and flavor. The base for our truffles is a rich and creamy mixture that’s surprisingly quick to assemble. We’ll be combining a few key ingredients to create a smooth, luscious filling that holds its shape beautifully. The star of the show, of course, is the lemon. Fresh lemon zest is non-negotiable here – it provides that vibrant, aromatic essence that truly defines these truffles. Don’t be tempted to use bottled lemon juice for the zest; the oils in the fresh peel are where all that glorious flavor lives.
Step-by-Step Instructions:
1. Creaming the Base: In a medium-sized mixing bowl, combine the softened cream cheese (or coconut butter) and the softened butter (or additional coconut butter). If you’re using cream cheese, ensure it’s truly at room temperature; this will make it much easier to blend smoothly and avoid lumps. If using coconut butter, make sure it’s soft but not melted. Use an electric mixer on medium speed, or a sturdy whisk and some elbow grease, to cream these ingredients together until they are light, fluffy, and well combined. This process incorporates air, which contributes to the delightful texture of the finished truffles. Scrape down the sides of the bowl a few times to ensure everything is evenly mixed.
2. Sweetening and Zesting: Add the powdered sugar (or erythritol) to the creamed mixture. If you’re using erythritol, it might be beneficial to blitz it in a food processor for a minute or two to ensure it’s a fine powder, mimicking the texture of powdered sugar for a smoother truffle. Mix on low speed initially to prevent the sugar from flying everywhere, then increase to medium speed and beat until the mixture is smooth and cohesive. Next, add the zest of one fresh lemon. This is where the magic really happens! Make sure to zest only the yellow part of the peel, avoiding the bitter white pith underneath. The zest will infuse the truffle base with a wonderfully bright and fragrant lemon aroma and taste. Mix until the zest is evenly distributed throughout the mixture.
3. Adding White Chocolate (Optional): If you’re opting for the white chocolate, this is the stage to incorporate it. You can either melt the white chocolate chips gently in a double boiler or in the microwave in short, 30-second intervals, stirring between each. Once melted and smooth, fold the melted white chocolate into the lemon mixture. If you prefer not to melt the chocolate separately, you can also add the white chocolate chips directly to the mixture and beat until they are mostly incorporated. The residual warmth from the cream cheese/coconut butter mixture will help them soften and distribute, creating little pockets of sweetness within the truffle. This step adds another layer of richness and a subtle sweetness that complements the tartness of the lemon beautifully.
4. Coloring and Chilling: If you desire a pop of color, now is the time to add a drop of natural food coloring or a tiny pinch of turmeric. Turmeric will give a lovely pnon-alcoholic ale yellow hue without altering the taste significantly, while food coloring offers more vibrant options. Add your coloring agent sparingly and mix thoroughly until you achieve your desired shade. Be careful not to over-mix once you’ve added coloring, as this can sometimes affect the texture. Once everything is well combined and you’re happy with the color, cover the bowl tightly with plastic wrap, pressing it directly onto the surface of the mixture to prevent a skin from forming. Place the bowl in the refrigerator for at least 1 to 2 hours, or until the mixture is firm enough to roll into balls. This chilling time is crucial for the truffles to firm up, making them easy to handle and shape.
5. Rolling and Finishing: Once the truffle mixture is firm, scoop out small portions using a tablespoon or a small cookie scoop. Roll each portion between your palms to form neat, bite-sized balls. Don’t worry if they aren’t perfectly round; a slightly rustic look is part of their charm! You can then either enjoy them as they are, or for an extra touch, you can roll them in additional powdered sugar, finely shredded coconut, or even some chopped pistachios for added texture and visual appeal. Place the finished truffles on a parchment-lined baking sheet. For the best flavor and texture, I recommend refrigerating the finished truffles for at least another 30 minutes before serving. This allows the flavors to meld and the truffles to set completely. Store them in an airtight container in the refrigerator, and they should stay fresh for up to a week. Enjoy these delightful bursts of lemon!
Conclusion:
There you have it – a simple yet incredibly elegant recipe for homemade Lemon Truffles! I truly believe these little bursts of sunshine are fantastic because they perfectly balance the creamy sweetness of white chocolate with the bright, zesty tang of fresh lemon. They’re surprisingly easy to whip up, making them an ideal project for both begin extractner and experienced bakers looking for a delightful treat. The smooth, melt-in-your-mouth texture is simply divine, and the vibrant citrus flavor is incredibly refreshing. These lemon truffles are perfect for gifting to loved ones, adding a touch of sophistication to a dessert platter, or simply enjoying as a personal indulgence.
Don’t be afraid to experiment with variations! You could try adding a hint of poppy seed for a subtle crunch and visual appeal, or perhaps a touch of lavender for a floral note. A drizzle of dark chocolate over the white chocolate coating can also add another layer of flavor and texture. I highly encourage you to give this recipe a try. You’ll be amazed at how rewarding it is to create such beautiful and delicious confections right in your own kitchen. Enjoy every bite!
Frequently Asked Questions about Lemon Truffles:
Q: Can I make these lemon truffles ahead of time?
A: Absolutely! Lemon truffles store wonderfully. Once they’ve set, you can keep them in an airtight container in the refrigerator for up to a week. Allowing them to come to room temperature for about 15-20 minutes before serving will ensure the best texture.
Q: My truffle mixture seems too soft. What should I do?
A: If your ganache mixture is too soft to roll, it likely needs a bit more chilling time. Pop it back into the refrigerator for another 30-60 minutes, or until it’s firm enough to handle. You can also try adding a tiny bit more powdered sugar to help firm it up, but do so sparingly to avoid making them too sweet.
Q: What’s the best way to store leftover lemon truffles?
A: For optimal freshness and texture, store your lemon truffles in an airtight container in the refrigerator. If you’re coating them in something that might melt, like white chocolate, ensure they are fully set before storing. They’ll keep well for about a week when refrigerated.
Lemon Truffles
Bright and zesty lemon truffles, perfect for a delightful treat. These can be made vegan by using coconut butter and erythritol.
Ingredients
-
4 oz cream cheese or coconut butter, softened
-
2 tbsp butter or additional coconut butter, softened
-
3 tbsp powdered sugar or erythritol
-
Zest of one lemon
-
3 oz white chocolate chips (optional)
-
Optional drop of natural food coloring or pinch of turmeric for color
Instructions
-
Step 1
In a medium bowl, combine the softened cream cheese (or coconut butter) and softened butter (or additional coconut butter) until smooth. -
Step 2
Add the powdered sugar (or erythritol) and lemon zest to the bowl. Mix thoroughly until well combined and the mixture is smooth. -
Step 3
If using, stir in the optional white chocolate chips. If you want to add color, add a drop of natural food coloring or a pinch of turmeric now and mix until evenly distributed. -
Step 4
Chill the mixture in the refrigerator for at least 30 minutes, or until firm enough to roll. -
Step 5
Once chilled, roll the mixture into small balls, about 1-inch in diameter. -
Step 6
Place the rolled truffles on a parchment-lined baking sheet and refrigerate for at least another 30 minutes to set.
Important Information
Nutrition Facts (Per Serving)
It is important to consider this information as approximate and not to use it as definitive health advice.
Allergy Information
Please check ingredients for potential allergens and consult a health professional if in doubt.