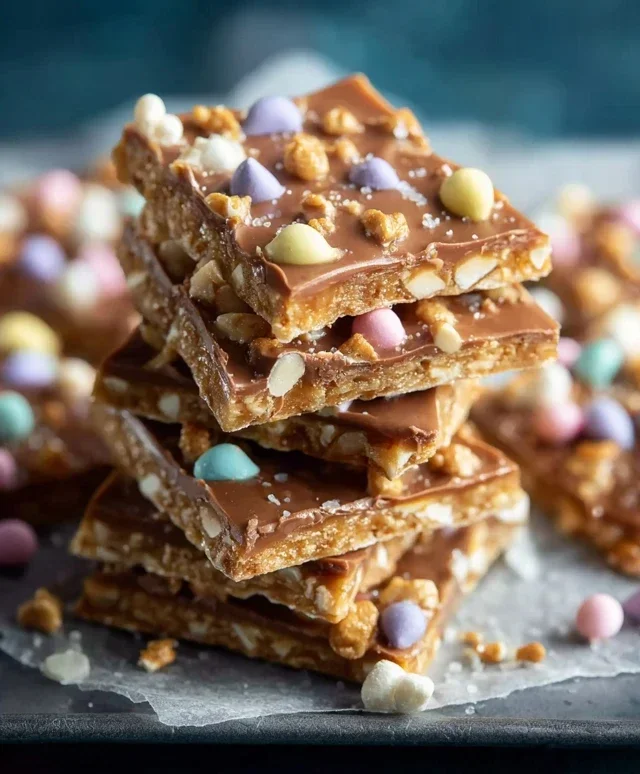
Easter Toffee – Easy Homemade Candy Recipe
Easter Toffee is a delightful confection that truly embodies the joy and sweetness of the spring holiday. As soon as those first hints of warmer weather arrive, my mind immediately drifts to the irresistible crunch and rich, buttery flavor of homemade Easter Toffee. It’s a treat that evokes childhood memories of vibrant egg hunts and the shared excitement of gathering with loved ones. What I adore most about this particular Easter Toffee is its deceptive simplicity; with just a few pantry staples, you can create a showstopper that rivals anything store-bought.
The magic lies in the transformation – the humble ingredients melt and swirl into a brittle, golden masterpiece that shatters with a satisfying crack.
It’s the perfect balance of sweet and slightly salty, with an addictive caramel undertone that keeps you reaching for more. Whether you’re looking for a showstopping centerpiece for your Easter dessert table or a thoughtful homemade gift, this Easter Toffee is sure to impress everyone who takes a bite.
Easter Toffee
Easter toffee, also known as “Easter crack” in many kitchens, is a delightful and surprisingly simple treat that captures the spirit of spring and celebration. Imagin extracte the satisfying crunch of buttery toffee, the sweet embrace of melted white chocolate, and the playful burst of festive colors and flavors from Easter sprinkles. This recipe is perfect for sharing with family and friends, adding a homemade touch to your Easter festivities, or even for a fun baking activity with the kids. It’s a project that yields a beautiful and delicious result without requiring advanced culinary skills. The beauty of this toffee lies in its adaptability; you can customize the colors and toppings to perfectly match your Easter theme. Let’s get started on creating this irresistible Easter delight!
Ingredients:
Cooking Instructions:
The process of making Easter toffee is broken down into a few key stages, each designed to build the perfect texture and flavor profile. We’ll start with preparing our base, then move on to creating the magical toffee, followed by dressing it up in its Easter finest.
Preparing the Base
The foundation of our Easter toffee is simple yet crucial: saltine crackers. Line a large baking sheet (approximately 13×18 inches is ideal for this quantity) with parchment paper or aluminum foil. Ensure the lining covers the entire surface and extends slightly up the sides to make cleanup easier and prevent sticking. Now, carefully arrange the Saltine crackers in a single layer, completely covering the bottom of the prepared baking sheet. Don’t worry if there are small gaps; they will be filled in by the toffee. The slight saltiness of the crackers is the secret weapon that balances the intense sweetness of the toffee, creating a truly addictive combination. If your baking sheet is a little smaller, you might need to overlap the crackers slightly, or if it’s larger, you might want to use a few extra crackers to ensure a solid layer.
Creating the Toffee
This is where the magic happens. In a medium saucepan, combine the unsalted butter and the packed dark brown sugar. Place the saucepan over medium heat. Stir continuously until the butter is completely melted and the sugar has dissolved. It’s important to keep stirring to prevent the sugar from scorching. Once the mixture is smooth and begin extracts to bubble, continue to cook and stir for about 3 to 5 minutes. This caramelization process is key to developing that classic toffee flavor. You’re looking for a rich, deep caramel color. Be patient here; rushing this step can result in a grainy texture or burnt flavor. The aroma will be incredibly enticing, a testament to the deliciousness to come. Once it reaches the desired color and consistency, carefully and quickly pour the hot caramel mixture evenly over the prepared layer of Saltine crackers on your baking sheet. Use a heat-resistant spatula to spread it out, ensuring all the crackers are coated. Work swiftly, as the caramel will begin extract to set as it cools.
Melting the Chocolate and Adding Color
While the toffee base is still warm (but not piping hot, as this can cause the chocolate to seize), it’s time to prepare the white chocolate topping. Scatter the 6 ounces of white chocolate chip morsels evenly over the hot toffee. The residual heat from the toffee will help them start to melt. If you’re using gel food coloring, this is the time to add a tiny amount. Remember, gel food coloring is very concentrated, so start with just one or two drops. Stir the food coloring gently into the white chocolate chips. You can swirl it for a marbled effect or mix it thoroughly for a uniform pastel hue. Pink and pastel green are wonderful choices for Easter, bringin extractg a light and airy feel to the toffee. Use your spatula to spread the melting white chocolate, coaxing it to cover the entire surface of the toffee and crackers. Be gentle to avoid disturbing the toffee layer too much. If the chocolate isn’t melting smoothly, you can pop the baking sheet into a very low oven (around 200°F or 95°C) for just a minute or two, watching it very closely to prevent burning.
Decorating with Easter Flair
This is perhaps the most fun part of making Easter toffee! As soon as the white chocolate is melted and spread, it’s time to unleash your creativity with the Easter and Springtime-themed sprinkles and candies. Shower them generously over the still-wet chocolate. Think about color combinations that evoke the Easter season: pastel eggs, bunny shapes, little yellow chicks, or even some edible glitter for a touch of sparkle. You can press larger candy pieces gently into the chocolate to ensure they adhere. The goal is to create a vibrant and festive mosaic that visually represents the joy of Easter. Don’t be afraid to mix and match different types of sprinkles and candies for visual interest and a variety of textures. This is your chance to make each piece of toffee a miniature work of art.
Chilling and Breaking
Once your Easter toffee is beautifully decorated, it needs time to set completely. Carefully place the baking sheet in the refrigerator for at least 2 to 3 hours, or until the chocolate is firm and the toffee is completely solidified. Patience is key here; rushing this step will result in a sticky mess. Once thoroughly chilled and firm, it’s time for the satisfying act of breaking the toffee into pieces. You can do this by hand, gently snapping it apart, or by using a sharp knife to cut it into more uniform shapes. Sometimes, the crackers will break along their natural lines, creating rustic pieces. For a cleaner break, you can also gently tap the back of the baking sheet with a wooden spoon before attempting to break it. The result will be a collection of delightful, crunchy, sweet, and visually stunning Easter toffee pieces, ready to be devoured. Store any leftover toffee in an airtight container at room temperature for up to a week. Enjoy your homemade Easter creation!

Conclusion:
There you have it – a foolproof guide to creating the most delightful Easter Toffee! This recipe is truly a winner because it strikes the perfect balance between rich, buttery toffee and a crisp, satisfying crunch, all elevated by the festive touch of chocolate and decorative sprinkles. It’s wonderfully simple to make, making it an ideal project for bakers of all skill levels, and the results are consistently impressive. Imagin extracte presenting this homemade Easter Toffee at your next gathering; it’s guaranteed to be a showstopper and a beloved treat for both kids and adults alike. I truly encourage you to give this Easter Toffee a try this season – you won’t regret it!
Serving suggestions are plentiful: enjoy it on its own as a decadent dessert, break it into shards and present it in pretty boxes as edible Easter gifts, or even chop it up and sprinkle it over ice cream for an extra special sundae. For variations, consider adding a hint of sea salt to the chocolate topping for a salted caramel effect, or experiment with different types of chocolate like dark or white chocolate chips for a unique flavor profile. You could also stir in finely chopped nuts like almonds or pecans before the chocolate sets for added texture and taste.
Frequently Asked Questions about Easter Toffee:
Q: How should I store my Easter Toffee to keep it fresh?
A: Once completely cooled and set, store your Easter Toffee in an airtight container at room temperature. You can layer pieces between parchment paper to prevent them from sticking together. It should stay delicious for up to a week, though I doubt it will last that long!
Q: My toffee seems a bit soft. What might have gone wrong?
A: This is often due to not reaching a high enough temperature when cooking the sugar mixture. Ensure your candy thermometer is accurate and that the sugar mixture reaches the hard crack stage (around 300-310°F or 150-154°C). Cooking on a humid day can also sometimes affect the set of toffee.
Easter Toffee
A festive and easy-to-make Easter toffee featuring a sweet, buttery toffee base topped with white chocolate and colorful Easter sprinkles.
Ingredients
-
48 Saltine crackers (regular)
-
1 cup unsalted butter
-
1 cup dark brown sugar, packed
-
6 ounces white chocolate chip morsels
-
1-2 drops gel food coloring (optional, red for pink and green for pastel colors)
-
Easter and Springtime-themed sprinkles and candy, to taste
Instructions
-
Step 1
Preheat oven to 375°F (190°C). Line a baking sheet with parchment paper or foil. Arrange the Saltine crackers in a single layer on the prepared baking sheet, covering the bottom completely. You may need to break some crackers to fit. -
Step 2
In a medium saucepan, melt the unsalted butter and stir in the packed dark brown sugar. Bring the mixture to a boil over medium heat, stirring constantly, and cook for 3 minutes. -
Step 3
Pour the hot sugar mixture evenly over the saltine crackers. Spread it quickly to cover all the crackers. -
Step 4
Bake in the preheated oven for 5 minutes, or until the toffee is bubbly and golden brown. -
Step 5
Remove the baking sheet from the oven. Immediately sprinkle the white chocolate chip morsels evenly over the hot toffee. Let sit for 2-3 minutes until the chocolate is melted. -
Step 6
If using food coloring, gently swirl the melted white chocolate with a toothpick after adding the coloring. Then, spread the melted chocolate evenly over the toffee. -
Step 7
While the chocolate is still wet, generously sprinkle with Easter and Springtime-themed sprinkles and candy. Press gently to adhere. -
Step 8
Let the toffee cool completely on the baking sheet at room temperature, or in the refrigerator, until the chocolate is set. Once hardened, break into pieces.
Important Information
Nutrition Facts (Per Serving)
It is important to consider this information as approximate and not to use it as definitive health advice.
Allergy Information
Please check ingredients for potential allergens and consult a health professional if in doubt.