Easy Bunny Cake Recipe – Fun & Festive Treat
Easy Bunny Cake Recipe adventures are a springtime staple for a reason! This delightful treat isn’t just visually charming; it’s a hug on a plate, guaranteed to bring smiles to faces young and old. There’s something truly magical about transforming simple ingredients into a whimsical bunny shape, especially when the process is as straightforward as this easy bunny cake recipe. It’s the perfect centerpiece for Easter brunch, a birthday party, or simply a cheerful way to brighten any ordinary day. We love it because it’s incredibly forgiving, making it accessible even for novice bakers, and the joy it sparks is truly immeasurable. What makes this particular easy bunny cake recipe so special is its adaptability – you can get creative with decorations, frosting colors, and even add a hint of your favorite flavor extract to make it uniquely yours. Get ready to hop into baking fun!
Easy Bunny Cake Recipe
There’s something truly magical about a bunny cake, especially around springtime or for a special Easter celebration! This easy bunny cake recipe is designed for home bakers of all skill levels, ensuring a delightful and adorable dessert without any fuss. We’re going to transform two simple round cake layers into a whimsical bunny that will have everyone hopping with joy. Forget complicated carving or intricate decorating; this method is all about simple assembly and charming touches. You’ll be amazed at how quickly you can create this festive centerpiece.
Ingredients:
Creating Your Bunny Masterpiece
Now that you have all your ingredients ready, it’s time to get down to the fun part – assembling our adorable bunny! The beauty of this cake lies in its simplicity. We’re essentially using the two round cakes as the body and head, and then adding a few strategic touches to bring our bunny to life.
First things first, ensure your cake layers are completely cooled. This is a crucial step to prevent your frosting from melting and sliding off. If your cakes baked with domes, you can gently level them with a serrated knife for a flatter surface, which will make stacking and frosting much easier. Don’t worry if they aren’t perfectly flat; a little imperfection adds character!
Step 1: Assembling the Bunny’s Body and Head
Place one round cake layer onto your serving platter or cake board. This will be the bunny’s body. Now, take your second round cake layer and carefully place it on top of the first one, slightly offset to one side. This offset placement will create the illusion of the bunny’s head peeking out. If you have a lot of excess frosting or need a bit of “glue” to hold the layers together, you can spread a thin layer of white frosting between the two cakes before stacking. This also adds an extra delicious layer of sweetness!
Step 2: Frosting the Bunny’s Base Coat
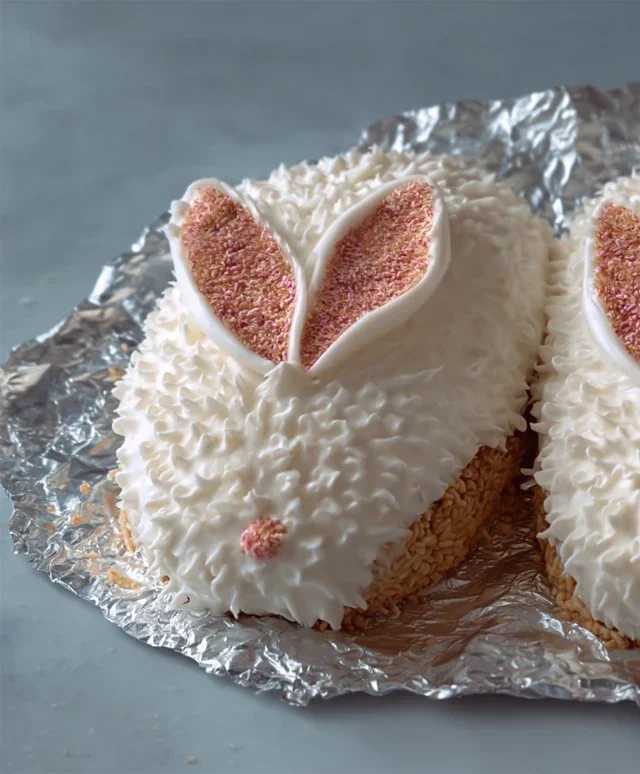
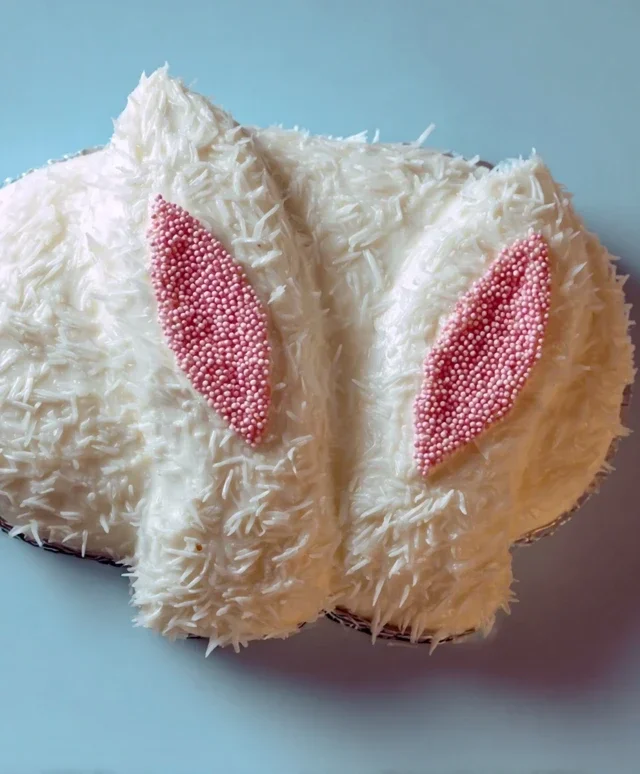
Now it’s time to give our bunny its soft, fluffy coat. Take your white frosting and generously spread it all over the stacked cake layers. Use an offset spatula or a butter knife to get an even coating. For a more textured, fur-like appearance, you can use the back of a spoon to create swirls and peaks, or even use a fork to gently pull up the frosting. Don’t strive for perfection here; a slightly rustic look is perfect for a bunny! Ensure you get frosting all around the sides, covering the entire surface. This is the foundation for our bunny’s charming look.
Step 3: Crafting the Bunny’s Ears
This is where the magic really starts to happen! For the bunny’s ears, you have a couple of easy options. If you have extra cake scraps from leveling, you can cut out ear shapes from those and frost them. A simpler method, however, is to use the white frosting itself. Using your piping bag fitted with a large round tip, pipe two large, elongated oval shapes emergin extractg from the top of the “head” portion of the cake. Aim for them to look like they are flopping slightly. Don’t be afraid to make them substantial! You can also create a more defined ear shape by gently shaping the frosting with your spatula as you pipe.
Step 4: Adding Pink Details and Facial Features
Now for the adorable details! Take your pink frosting and put it into a piping bag fitted with a smaller round tip. Carefully pipe a smaller oval shape inside each of the white frosting ears. This creates the inner ear, adding a pop of sweet color. Next, switch to your chocolate icing or melted chocolate, using a piping bag with a very fine tip or even a toothpick for precision. Pipe two small dots for the bunny’s eyes. Then, pipe a small inverted triangle or a little “Y” shape for the nose. For whiskers, you can pipe thin lines extending from the nose area or gently press thin strands of licorice into the frosting if you have them.
Step 5: Decorating with Jellybeans and Final Touches
Our bunny is almost complete! For a final flourish, let’s add some cheerful decoration. You can use jellybeans or other colorful round candies to create a festive collar around the base of the bunny’s “neck” (where the head meets the body). You can also place a few scattered jellybeans on top of the cake, perhaps on the bunny’s back, to add a touch of playful color. If you like, you can even use a few jellybeans to create a little rosy cheek effect by gently pressing them into the white frosting. Take a step back and admire your work! This easy bunny cake is a testament to how simple ingredients and a little creativity can result in a truly show-stopping dessert.
This easy bunny cake recipe is perfect for any occasion that calls for a touch of whimsy. It’s a wonderful project to do with children, allowing them to get involved in the decorating process. The result is not just a cake, but a charming edible centerpiece that will bring smiles to everyone’s faces. Enjoy the process, and most importantly, enjoy the delicious results of your adorable bunny creation!
Conclusion:
And there you have it – your delightful and oh-so-easy Bunny Cake recipe! I truly hope you give this a try. It’s a fantastic way to bring a smile to anyone’s face, especially during spring celebrations or just because. The beauty of this recipe lies in its simplicity, making it perfect for bakers of all skill levels, even those just starting out. You’ll be amazed at how quickly you can create a charming centerpiece that tastes as good as it looks.
This Bunny Cake is incredibly versatile. Serve it as a show-stopping dessert for Easter brunch, a birthday party, or a fun afternoon baking project with the kids. For serving suggestions, consider pairing a slice with fresh berries and a dollop of whipped cream, or perhaps a light dusting of powdered sugar that mimics freshly fallen snow. If you’re feeling adventurous with variations, try adding a hint of lemon zest to the batter for a brighter flavor, or swap out the vanilla extract for almond for a different profile. You could also experiment with different frosting colors or sprinkle combinations to personalize your bunny!
Don’t be intimidated – this is an easy bunny cake that guarantees success. So, gather your ingredients, put on your favorite apron, and let’s get baking! I can’t wait to hear about your creations.
Frequently Asked Questions:
Can I make this cake ahead of time?
Absolutely! The cake layers can be baked a day in advance, cooled completely, wrapped tightly in plastic wrap, and stored at room temperature. The frosting can also be made ahead and stored in an airtight container in the refrigerator; just bring it to room temperature and give it a good whisk before decorating.
What kind of frosting works best for decorating the bunny ears and face?
A classic buttercream frosting is ideal for this easy bunny cake. It holds its shape well, making it perfect for piping details like the ears, eyes, and nose. Ensure it’s at the right consistency – not too stiff and not too runny – for easy application and a smooth finish.
Easy Bunny Cake Recipe
A simple and fun bunny cake perfect for Easter or any celebration, made with basic cake and frosting ingredients.
Ingredients
-
Two round cake layers (use one cake mix or your favorite homemade recipe)
-
White frosting (ready-made or your favorite homemade recipe)
-
Pink frosting (or use pink gel food coloring on white frosting)
-
Chocolate icing or melted chocolate for details
-
Jellybeans or colorful round candies
-
Piping bags
Instructions
-
Step 1
Prepare and bake your two round cake layers according to your chosen cake mix or homemade recipe instructions. Let them cool completely. -
Step 2
Once cool, place one cake layer on your serving platter. Spread a layer of white frosting on top. -
Step 3
Place the second cake layer on top of the first. Frost the entire cake with white frosting, creating a smooth surface. -
Step 4
Using pink frosting (or colored white frosting), create the bunny’s ears and nose. You can pipe these directly onto the cake or cut shapes from fondant if preferred and place them on top. -
Step 5
Use chocolate icing or melted chocolate to pipe eyes and a mouth for the bunny. Add whiskers if desired. -
Step 6
Decorate the cake with jellybeans or colorful round candies around the base or as accents to complete the bunny look.
Important Information
Nutrition Facts (Per Serving)
It is important to consider this information as approximate and not to use it as definitive health advice.
Allergy Information
Please check ingredients for potential allergens and consult a health professional if in doubt.