Easy Dairy-Free Frozen Yogurt Bites Recipe
Easy Frozen Yogurt Bites (Dairy-free option) are the ultimate treat that perfectly balances refreshing coolness with delightful flavor, all while being surprisingly simple to make. There’s something undeniably magical about a bite-sized frozen confection that melts in your mouth, offering a burst of sweetness without the guilt. What makes these particular easy frozen yogurt bites (dairy-free option) so beloved is their incredible versatility. You can customize them with your favorite fruits, a hint of honey, or even a sprinkle of cocoa powder, transforming them into a personalized delight. For those seeking a lighter, plant-based indulgence, the dairy-free option ensures everyone can enjoy this delightful snack. They are the perfect solution for a hot summer day, a post-workout refresher, or even a fun, healthy dessert for kids. Get ready to discover how effortless it is to whip up a batch of these crowd-pleasing treats that will leave you craving more.
Ingredients:
- 1 cup thick Greek yogurt or coconut yogurt (for a dairy-free option)
- 3 tablespoons cashew butter or almond butter
- 3 tablespoons maple syrup (you can add another tablespoon if you prefer it sweeter)
- 3 tablespoons of your favorite protein powder (optional, only use if you genuinely enjoy the taste)
- 1 teaspoon vanilla extract
- A generous pinch of sea salt (Maldon or Celtic salt are excellent choices)
- A handful of cacao nibs (optional, great for texture and antioxidants)
- 3/4 cup chocolate chips or chopped chocolate
- 1/2 tablespoon coconut oil
Preparing the Yogurt Base
Step 1: Combine the Yogurt and Nut Butter
This is where the magic starts! In a medium-sized bowl, add your 1 cup of thick Greek yogurt or, if you’re going dairy-free, your thick coconut yogurt. The thickness is key here, as it will help the bites hold their shape once frozen. Next, spoon in your 3 tablespoons of cashew butter or almond butter. If you don’t have cashew or almond butter, you can certainly substitute with another smooth nut or seed butter like sunflower seed butter. Gently stir these two ingredients together until they are just combined. Don’t overmix at this stage; we want to maintain a good texture.
Step 2: Sweeten and Flavor the Base
Now it’s time to add the sweetness and extra flavor to our yogurt mixture. Drizzle in the 3 tablespoons of maple syrup. Remember, you have the flexibility to add another tablespoon if your sweet tooth is calling for it, but start with three and taste later. Following that, add the 1 teaspoon of vanilla extract. This little addition really rounds out the flavors beautifully. If you’re choosing to add protein powder, now is the time to sprinkle in your 3 tablespoons. Be sure you are using a protein powder that you truly enjoy the taste of, as it will be prominent. Stir everything together until it’s well incorporated and the mixture is smooth and creamy.
Incorporating the Mix-ins
Step 3: Add the Salt and Optional Cacao Nibs
A touch of salt can do wonders for enhancing sweetness and balancing flavors. Add a good pinch of sea salt to the yogurt mixture. I personally love using Maldon or Celtic sea salt for their flaky texture and pure taste, but any good quality sea salt will work. If you’re feeling adventurous and want an extra textural element and a boost of antioxidants, now’s the time to add your handful of cacao nibs. Give everything another gentle stir to distribute the salt and nibs evenly throughout the yogurt base.
Step 4: Prepare the Chocolate Coating
For our delightful chocolate coating, we need to melt the chocolate. In a small, microwave-safe bowl or a heatproof bowl set over a saucepan of simmering water (this is called a double boiler), combine the 3/4 cup of chocolate chips or chopped chocolate with the 1/2 tablespoon of coconut oil. The coconut oil helps the chocolate melt smoothly and gives it a beautiful sheen, plus it helps the coating set up nicely. Microwave the chocolate in 20-second intervals, stirring well after each interval, until it’s completely melted and smooth. If using a double boiler, stir occasionally until fully melted. Be careful not to overheat the chocolate, as it can seize.
Assembling and Freezing the Bites
Step 5: Form and Coat the Yogurt Bites
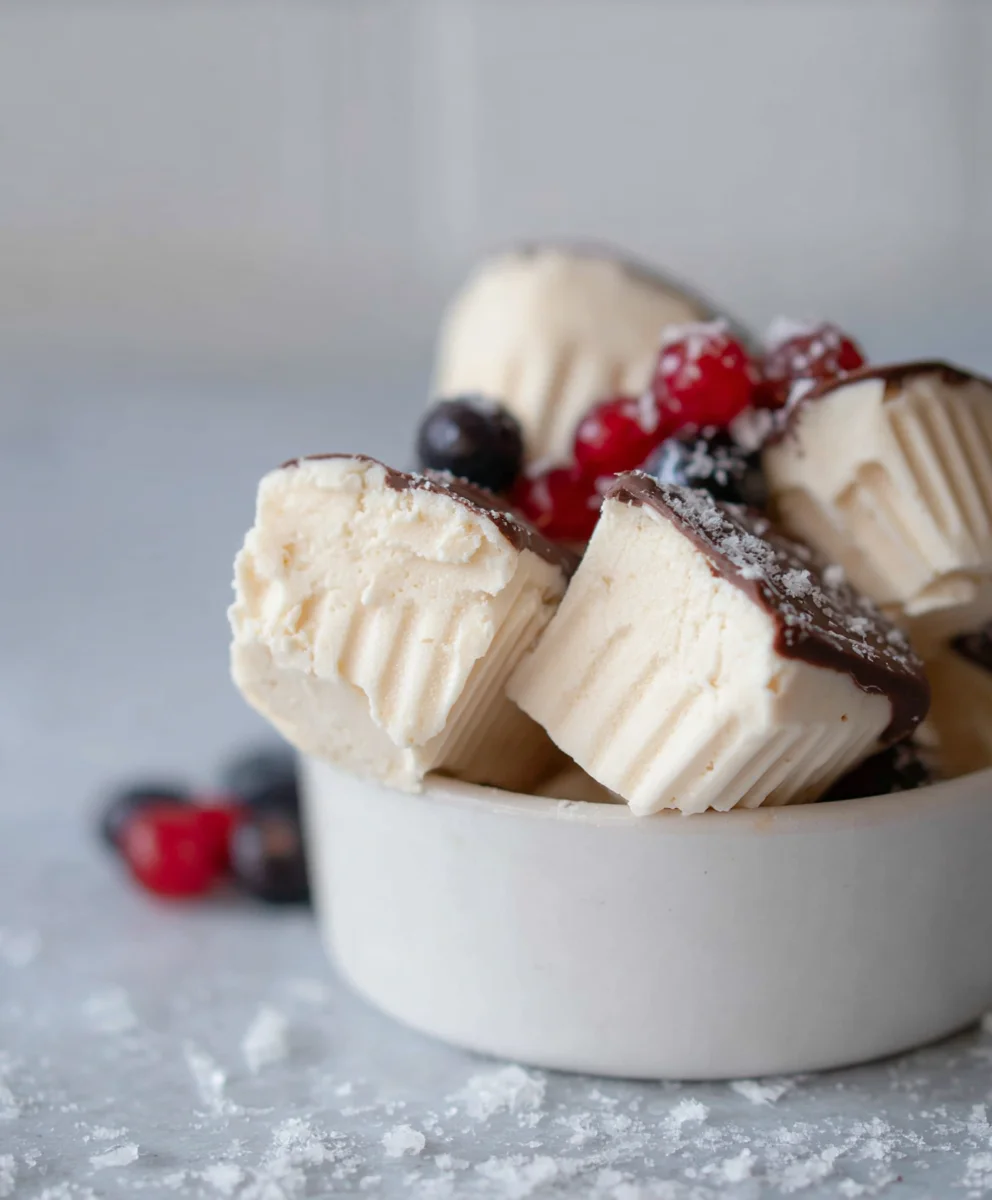
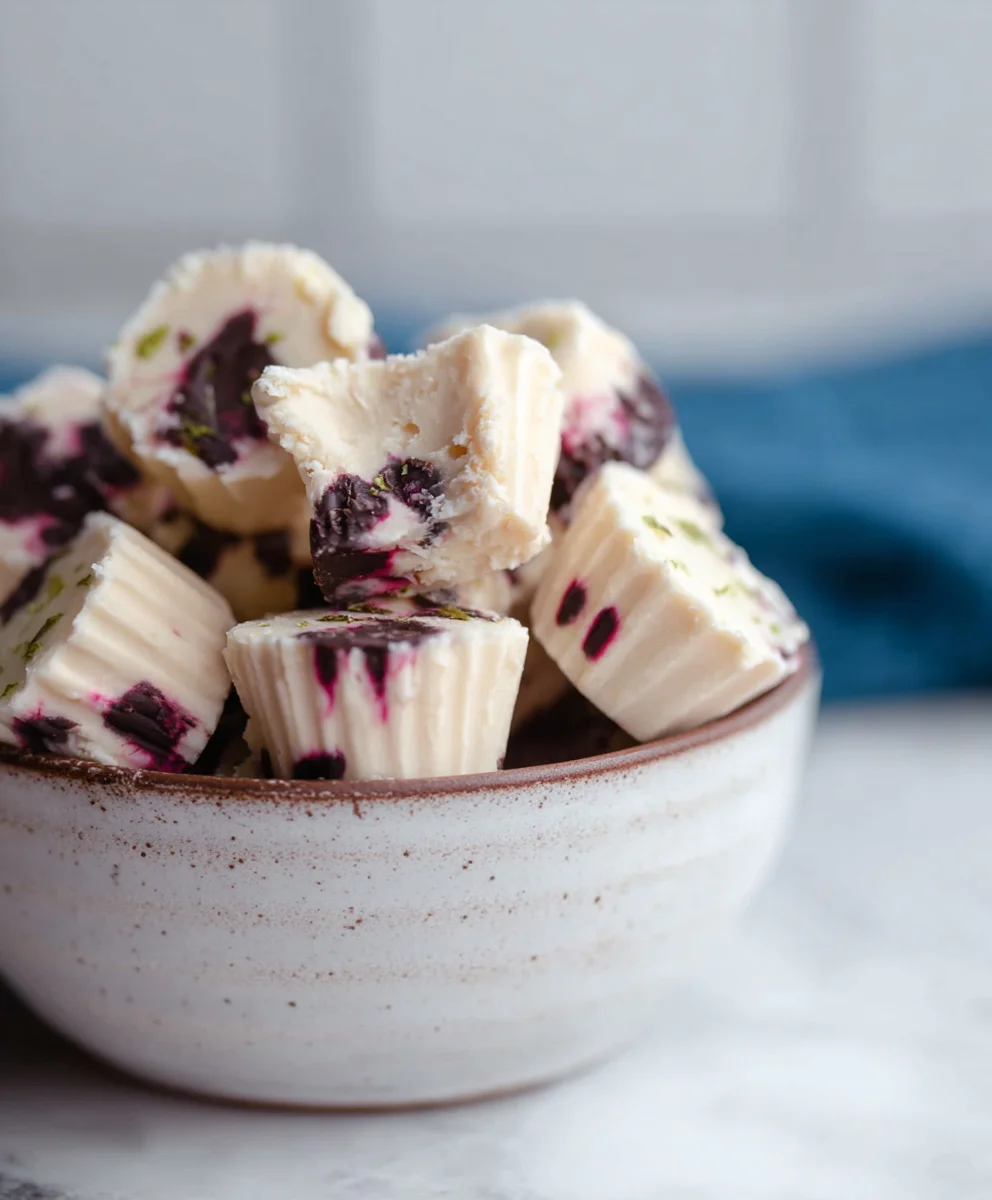
This is the most fun part! You have a couple of options for forming your bites. You can dollop spoonfuls of the yogurt mixture directly onto a parchment-lined baking sheet, aiming for bite-sized portions. Alternatively, if you want more uniform shapes, you can use small silicone molds or even a mini muffin tin. Once your yogurt shapes are formed on the baking sheet or in the molds, it’s time to coat them in the melted chocolate. You can either gently dip each yogurt bite into the melted chocolate using a toothpick or fork, or you can drizzle the melted chocolate over the tops. Work relatively quickly, as the yogurt will start to soften. Ensure each bite is well-coated. Place the chocolate-coated bites back onto the parchment-lined baking sheet or into the freezer-safe container.
Step 6: Freeze Until Solid
Once all your yogurt bites are formed and coated, it’s crucial to get them into the freezer promptly. Place the baking sheet or container into your freezer. Allow them to freeze completely, which typically takes about 2 to 3 hours. You want them to be firm and solid so they don’t melt when you try to eat them. Once frozen solid, you can transfer them to an airtight container or a freezer bag for easier storage. They should keep well in the freezer for up to a month. Enjoy these delightful, refreshing treats whenever a craving strikes!
Conclusion:
And there you have it – your delightful batch of Easy Frozen Yogurt Bites (Dairy-free option) is ready to be enjoyed! We’ve walked through the simple steps to create these refreshing treats, perfect for a healthy snack, a cool dessert, or even a fun activity with the kids. The beauty of this recipe lies in its adaptability, allowing you to tailor it to your specific tastes and dietary needs. So go ahead, whip up a batch and experience the simple joy of a homemade, guilt-free indulgence!
These Easy Frozen Yogurt Bites (Dairy-free option) are fantastic served as is, straight from the freezer. For a more elaborate presentation, you could arrange them on a platter with a drizzle of berry coulis or a sprinkle of toasted coconut flakes. They also make a wonderful accompaniment to a fruit salad or a light brunch.
Don’t be afraid to experiment with the flavor combinations! You can incorporate different fruits like mango, peach, or even a touch of cocoa powder for a chocolatey twist. If you’re opting for the dairy-free version, ensure your yogurt base is unsweetened and rich in flavor to compensate. The possibilities are truly endless!
Frequently Asked Questions:
Q1: Can I use regular dairy yogurt instead of dairy-free for the Easy Frozen Yogurt Bites?
Absolutely! If you prefer to use regular dairy yogurt, feel free to do so. The process remains the same, and you’ll still achieve delicious frozen yogurt bites. Just ensure it’s plain and unsweetened to control the sweetness of your final product.
Q2: How should I store the Easy Frozen Yogurt Bites?
For optimal freshness and to prevent them from sticking together, it’s best to store your Easy Frozen Yogurt Bites (Dairy-free option) in an airtight container or a freezer-safe bag in the freezer. If they do stick, a quick tap of the container usually separates them.
Q3: My Easy Frozen Yogurt Bites are too hard. How can I fix this?
If your frozen yogurt bites are too hard, it might be due to the water content or the specific type of yogurt used. Allowing them to sit at room temperature for a few minutes before serving usually softens them up perfectly. For future batches, you could try adding a small amount of a sweetener like maple syrup or honey, which can help prevent them from freezing too solidly.
Easy Dairy-Free Frozen Yogurt Bites
A simple and delicious recipe for dairy-free frozen yogurt bites, perfect for a refreshing and healthy treat. These bites are customizable with your favorite mix-ins and a rich chocolate coating.
Ingredients
-
1 cup thick Greek yogurt or coconut yogurt
-
3 tablespoons cashew butter or almond butter
-
3 tablespoons maple syrup
-
3 tablespoons of your favorite protein powder (optional)
-
1 teaspoon vanilla extract
-
A generous pinch of sea salt
-
A handful of cacao nibs (optional)
-
3/4 cup chocolate chips or chopped chocolate
-
1/2 tablespoon coconut oil
Instructions
-
Step 1
In a medium bowl, combine the thick Greek yogurt (or coconut yogurt for dairy-free) and cashew butter (or almond butter). Stir until just combined. -
Step 2
Add the maple syrup, vanilla extract, and optional protein powder to the yogurt mixture. Stir until smooth and creamy. Taste and add another tablespoon of maple syrup if desired. -
Step 3
Stir in the sea salt and optional cacao nibs until evenly distributed. -
Step 4
Melt the chocolate chips (or chopped chocolate) with the coconut oil in a microwave-safe bowl or using a double boiler. Stir until smooth. Be careful not to overheat. -
Step 5
Dollop spoonfuls of the yogurt mixture onto a parchment-lined baking sheet or use silicone molds. Gently dip each bite into the melted chocolate or drizzle it over the tops. Work quickly. -
Step 6
Place the chocolate-coated bites back onto the parchment-lined baking sheet and freeze for 2-3 hours, or until solid. Transfer to an airtight container for storage.
Important Information
Nutrition Facts (Per Serving)
It is important to consider this information as approximate and not to use it as definitive health advice.
Allergy Information
Please check ingredients for potential allergens and consult a health professional if in doubt.