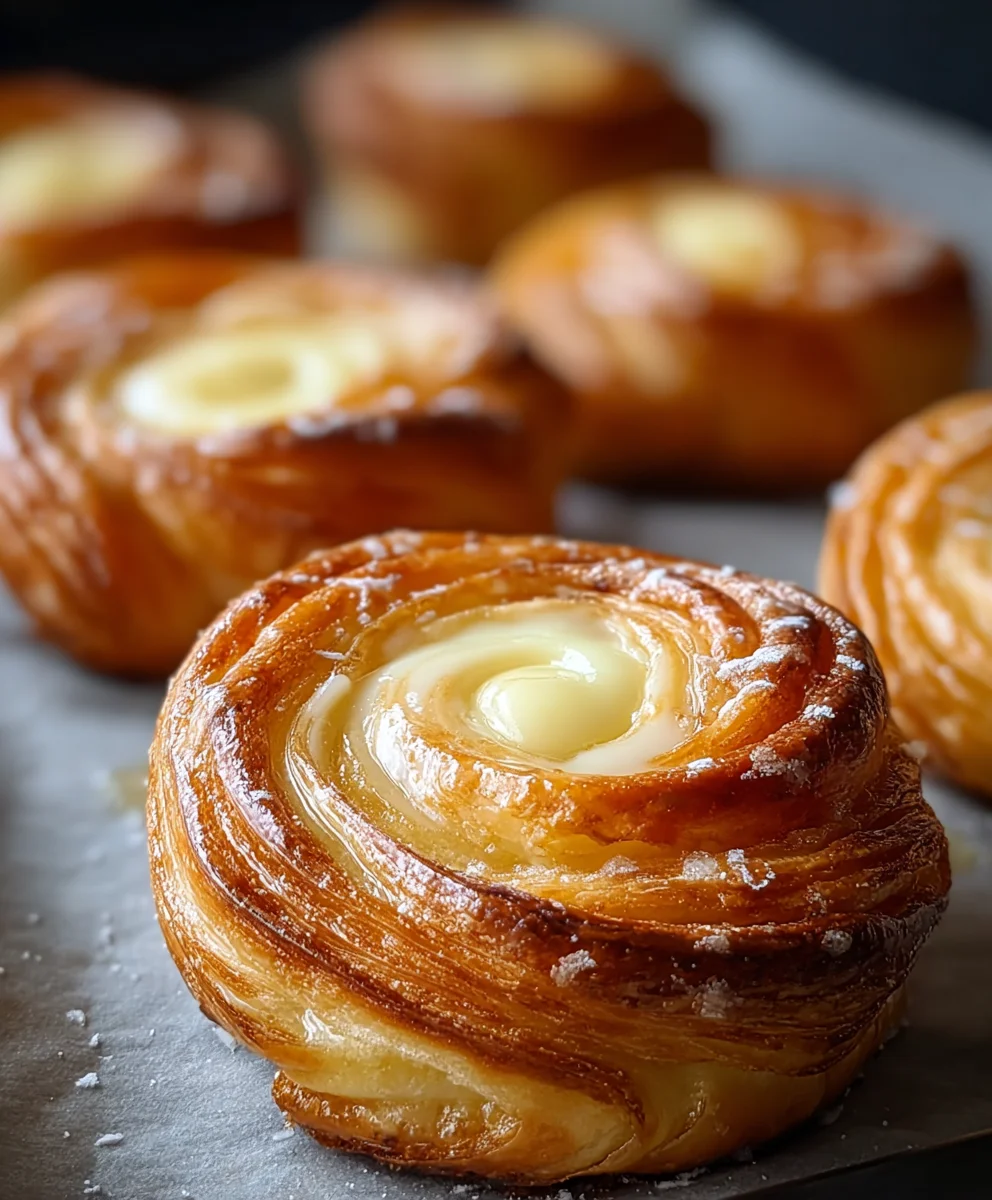
Easy Homemade Cheese Danishes-Flaky Pastry & Creamy Filling
Cheese Danishes are more than just a pastry; they’re a whisper of morning sunshine, a delicate dance of flaky dough and sweet, tangy filling that awakens the senses. Who doesn’t dream of sinking their teeth into that buttery, golden crust, giving way to a luscious cream cheese filling that’s just the right amount of sweet and tart? It’s no wonder these delightful treats have captured hearts around the globe, gracing breakfast tables and afternoon tea spreads with their irresistible charm. What truly sets our featured Cheese Danishes apart is the perfect balance achieved between the crisp, almost shattering layers of puff pastry and the smooth, rich cheese filling, enhanced by a hint of citrus zest that cuts through the sweetness beautifully. This recipe is designed to bring that bakery-quality magic right into your own kitchen, promising a rewarding baking experience and a truly unforgettable bite.
Ingredients:
- 2 tubes (8 oz each) refrigerated crescent rolls
- 2 tablespoons salted butter, melted
- 8 tablespoons light brown sugar
- 1 package (8 oz) cream cheese, softened to room temperature
- ¼ cup granulated white sugar
- 1 teaspoon pure vanilla extract (for the cream cheese filling)
- ½ cup powdered sugar
- 1 teaspoon pure vanilla extract (for the glaze)
- 4 teaspoons milk
Preparing the Cheese Filling
Step 1: Soften the Cream Cheese
The first crucial step for achieving a perfectly smooth and spreadable cream cheese filling is ensuring your cream cheese is truly at room temperature. Cold cream cheese can lead to a lumpy filling, which isn’t ideal for our delicate Cheese Danishes. If you’ve forgotten to take it out of the refrigerator in advance, a quick way to soften it is to remove it from its packagin extractg and place it in a microwave-safe bowl. Then, microwave on a very low power setting or in 10-second intervals, checking frequently, until it’s pliable and no longer cold to the touch. Be careful not to overheat it, as this can alter the texture. Once softened, transfer the cream cheese to a medium-sized mixing bowl.
Step 2: Create the Sweet and Creamy Filling
In the bowl with your softened cream cheese, add the ¼ cup of granulated white sugar and 1 teaspoon of pure vanilla extract. Using an electric mixer on medium speed, or a whisk and some arm power, cream these ingredients together until they are wonderfully smooth and well combined. Scrape down the sides of the bowl occasionally to make sure all the cream cheese is incorporated into the sugar and vanilla mixture. This process should take about 2-3 minutes with an electric mixer, resulting in a light and airy filling that will be the star of our Cheese Danishes. The vanilla extract adds a lovely depth of flavor that complementsgin extracte tanginess of the cream cheese beautifully.
Assembling the Danishes
Step 3: Prepare the Crescent Roll Dough
Now it’s time to work with the crescent roll dough. Carefully unroll the two tubes of refrigerated crescent rolls onto a clean, lightly floured surface. You’ll notice that each tube contains several pre-cut triangles. Gently press the seams of these triangles together to form a solid rectangle. You can do this by pinching them together with your fingers. If the dough tears slightly, don’t worry too much; it will bake up just fine. Once you have two connected rectangles, you can roll over the seams lightly with a rolling pin to further seal them and create a smoother surface. This ensures a more even base for our filling and prevents any gaps where the filling might leak out during baking.
Step 4: Layering the Filling and Sugar Mixture
Take one of the prepared crescent roll rectangles and spread about half of the cream cheese filling evenly over its surface, leaving about a ½-inch border around all the edges. This border is important to keep the filling contained. Then, sprinkle about half of the 8 tablespoons of light brown sugar evenly over the cream cheese. Now, gently place the second crescent roll rectangle on top of the first, pressing down the edges to seal them together. Repeat this process with the remaining cream cheese filling and light brown sugar, spreading it over the top rectangle and leaving a ½-inch border. This creates a layered effect that’s both visually appealing and delicious.
Baking and Glazing
Step 5: Shaping and Baking the Cheese Danishes
Using a sharp knife or a pizza cutter, cut the layered dough into squares or rectangles. A good size to aim for is about 2-3 inches per piece. You should get approximately 8-10 danishes from this recipe. Place the cut danishes onto a baking sheet lined with parchment paper, ensuring there’s a little space between each one to allow for expansion as they bake. Before they go into the oven, brush the tops of each danish with the 2 tablespoons of melted salted butter. This butter will help them brown beautifully and add an extra layer of richness. Bake in a preheated oven at 375°F (190°C) for 15-18 minutes, or until the danishes are golden brown and puffed up. Keep a close eye on them, as oven temperatures can vary.
Step 6: Crafting and Applying the Vanilla Glaze
While the Cheese Danishes are baking, prepare the simple yet delicious vanilla glaze. In a small bowl, whisk together the ½ cup of powdered sugar, 1 teaspoon of pure vanilla extract, and 4 teaspoons of milk. Start with the 4 teaspoons of milk and add more, a teaspoon at a time, only if needed, until you reach a smooth, pourable consistency. You want it thin enough to drizzle easily but not so thin that it runs off the danishes completely. Once the danishes are out of the oven and have cooled slightly on the baking sheet for about 5-10 minutes, transfer them to a wire rack to cool completely. Once they are mostly cooled, generously drizzle the vanilla glaze over the top of each danish. The contrast between the warm, sweet danish and the cool, slightly tangy glaze is simply divine, making these Cheese Danishes an irresistible treat.

Conclusion:
There you have it! Crafting these delicious Cheese Danishes at home is a rewarding experience, transforming simple ingredients into a truly delightful treat. We’ve walked through each step, from preparing the flaky pastry to creating that luscious cream cheese filling, and finally, to achieving that perfect golden bake. These danishes are wonderful served warm with a cup of coffee or tea, making for a fantastic breakfast, brunch, or afternoon pick-me-up. For serving, consider a dusting of powdered sugar or a drizzle of glaze for an extra touch of sweetness. Feel free to get creative with variations! Adding a swirl of fruit compote, like cherry or raspberry, before baking can introduce a lovely tartness. You could also mix in a hint of lemon zest to the cream cheese filling for a brighter flavor profile. Don’t be intimidated; embrace the process and enjoy the delicious results. Happy baking!
Frequently Asked Questions:
Can I make the pastry dough ahead of time?
Yes, absolutely! You can prepare the pastry dough for your Cheese Danishes up to 2 days in advance and store it, tightly wrapped, in the refrigerator. This allows the flavors to meld and makes assembly even quicker when you’re ready to bake.
What can I do if my cream cheese filling is too runny?
If your cream cheese filling for the Cheese Danishes seems a bit runny, you can try whisking in an extra tablespoon or two of cream cheese or a small amount of cornstarch. Ensure your cream cheese is at room temperature to avoid lumps, and then whisk thoroughly until smooth and thickened. You can also bake them for a few extra minutes until the filling is set.
Easy Homemade Cheese Danishes
Flaky pastry filled with a creamy cheese mixture and topped with a sweet vanilla glaze. A delightful homemade treat.
Ingredients
-
2 tubes (8 oz each) refrigerated crescent rolls
-
2 tablespoons salted butter, melted
-
8 tablespoons light brown sugar
-
1 package (8 oz) cream cheese, softened to room temperature
-
1/4 cup granulated white sugar
-
1 teaspoon pure vanilla extract
-
1/2 cup powdered sugar
-
1 teaspoon pure vanilla extract
-
4 teaspoons milk
Instructions
-
Step 1
Soften cream cheese to room temperature. If needed, microwave on very low power in 10-second intervals until pliable. Transfer to a medium mixing bowl. -
Step 2
Add granulated white sugar and 1 teaspoon vanilla extract to the cream cheese. Mix with an electric mixer or whisk until smooth and well combined, about 2-3 minutes. Scrape down sides as needed. -
Step 3
Unroll crescent rolls onto a lightly floured surface. Press seams of triangles together to form two rectangles. Pinch and optionally roll seams lightly with a rolling pin to seal. -
Step 4
Spread half the cream cheese filling evenly over one rectangle, leaving a ½-inch border. Sprinkle half the light brown sugar over the filling. Place the second rectangle on top and press edges to seal. Repeat with remaining filling and brown sugar on top. -
Step 5
Cut the layered dough into 2-3 inch squares or rectangles. Place on a parchment-lined baking sheet. Brush the tops with melted butter. Bake at 375°F (190°C) for 15-18 minutes, or until golden brown and puffed. -
Step 6
While danishes bake, whisk together powdered sugar, 1 teaspoon vanilla extract, and 4 teaspoons milk in a small bowl until smooth and pourable. Add more milk by the teaspoon if needed. Drizzle glaze over slightly cooled danishes on a wire rack.
Important Information
Nutrition Facts (Per Serving)
It is important to consider this information as approximate and not to use it as definitive health advice.
Allergy Information
Please check ingredients for potential allergens and consult a health professional if in doubt.